Crochet Baby Hat With Ears Free Pattern
Crochet Baby Hat With Ears Free Pattern
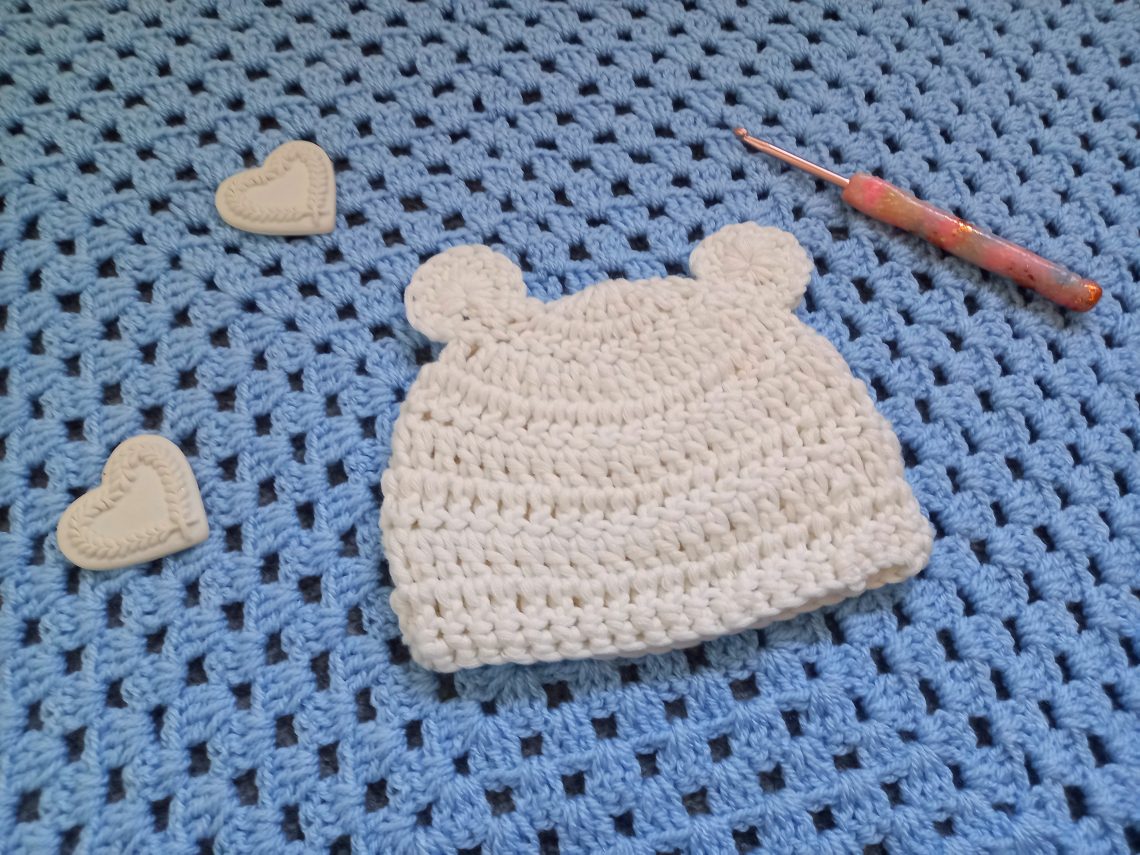
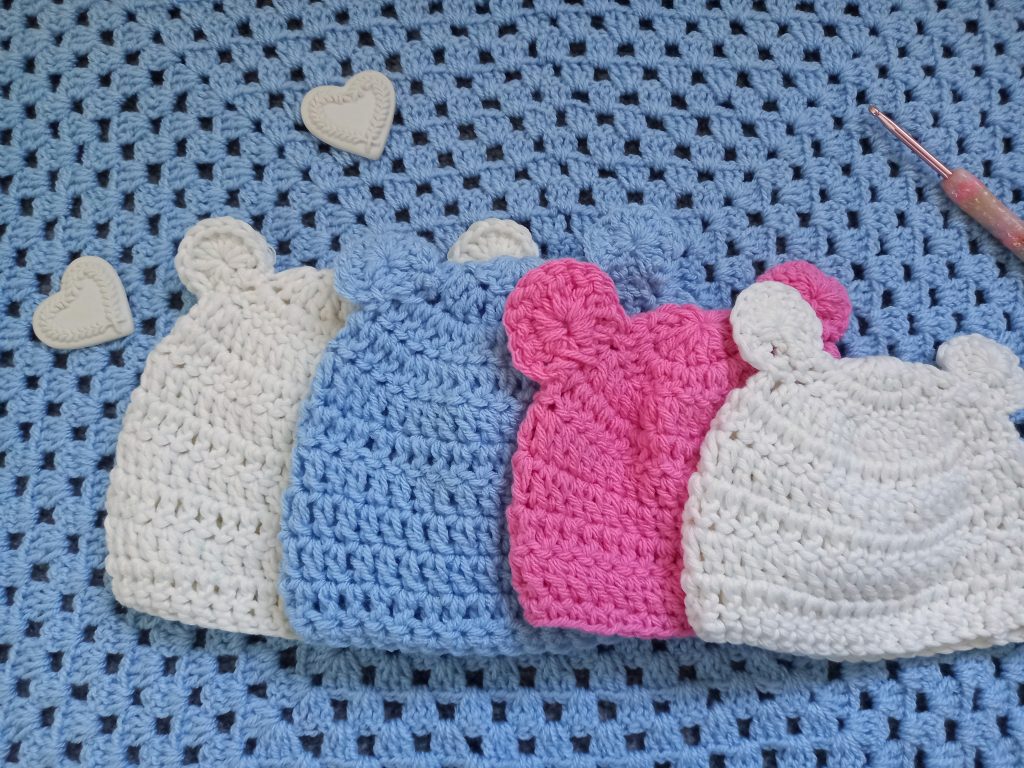
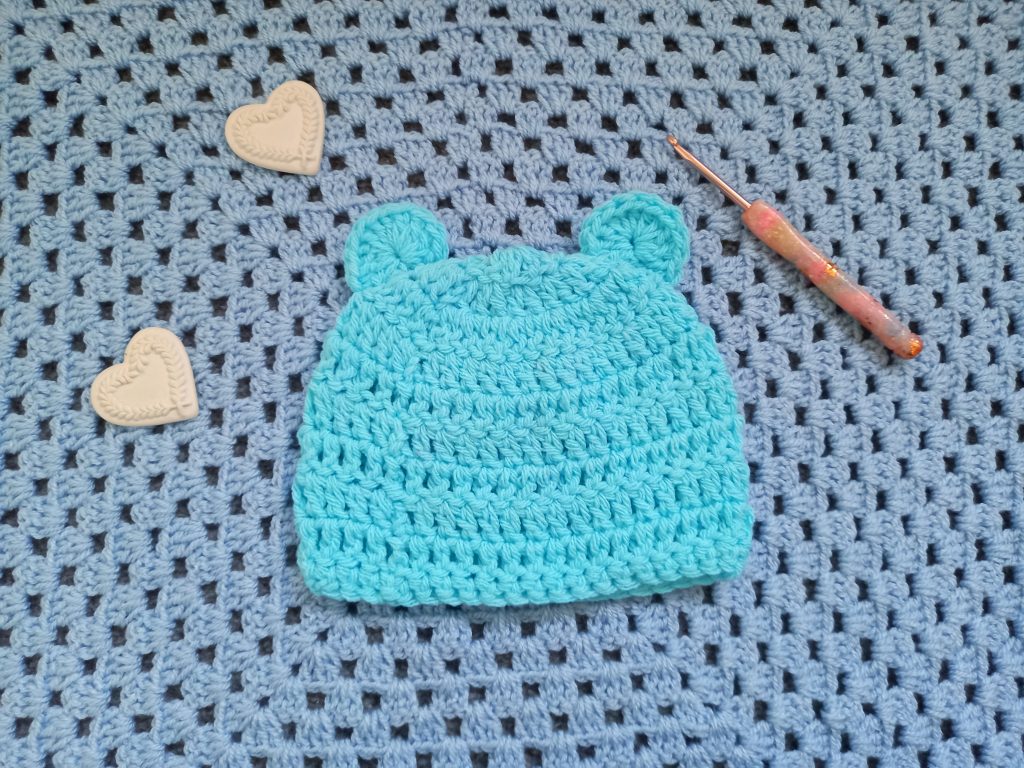
Hi everyone, this week I am bringing to you a crochet baby and toddler hat with bear ears (free pattern). This is a very easy and fun project to crochet. It looks absolutely lovely and is a perfect crocheted hat for a baby or toddler. It can be crocheted in many different colors. This hat comes in four different sizes, ranging from size 3 months old to 6 years old.
The video tutorial can be found here:
Crochet Baby Hat With Ears Free Pattern: the inspiration
I have to say my own little boy, aged two (almost three), inspired this hat. Indeed, I have been wanting to make one of these hats with bear ears for a long time now. Last week I decided to make this design, and I crocheted five different ones in different sizes, so as to come up with the perfect pattern. I am very pleased to say that this pattern comes in four distinct sizes. The first size is from 3 to 12 months old, the second size is from 1 to 2 years old, the third size covers sizes 3 to 4 years old. The fourth and last size is for 5 to 6 year olds.
I absolutely love this new design, and really enjoyed making these hats. Also, I am proud that I can now create a pattern in multiple sizes. For me this is a huge achievement, and it has made me very happy over the last few days.
This is a very easy crochet pattern, and I do hope you enjoy it. The last time I made a baby crochet item was when I designed the Louis Baby Blanket. As a matter of fact, a new baby blanket tutorial is soon going to be filmed and released, so watch this space. I do love crocheted baby items, as I find crochet is so perfect for babies and children.
Crochet Baby Hat With Ears Free Pattern: the yarn
I used chunky yarn for this project. Indeed, I love chunky yarn to create hats. Chunky yarn works up fast, whilst also providing very good warmth to a hat. In Winter, I believe a hat should be very warm and snugly. For this project, I used two different types of chunky yarn. Firstly, I used Sirdar Number 1 chunky in the cream shade, for the smallest hat that I made. I also used Paintbox Simply Chunky for two other hats, and that yarn worked up like a dream also. I definitely would recommend both yarns for this pattern, as they both work up really good.

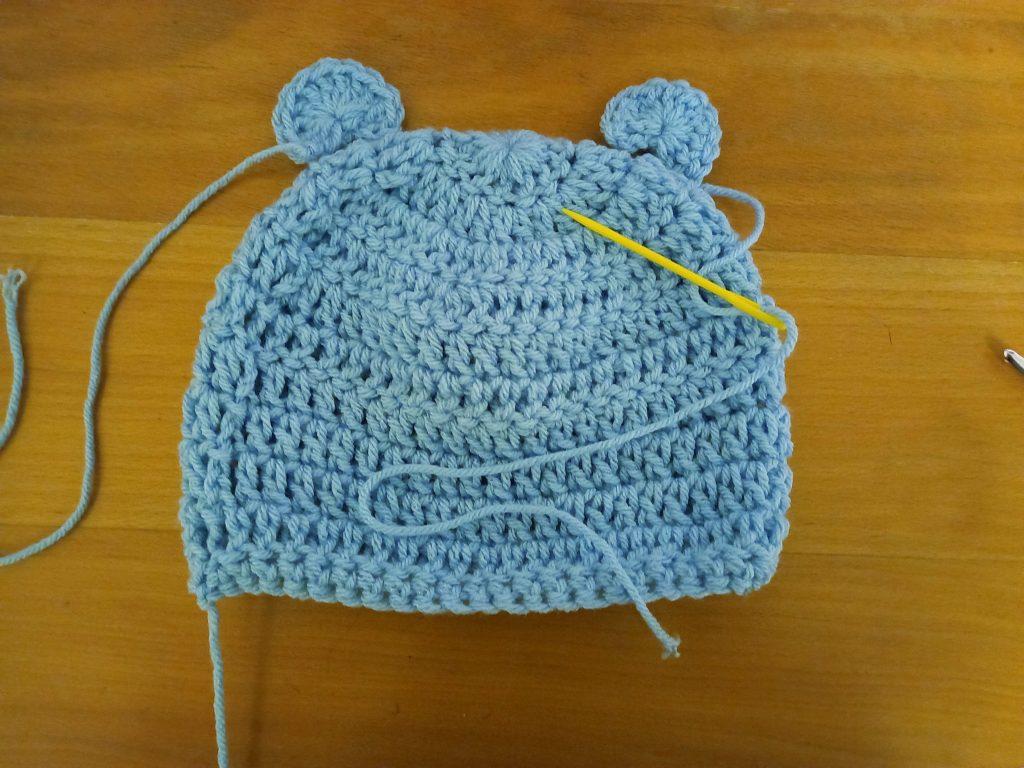
This hat is simply worked up in the rounds. Once a number of rounds are crocheted, row after row of simple Double Crochets are then added, to give the hat it’s shape. Two ears are later crocheted and sewed symmetrically onto the hat.
I love how cute and lovely this hat looks, perfect for a baby or toddler. My little boy wears his little blue hat, and looks so beautiful whilst wearing it.
Connecting with you
I love connecting with my Crochet Community through my blog and Social Media. You can find me on Youtube, Instagram, and Pinterest. I would love to connect with you on these platforms.
You can also join my private Facebook group to connect.
You can subscribe to my weekly newsletter here just below. Once you are subscribed, you will be updated once a week about my new free crochet pattern, my new video tutorial, and amazing giveaways.
Crochet Baby Hat With Ears: the pattern
You can purchase the ad free, large print, PDF pattern from my Etsy store: Crochet The Baby Child Hat With Bear Ears PDF Pattern
Level: Easy/beginner
Notes
I will be using US terms (British terms in brackets)
Gauge
4”x4” (10×10 cm): 6 rows and 12 stitches
Size of finished hat (excluding ears, and measuring at highest & widest areas)
3-12 months: 5” (13 cm) x 6,8” (17 cm)
12-24 months: 5” (13 cm) x 7” (18 cm)
2-4 years: 7” (18 cm) x 9” (23 cm)
4-6 years: 7” (18 cm) x 9,4” (24 cm)
Materials
1 skein of Sirdar Number 1 Chunky or Paintbox Simply Chunky in your favourite shade
6 mm crochet hook
Pair of scissors
Tapestry Needle
Abbreviations
Ch: Chain
St: Stitch
Sl st: slip stitch
Sk: skip
EOR: End of round
DC: Double crochet (UK Treble Crochet)
SC: Single Crochet (UK Double Crochet)
Begin pattern here:
Size 3-12 months:
Ch 4, sl st to form a ring.
Round 1: Ch 3 (=DC), place 13 DC inside the ring (=14 DC total). Sl st to 1st ch 3 to close off round.
Round 2: Ch 3 (=DC), turn your work, place another DC inside the first stitch (=2 DC together in one stitch). Place 2 DC inside next DC until eor (=28 DC total). Sl st to 1st ch 3 to close off round.
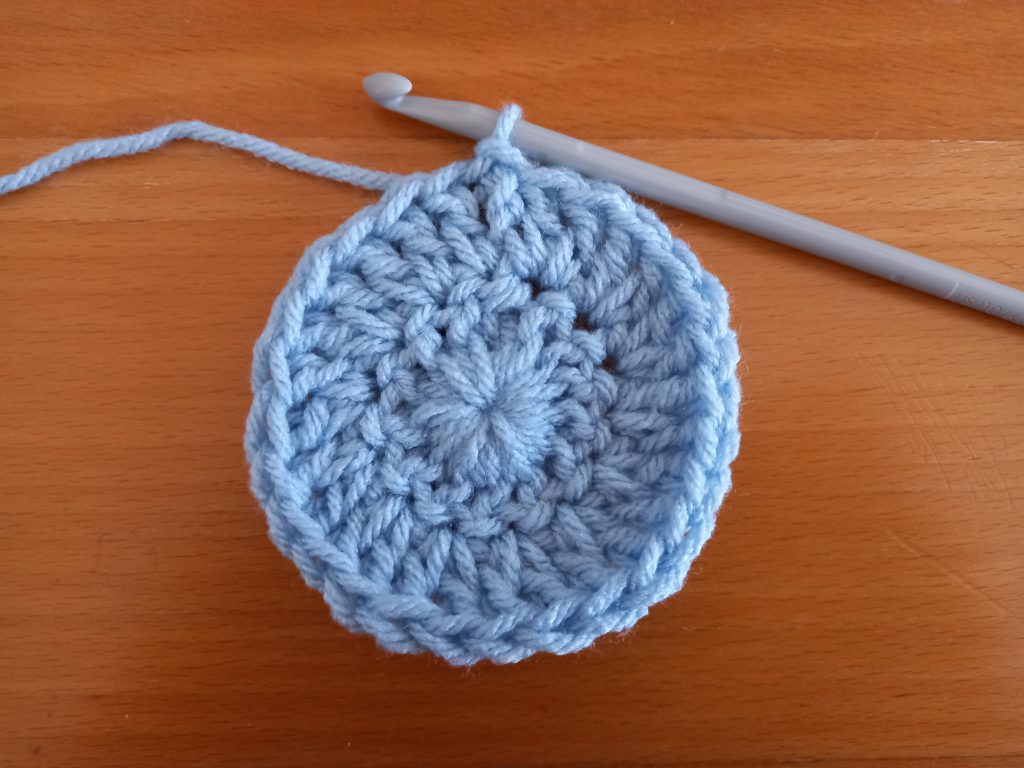
Round 3: Ch 3 (=DC), turn your work, place another DC inside the first stitch (=2 DC together in one stitch). Place DC in next st, [2 DC in next st, 1 DC in next st] until eor (=42 DC total). Sl st to 1st ch 3 to close off round.
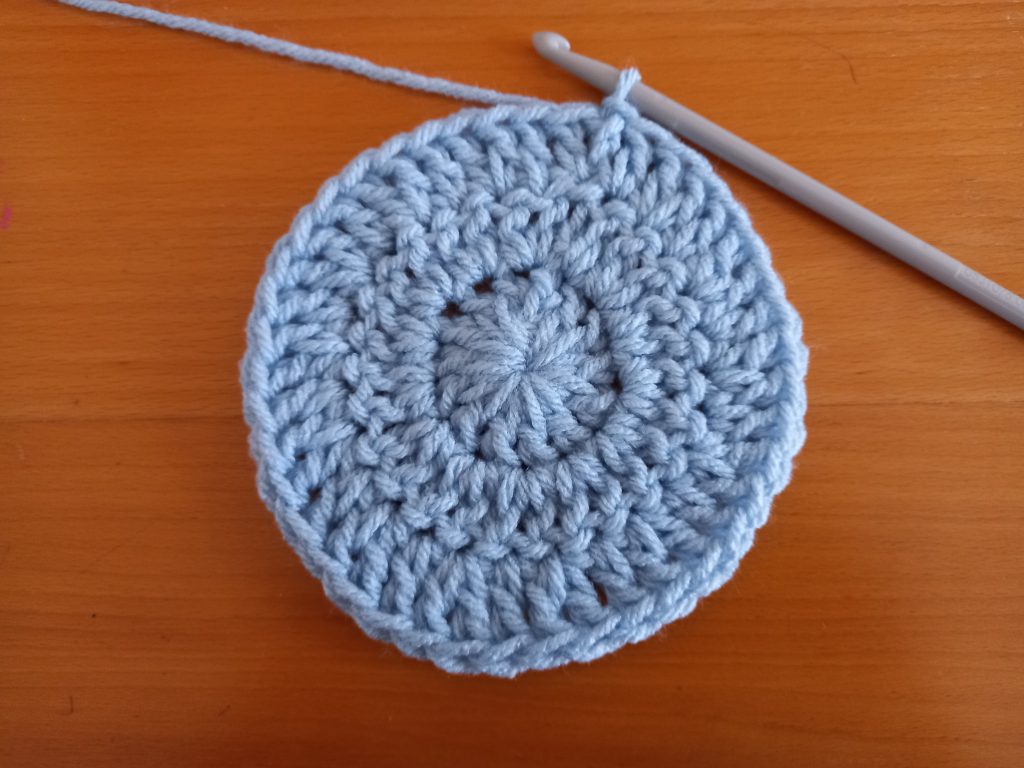
Round 4: Ch 3 (=DC), place a DC into next st until eor. Sl st to 1st ch 3 to close off round.
Round 5-8: Repeat row 4.
Round 9: Ch 1 (=SC), place a SC into next stitch until eor, sl st to first ch 1 to close off round.
Fasten off, tidy up all loose ends.
Size 12-24 months:
Ch 4, sl st to form a ring.
Round 1: Ch 3 (=DC), place 13 DC inside the ring (=14 DC total). Sl st to 1st ch 3 to close off round.
Round 2: Ch 3 (=DC), turn your work, place another DC inside the first stitch (=2 DC together in one stitch). Place 2 DC inside next DC until eor (=28 DC total). Sl st to 1st ch 3 to close off round.
Round 3: Ch 3 (=DC), turn your work, place another DC inside the first stitch (=2 DC together in one stitch). Place DC in next st, [2 DC in next st, 1 DC in next st] until eor (=42 DC total). Sl st to 1st ch 3 to close off round.
Round 4: Ch 3 (=DC), turn your work, place a DC into next st until eor. Sl st to 1st ch 3 to close off round.
Round 5-9: Repeat row 4.
Round 10: Ch 1 (=SC), place a SC into next stitch until eor, sl st to first ch 1 to close off round.
Fasten off, tidy up all loose ends.
Size 2-4 years:
Ch 4, sl st to form a ring.
Round 1: Ch 3 (=DC), place 13 DC inside the ring (=14 DC total). Sl st to 1st ch 3 to close off round.
Round 2: Ch 3 (=DC), turn your work, place another DC inside the first stitch (=2 DC together in one stitch). Place 2 DC inside next DC until eor (=28 DC total). Sl st to 1st ch 3 to close off round.
Round 3: Ch 3 (=DC), turn your work, place another DC inside the first stitch (=2 DC together in one stitch). Place DC in next st, [2 DC in next st, 1 DC in next st] until eor (=42 DC total). Sl st to 1st ch 3 to close off round.
Round 4: Ch 3 (=DC), turn your work, place another DC inside the first stitch (=2 DC together in one stitch). Place a DC into next stitch 6 times, [in the 7th stitch place 2 DC together, then place a DC into next stitch 6 times], repeat [] until eor. Sl st to 1st ch 3 to close off round.
Round 5: Ch 3 (=DC), turn your work, place a DC into next st until eor. Sl st to 1st ch 3 to close off round.
Round 6-10: Repeat row 5.
Round 11: Ch 1 (=SC), place a SC into next stitch until eor, sl st to first ch 1 to close off round.
Fasten off, tidy up all loose ends.
Size 5-6 years old:
Ch 4, sl st to form a ring.
Round 1: Ch 3 (=DC), place 13 DC inside the ring (=14 DC total). Sl st to 1st ch 3 to close off round.
Round 2: Ch 3 (=DC), turn your work, place another DC inside the first stitch (=2 DC together in one stitch). Place 2 DC inside next DC until eor (=28 DC total). Sl st to 1st ch 3 to close off round.
Round 3: Ch 3 (=DC), turn your work, place another DC inside the first stitch (=2 DC together in one stitch). Place DC in next st, [2 DC in next st, 1 DC in next st] until eor (=42 DC total). Sl st to 1st ch 3 to close off round.
Round 4: Ch 3 (=DC), turn your work, place another DC inside the first stitch (=2 DC together in one stitch). Place a DC into next stitch 3 times, [in the 4th stitch place 2 DC together, then place a DC into next stitch 3 times], repeat [] until eor. Sl st to 1st ch 3 to close off round.
Round 5: Ch 3 (=DC), turn your work, place a DC into next st until eor. Sl st to 1st ch 3 to close off round.
Round 6-10: Repeat row 5.
Round 11: Ch 1 (=SC), place a SC into next stitch until eor, sl st to first ch 1 to close off round.
Fasten off, tidy up all loose ends.
Note for all sizes:
Make sure you tighten the beginning center of project, sew it in so as to secure the project so that it does not unravel.
Crochet & Sew on ears:
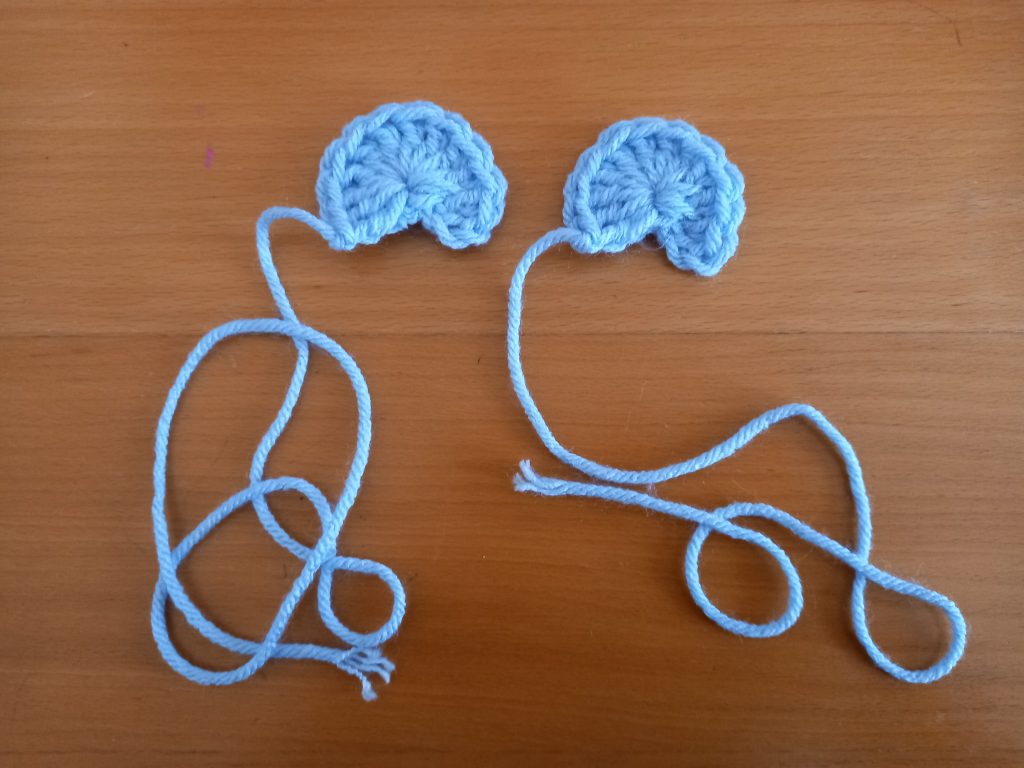
Make 2 identical ears:
Ch 3, sl st to first ch 3 to form a ring.
Round 1: Ch3 (=DC), place 11 DC into the ring (=12 DC total).
Fasten off, leaving long tail to sew ear into hat.
Pull on the loose end of initial ch 3 to close off ring. Snip off your loose end from initial chain 3 before stitching on the ears.
Stitching the ears onto project:
Lie your project on a flat surface, with the front of the hat facing you. Place both your ears onto the top of the project, making sure they are both symmetrically placed at an approximate 3” distance from each other on the top of the hat.
Once you are satisfied with where they are placed, place your tapestry needle onto the loose end of the ear, and sew the ear into project delicately using the your preferred stitch. Make sure your ear is well secured, tie a knot with the loose end, fasten off, and tidy up your loose end.


6 Comments
Linda Sims
Love your patterns!
Selina Veronique
Thank you so much!
Lorrie Patterson
I really love these patterns. Some are so darling.
Selina Veronique
Thank you so much!
Kristen
What yardage do I need for each hat size?
Selina Veronique
Hi, thank you for commenting.
I cannot say for sure the exact yardage you will need for each size; I know that you will need under one skein of Sirdar Number 1 Chunky for any of these hats.
I hope this helps!