Crochet Coconut Cream Cardigan Pattern
Crochet Coconut Cream Cardigan Pattern
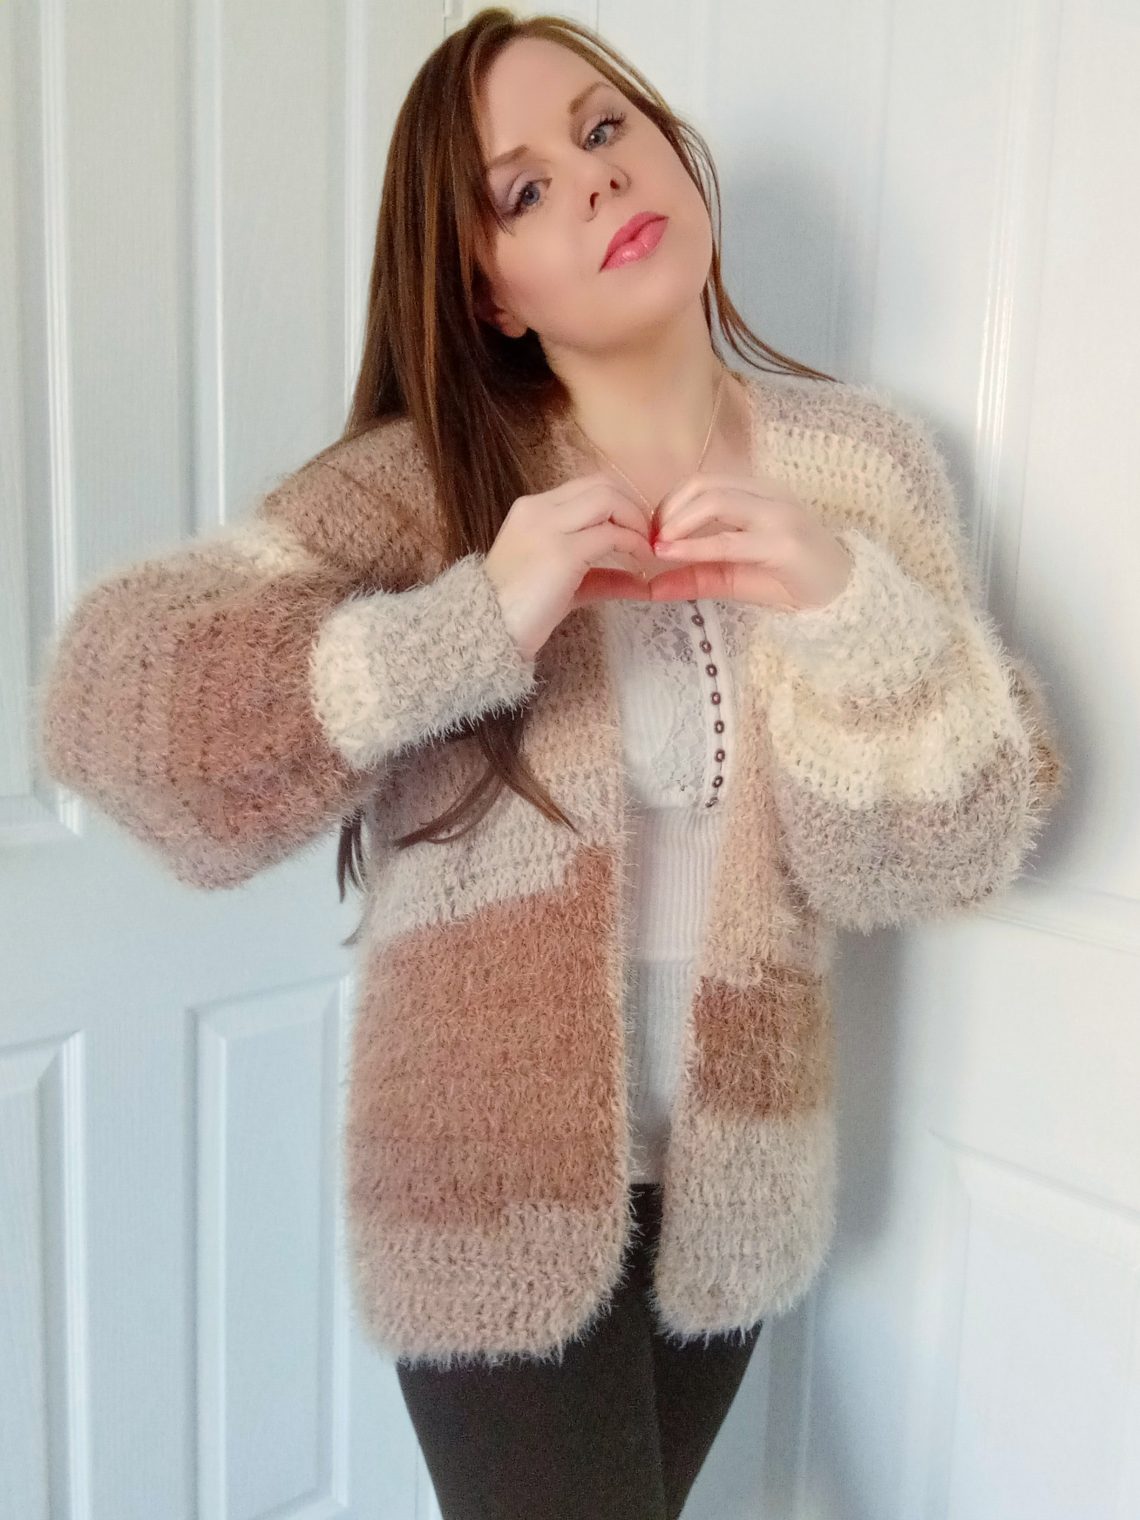
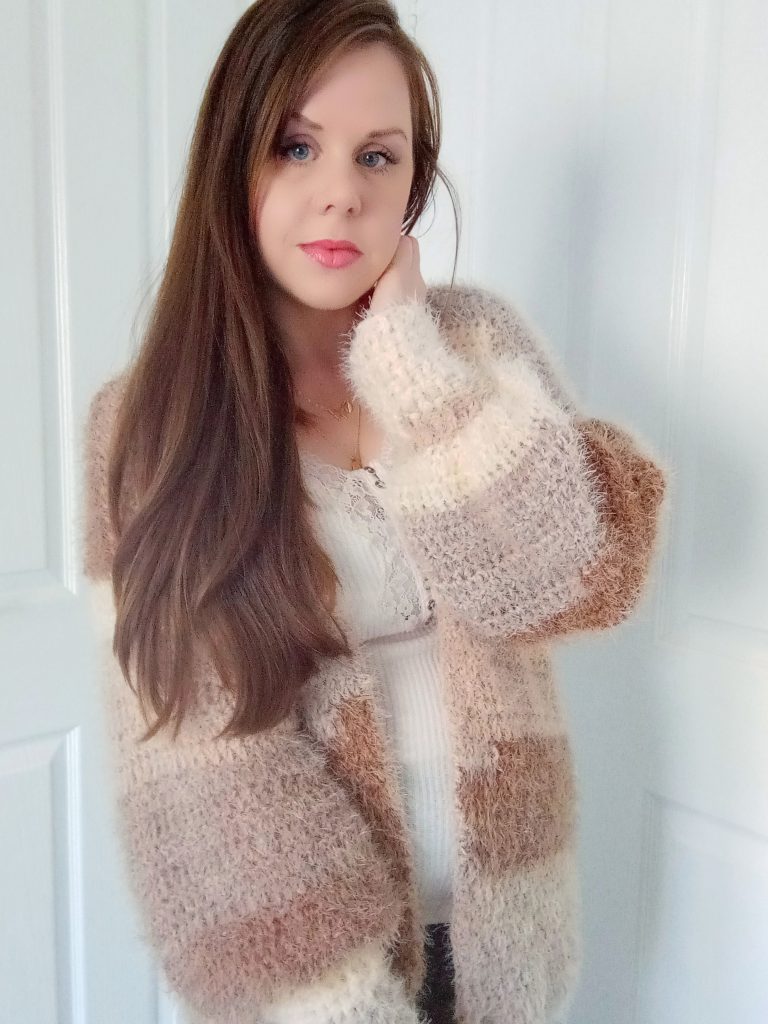
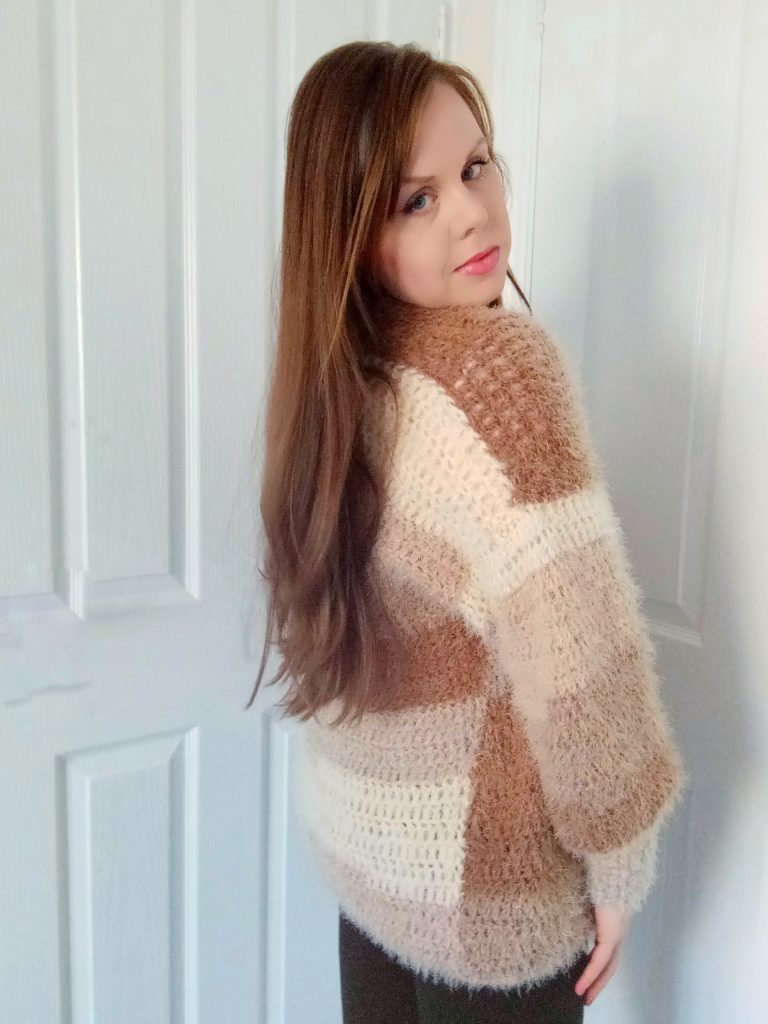
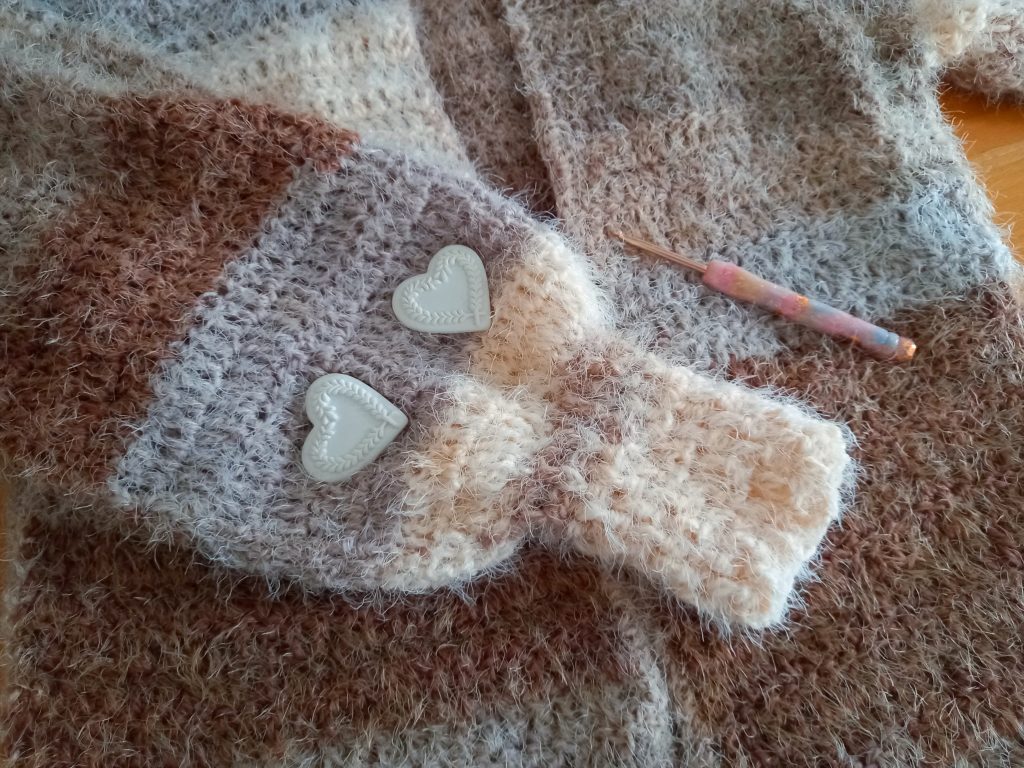
Hi everyone, this week I am bringing to you this brand new crochet Coconut Cream Cardigan pattern and tutorial. This is a super easy beginner friendly project. I already love it so much, it’s super soft and fluffy, and it’s perfect for layering. It crocheted with two skeins of Caron Latte Cakes in shade Coconut Cream.
The video tutorial for this project can be found here:
Crochet Coconut Cream Cardigan Pattern: the inspiration
I had been inspired to crochet a jumper or a cardigan with Yarnspiration’s Caron Latte Cakes. I had bought two skeins each of shade Coconut Cream, and shade Plum Fresh. However, I decided to use shade Coconut Cream for this project as I had already made The Princess Shawl a few years ago using shade Plum Fresh, and I fancied a change. I however still have my two skeins of Plum Fresh yarn at the ready. I think I will be making a beautiful feminine poncho with this yarn. To be honest, I can’t wait to show you!
I have so many ideas for many crochet designs, however it takes time to create all of these projects. This means I have to bide my time. However this means I have a never ending supply of ideas for crochet projects.
I decided to make the cardigan as I was creating the pattern. It just seemed to make sense, and I am so glad I listened to my intuition on this instance. The end result has blown me away, I am really in love with this project. I know I will be wearing this cardigan a lot! Now, I also want to make one in a block color, such as a pale pink. Let me know if you have the same crochet project in multiple different colors!
Crochet Coconut Cream Cardigan Pattern: a fuzzy and cozy yarn
Yarnspirations Latte Cake is a favorite yarn of mine. I have used this yarn for multiple projects now, including the lovely Soft Dreams Top. It is a 100% acrylic yarn which is very soft and fluffy. This yarn really gives off all the warm and fuzzy vibes of Autumn/Winter, and I have to say I always love working with it.
It is very soft to the touch, and is very easy to work with. It looks cozy yet it is perfect for all those people who may be allergic to wool. This is a great way to substitute a wool yarn, as it still gives off these cozy feels.
A skein of Latte cake goes a very long way, as this is a slightly oversized project, and I only used a skein and a half for this project. I think I may well crochet a matching pompom hat!
The weather in the UK has gotten very cold in the past few days. A massive storm hit the North East where I live, last week-end, creating a lot of disruptions and damage. Thankfully there is only a bit of damage in my garden. However, the bitter cold and icy pavements are very much present. And this cozy cardigan is perfect for that type of weather.
Crochet Coconut Cream Cardigan Pattern: a simple design
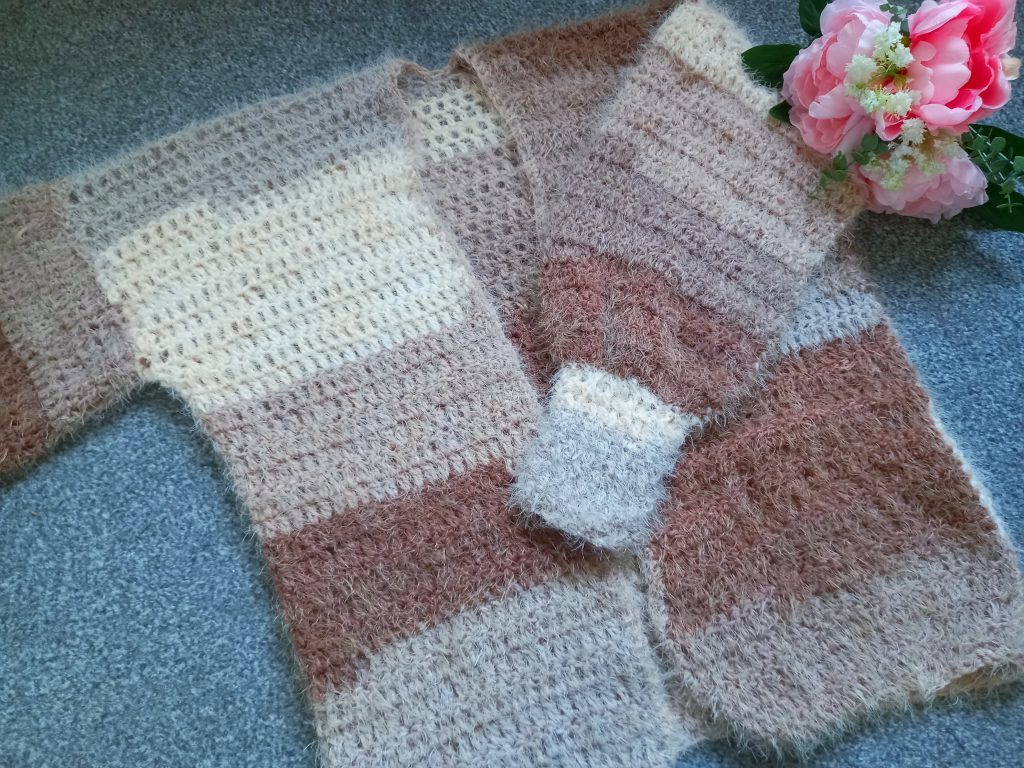
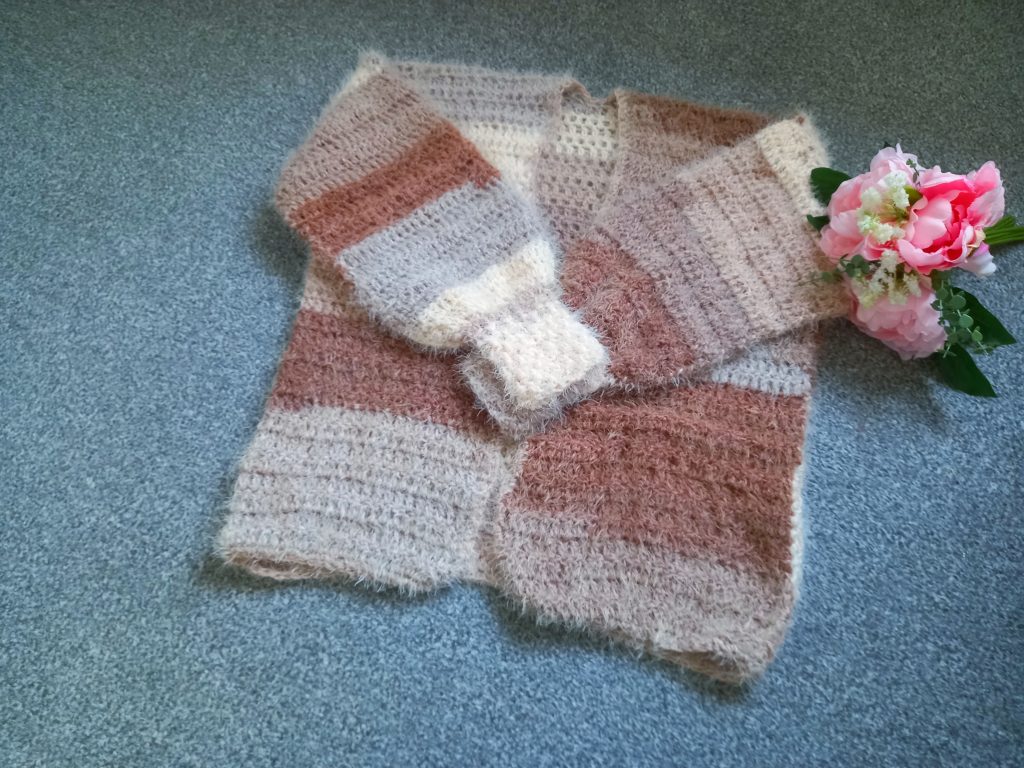
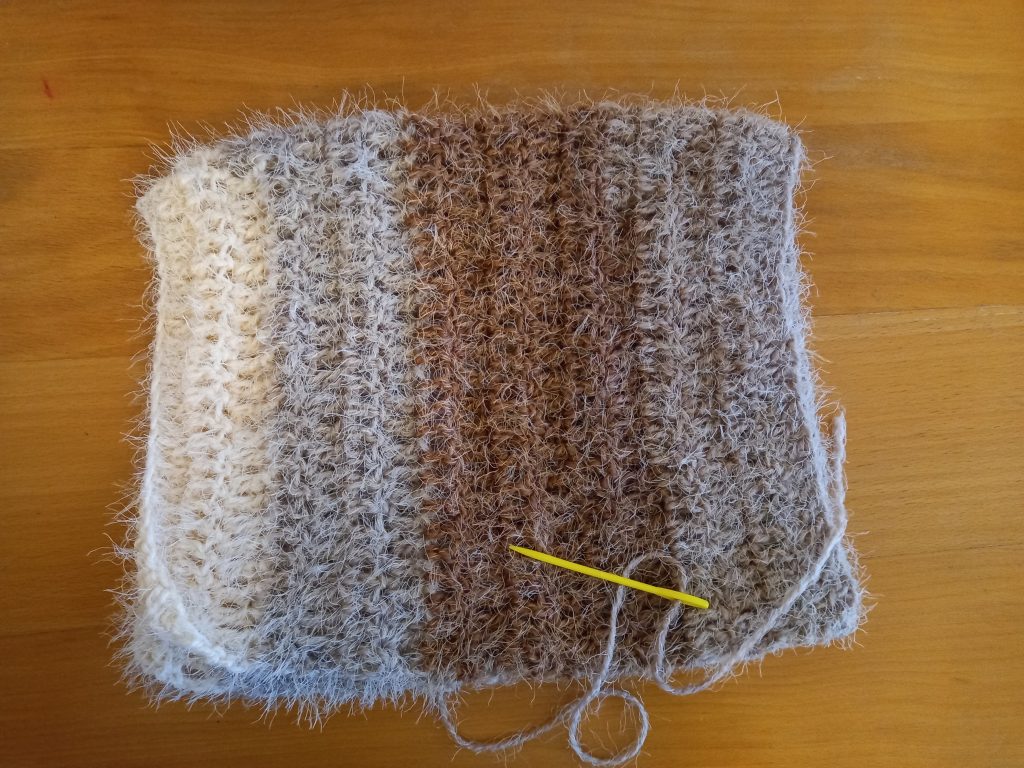
This crochet cardigan pattern is very simple. It is based on an easy and repetitive one row repeat of Double Crochets, and can be crocheted fairly quickly as this yarn is chunky. This crochet design doesn’t require a lot of technical skills, and is therefore perfect for beginners. If you are looking to create your first wearable item, this is just what you are looking for.
Firstly we will be making the back, then the two front panels, before we make two identical sleeves. After that, we will be assembling the cardigan, before adding the front opening and bottom border, as well as the two sleeve cuffs. The tapered sleeve cuffs are my favorite part of this crochet project! Indeed, this simple detail makes the whole design come together perfectly, which is great!
Let me know if you crochet this feminine and cozy cardigan, I love to hear about your projects.
Connecting with you
I love connecting with my Crochet Community through my blog and Social Media. You can find me on Youtube, Instagram, and Pinterest. I would love to connect with you on these platforms.
You can also join my private Facebook group to connect.
Don’t forget to subscribe to my weekly newsletter! You will then be the first to know when I release a new crochet pattern, video tutorial, and giveaways.

Crochet Coconut Cream Cardigan: the Pattern
You can purchase the ad free, large print, PDF pattern from my Etsy store here: Crochet The Coconut Cream Cardigan PDF Pattern
You can purchase the ad free, large print, PDF pattern from my Ravelry store here: Crochet The Coconut Cream Cardigan PDF Pattern
Level: Easy/beginner
Notes
I will be using US terms (British terms in brackets)
Pattern written for size S, M written in ( ), L in [ ], XL in bold, XXL in cursive, XXXL in ().
Gauge
4”x4” (10×10 cm): 10 DC & 5 rows
Size of finished cardigan (including border)
Size S: 28,5” (72 cm) x 21” (53 cm)
Size M: 31,5” (80 cm) x 24” (61 cm)
Size L: 34,5” (87,5 cm) x 27” (68,5 cm)
Size XL: 37,5” (95 cm) x 30” (76 cm)
Size XXL: 40,5” (103 cm) x 33” (84 cm)
Size XXXL: 43,5” (110 cm) x 36” (91 cm)
Size of sleeves (after sewing into project, including cuffs)
S: 8” (20 cm) x 18.5” (46 cm)
M: 8” (20 cm) x 18.5” (46 cm)
L: 9” (23 cm) x 19.3” (48.5 cm)
XL: 9” (23 cm) x 19.3” (48.5 cm)
XXL: 10” (25.5 cm) x 20” (51 cm)
3XL: 11” (28 cm) x 20” (51 cm)
Materials
2 skeins of Caron Latte Cake in shade Coconut Cream (S/M/L) or 3 skeins of Caron Latte Cake (XL/XXL/XXXL)
7 mm crochet hook
6.5 mm crochet hook
Pair of scissors
Tapestry needle
Abbreviations
Ch: Chain
Sl st : slip stitch
DC: Double crochet (UK Treble Crochet)
SC: Single Crochet (UK Double Crochet)
FPDC: Front Post Double Crochet (Front Post Treble Crochet)
BPDC: Back Post Double Crochet (Back Post Treble Crochet)
EOR: End of Row or End of Round
Begin pattern here
You will be making the back, the 2 side panels, and 2 identical sleeves before sewing your cardigan together. Then you will then be adding a simple SC border to the front opening and bottom of the cardigan.
You will finish the cardigan by adding the sleeve cuffs on each sleeve.
Back body
With 7 mm crochet hook
Chain 51 (58) [65] 72, 79 (86)
Complete rows as follows:
1: Place a DC into the 4th chain from the hook (first chain 3 counts as a DC throughout), place a DC into next chain until eor.
2: Ch 3, turn your work, place a DC into next stitch until eor.
3-34 (37) [40] 43, 46 (49): Repeat row 2
Fasten off, leaving long tail for sewing.
Front panels (make 2)
With 7 mm crochet hook
Ch 27 (30) [33] 36, 39, (42)
1: Place a DC into the 4th chain from the hook (first chain 3 counts as a DC throughout), place a DC into next chain until eor.
2: Ch 3, turn your work, place a DC into next stitch until eor.
3-34 (37) [40] 43, 46 (49): Repeat row 2
Fasten off, leaving long tail for sewing.
Sleeves (make 2)
With 7 mm crochet hook
Chain 51 (51) [54], 54, 58 (62)
Complete rows as follows:
1: Place a DC into the 4th chain from the hook (first chain 3 counts as a DC throughout), place a DC into next chain until eor.
2: Ch 3, turn your work, place a DC into next stitch until eor.
3-17 (17) [18], 18, 19, (19): Repeat row 2
Fasten off, leaving long tail for sewing.
To sew your cardigan together
With wrong side facing, place your sleeves flat and fold in half (make sure you fold them so that the rows are vertical, not horizontal).
With tapestry needle and yarn, sew your seam up so as to create your sleeves.
Do not turn inside out yet.
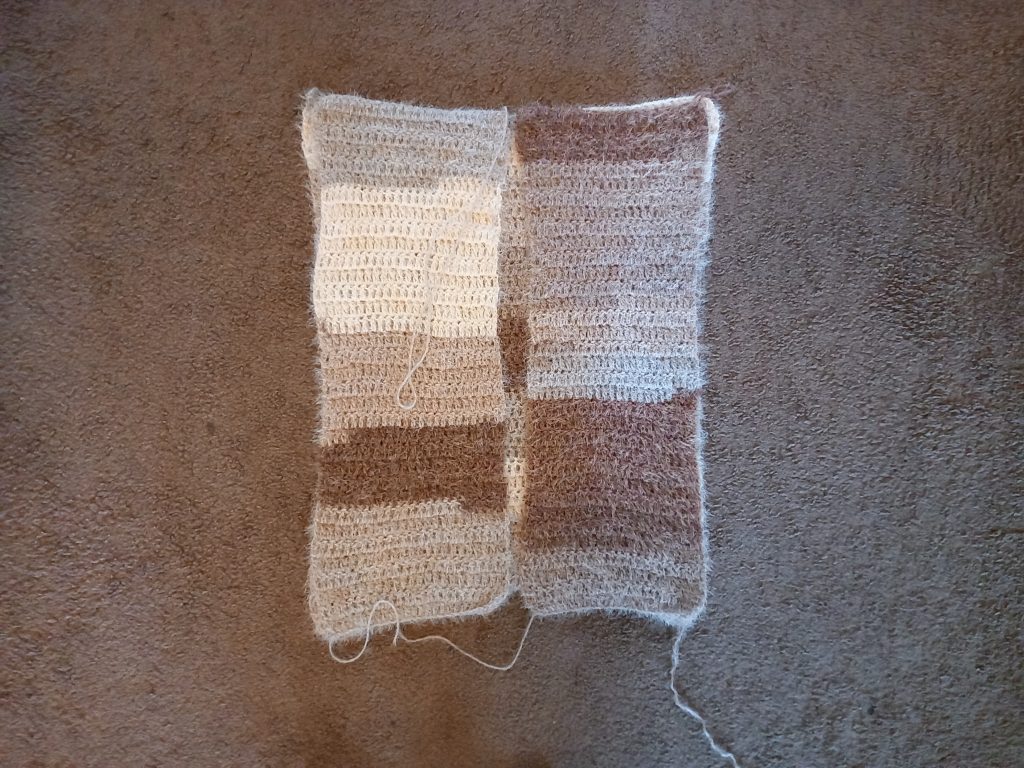
With wrong side facing, place your back panel onto a flat surface. Place your 2 front panels symmetrically, start sewing the shoulder seams straight across.
Sew sleeves onto project
Once this is done, sew your sleeves onto each side of the cardigan. To do this, place your sleeve at the top of the cardigan on each side, so that the top of each sleeve joins the top of the body of the cardigan. Make sure the seams of your sleeves are facing down.
Now attach a piece of yarn to the top of the cardigan, where the top front panel is touching the sleeve; start sewing the sleeve and front panel together. Once you reach the bottom side of the sleeve, just carry on sewing the front and back panels together, without stopping. When you reach the bottom of the cardigan, fasten off.
Now turn your project around so as to sew in the back part of your sleeve to the back panel. Attach yarn at the top of shoulder, and sew both parts together. Once you reach the bottom of the sleeve, fasten off.
Repeat this process on the other side of the cardigan.
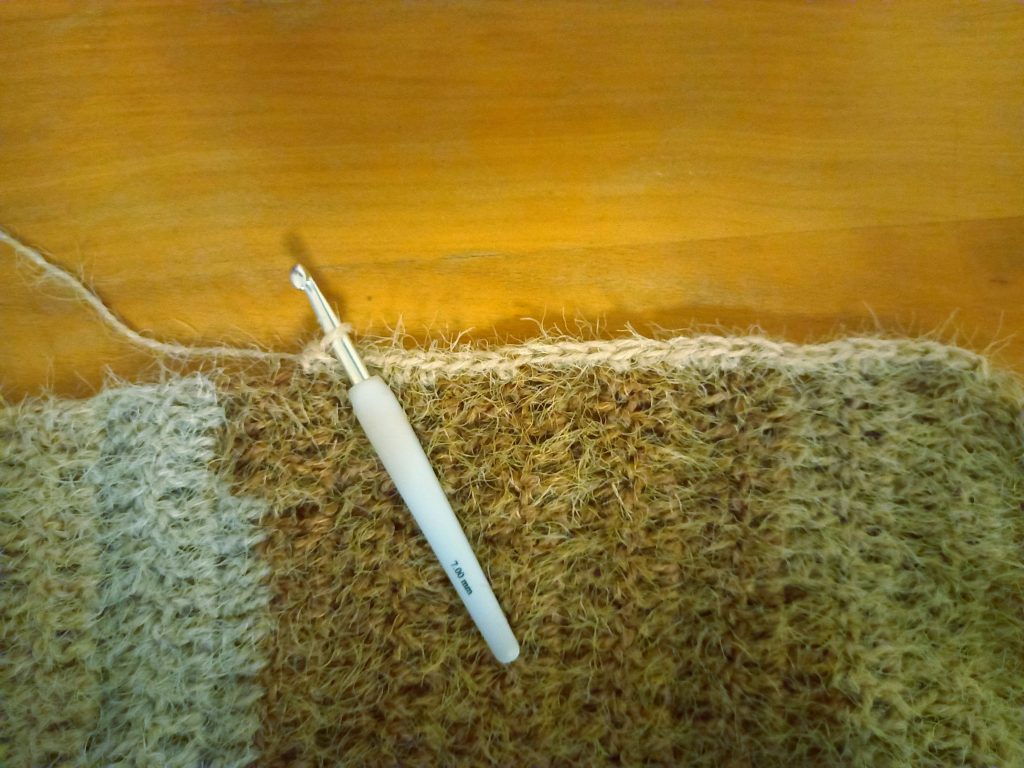
Add border to the front opening and bottom of the cardigan
With 7 mm crochet hook
Attach yarn to either bottom edge of the front opening.
Row 1: Ch 1 (=SC), SC into next stitch until eor all the way around the front opening and bottom of cardigan, until you reach the first ch 1. Sl st to the first ch 1 to close off round.
There may not always be a clear stitch into which you will place a SC, so just make sure you place SC evenly around the front opening and bottom of the cardigan.
Fasten off and tidy up all loose ends.
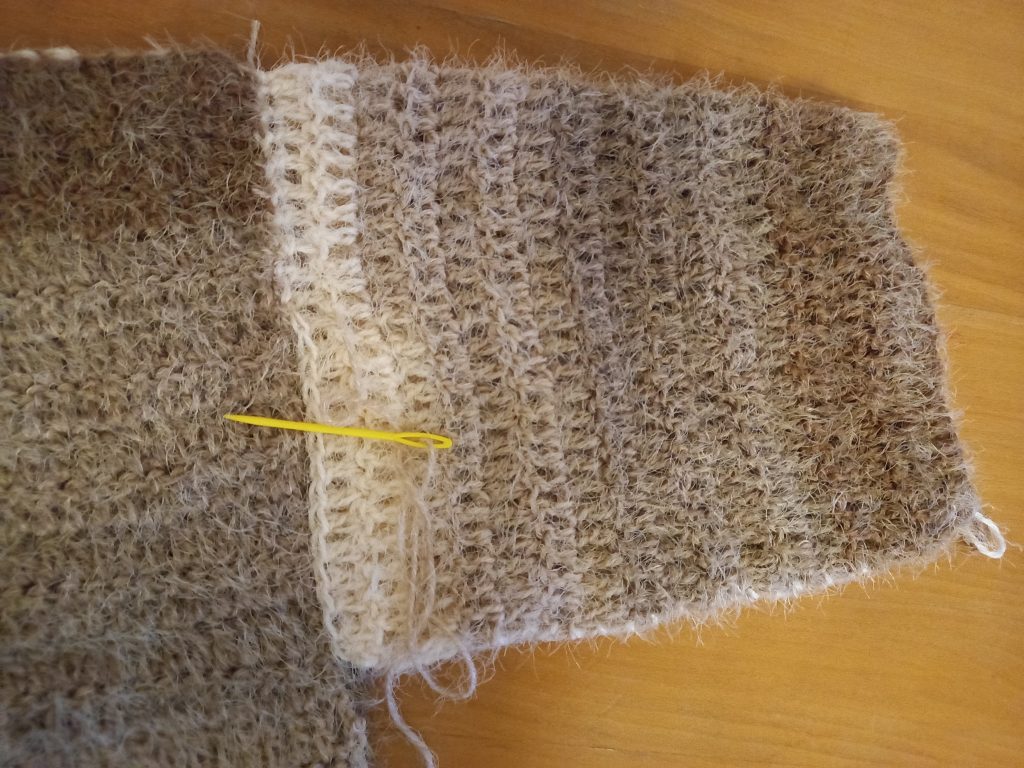
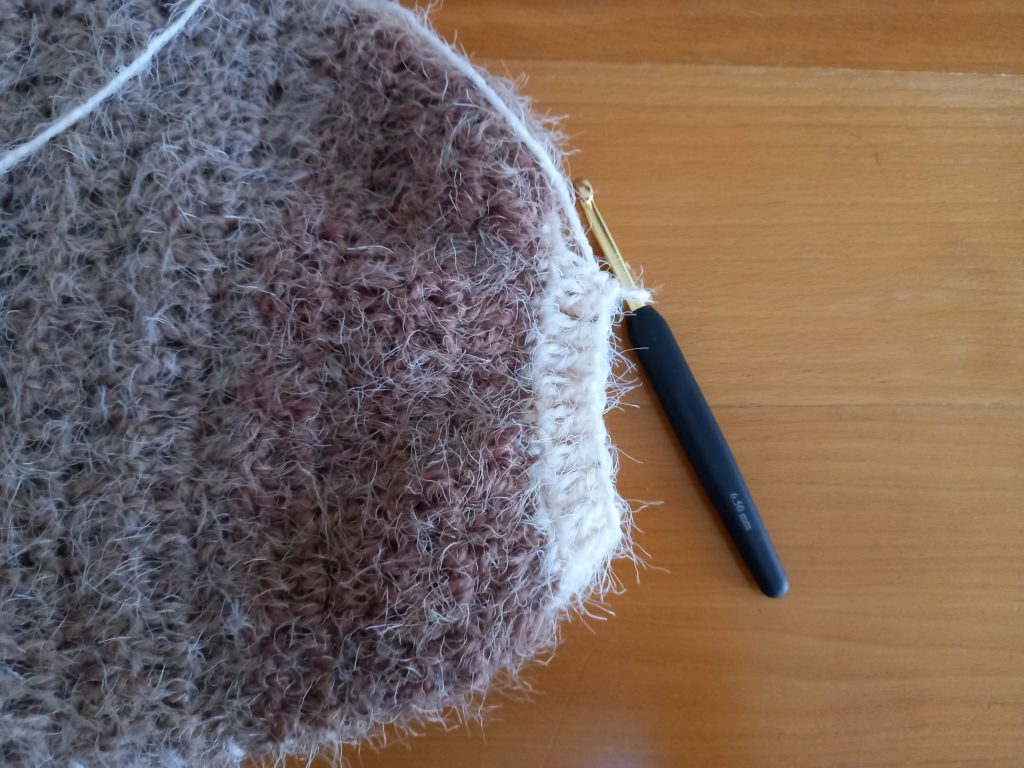
Add cuff edging (repeat process on both sleeve cuffs)
With 6,5 mm crochet hook
Attach yarn to one sleeve end.
Complete rounds as follows:
1: Ch 1 (counts as a SC), sk one stitch. [Place a SC into next stitch, sk a stitch] until eor. Sl stitch to first ch 1 to close round.
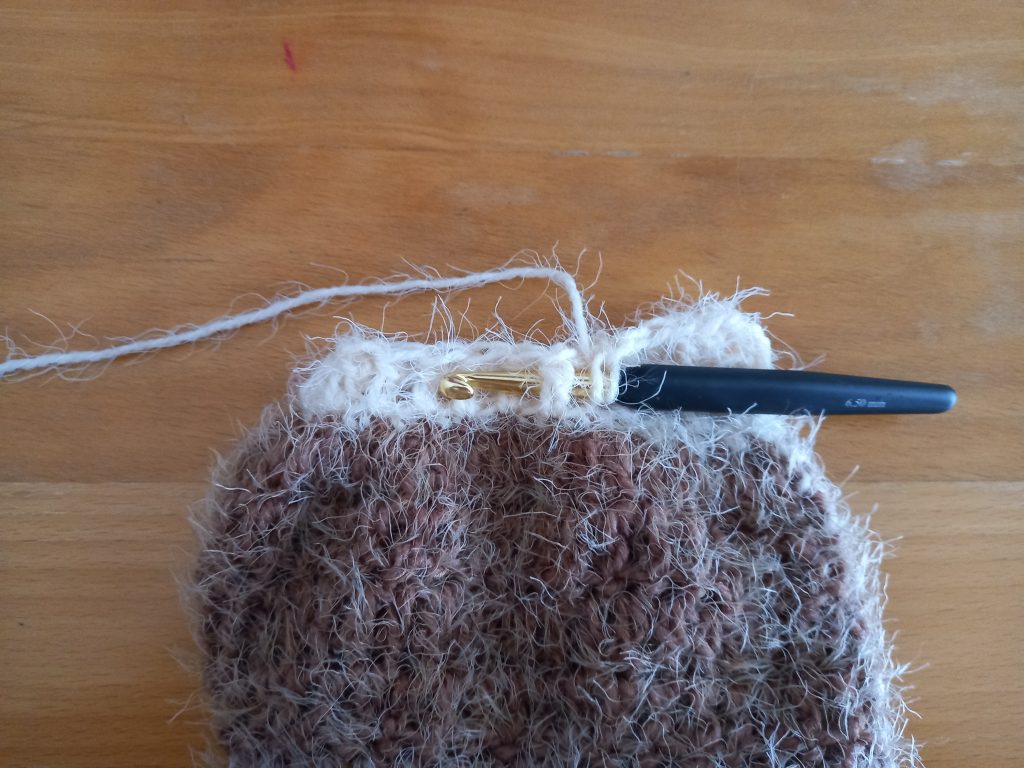
2: Now ch 3 (counts as a DC), place a DC into next stitch until eor. Sl st to 1st ch 3 at beginning of round.
3: Ch 3 (counts as a BPDC), [Front Post Double Crochet into the next DC from previous row, Back Post Double Crochet into next stitch] until you reach the first ch 3, sl st to 1st ch 3 to close off round.
4: Ch 3 (counts as FPDC), [Back Post Double Crochet into the Front Post Double Crochet from previous row, Front Post Double Crochet into the Back Post Double Crochet from previous round] until eor. Therefore you will be alternating FPDC and BPDC from row to row, creating a ribbed effect. Slip stitch to first chain 3 to close off round.
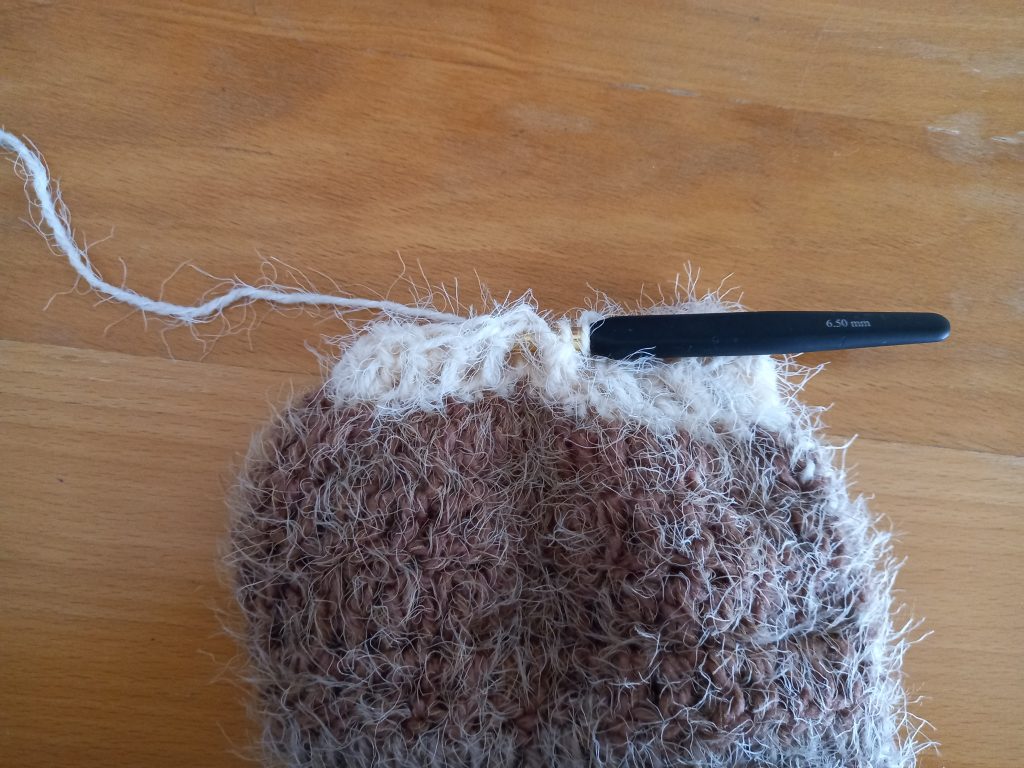
Round 5-9: Repeat row 3 and 4.
Fasten off, tidy up all loose ends.


5 Comments
Hope Albritton
Hi! I know you said that this yarn is super soft! But does it have even the “slightest” scratchy feeling too it? (It looks a bit scratchy from the tutorial video. Like it would be itchy and uncomfortable.) 😬
I would love to try out using this yarn ( as I have never used it before ), yet I hate yarn that has even the slightest hint of scratchiness.
Oh and your cardigan looks absolutely stunning. So beautiful. 🙂 keep up the good work!
Deb
Hi. Love this cardigan and easy to crochet. However I’m not understanding the instructions for connecting the front panels to the back. You say stitch right across with no space? That doesn’t make sense to me. It would be closed. I just can’t seem to wrap my head around that part. Maybe im misunderstanding? Any help would be be appreciated.
Thank you
Deb
Selina Veronique
Hello and thank you for your comment. It means you need to lay the back panel flat, and place both front panels on top of it directly. You will be sewing the very top part of the project (front and back panels), at the top of the shoulders if that makes sense (as seen on the photographs). There is no space between both front panels when you sew that seam.
The video tutorial for this project can be found here: https://www.youtube.com/watch?v=ZRCjLbTSvG4
I hope this helps, the photographs on my blog should hep too. It really is just a small seam at the very top of the project that you need to sew.
Have a great day
Selina.
Kathryn Griffin
I am having the same problem as Deb understanding if sew both front panels all the way across to the back how will you get into the sweater???? I have spent $60 on this yarn and don’t want to waste my efforts and money. Thank you. I have looked at the pictures and I still don’t see a front opening at the top of the project as is usually in a cardigan.
Selina Veronique
Hello and thank you for contacting me. So the front opening is created by the fact that the two front panels have a frontal opening once the shoulders are sewn (ie the shoulders of both the back and front are sewed together). I hope this makes sense. Have you watched the video tutorial for this project? As this will give you a very clear idea of what to do. The video can be found here: https://www.youtube.com/watch?v=ZRCjLbTSvG4
Please get back to me if you still have an issue after watching the video,
Have a great day
Selina.