Crochet Easy Boho Festival Bag
Crochet Easy Boho Festival Bag
Hi everyone, today I will show you how to crochet an easy Boho Festival Bag.
I hope you are well and that you have had a lot of crochet time. Crochet is my own personal therapy. To be honest, I love the feeling of creating something out of a beautiful and colourful yarn! This Summer project really puts me in the mood to go to a Festival, or just go out for a simple ice cream with my little baby boy.
The video tutorial can be found on my Youtube channel: Crochet The Boho Bag Video Tutorial
My inspiration
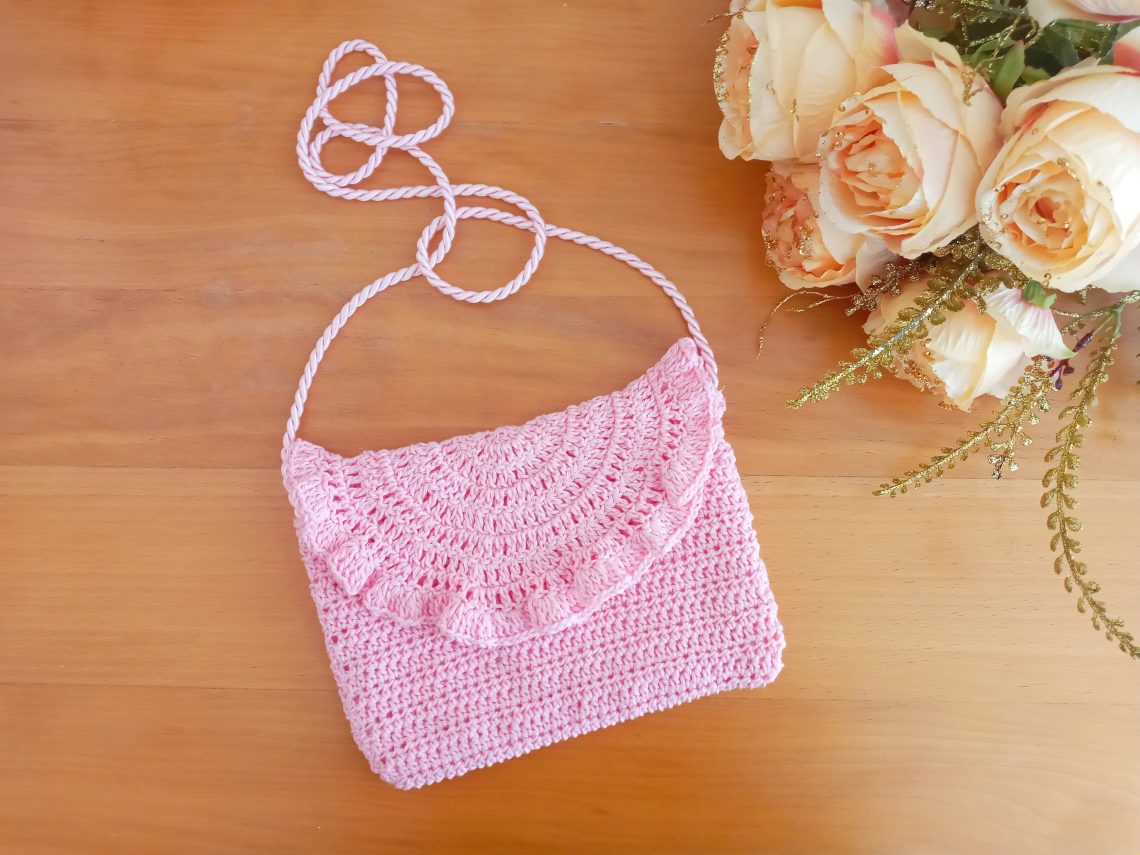
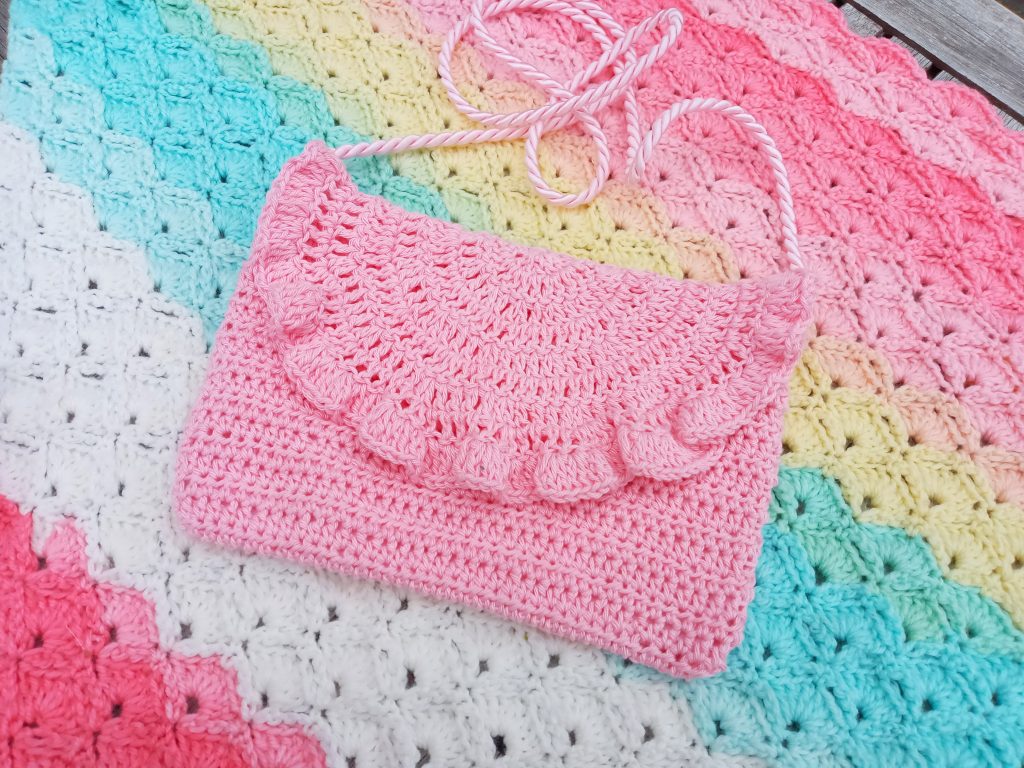
This week I am bringing to you a lovely and very easy to make Boho Festival Coachella inspired bag. You know how much I love those hippy vibes. I seem to be obsessed with cotton yarn at the moment, and this bag was made using the stunning Wendy Supreme Luxury DK yarn, which is so lovely.
Pink is my favourite colour, and I know this bag will be so convenient and easy to use this Spring/Summer. You can use any 100% cotton in DK/size 3 light yarn, as it will work just the same with this pattern. It’s the versatility of this crochet pattern that I love the most! Maybe I will even crochet this bag in a few different shades as it is so easy to wear with all of my outfits.
I hope you enjoy making this project, let me know in the comments below, and I will be bringing to you a lot more Coachella Boho vibes projects very soon.
An easy pattern
I love creating Boho, festival inspired bags and crochet garments, and you will find a lot of these patterns on my blog. Indeed, I love to use up my cotton yarn stash to make myself some cute, bohemian accessories, which I can use day to day with most of my closet pieces. This crochet Easy Boho Festival Bag is super cute too!
I have crocheted quite a few 70’s inspired headbands, and plan on releasing more crochet bag patterns and video tutorials over the Summer. Recently I have also purchased some beautiful buttons online, that I cannot wait to use on my cotton pieces, so watch this space.
Lining your crochet Easy Boho Festival bag
I have also lined this bag with beautiful cotton fabric, which is very easy to do. To be honest, I even hand-stitched it, so it definitely is something you can do without a sewing machine if you don’t have one. Lining a crochet bag really adds to not only it’s longevity, but really makes the whole project look more put together. The video on how to line a crochet bag is also available, and it’s very easy and quick to do.

Video Tutorial on How to line your Boho Bag:
The video tutorial can be found on my Youtube channel if you follow this link How to Line a Crochet Bag Video Tutorial
Please do not hesitate to contact me or leave me a comment. I always answer any question or message you leave me. You can also tag me in your projects, as I love to see your creations using these patterns!
Au revoir and take care my lovelies, and don’t forget to subscribe to my Youtube channel and like my Facebook page. You can also join my Facebook group to connect, it’s called Selina Veronique’s Crochet Corner.
Lots of love,
Selina.
The Pattern for The Easy Boho Festival Bag
You can purchase the ad free PDF pattern from my Etsy shop: Crochet a Pink Boho Bag PDF pattern
Level: Easy/beginner
Gauge: 10 cm (4”)=13 rows and 10 cm(4”)=18 HDC
Size of finished project: 15 cm (6”) high and 23 cm (9”) wide
Notes:
I will be using US terms (British terms in brackets)
Materials:
1 skein of Wendy Supreme Luxury Cotton DK (or any other DK/Size 3 light yarn in 100% cotton)
A 3,5 mm crochet hook
120 cm of rope for the strap (or you can create your own by following my guide in this pattern)
Pair of scissors
Stitch marker
Tapestry needle
Darning needle and pink thread (if you using some rope)
2 sewing pins to secure project while sewing
Abbreviations:
Ch : chain
Sl st : slip stitch
HDC: Half Double crochet (UK Half Treble)
DC: Double Crochet (UK Treble Crochet)
EOR: End of row
Front and Back Panels (identical):
To start, make a slip knot.
Ch 41
Complete rows as follows:
1: HDC in 3rd ch from hook (first ch 2 counts as a HDC), HDC into each ch until eor
2: Ch 2 (=HDC), turn your work, HDC into 2nd HDC from previous row, and into each HDC until eor (including ch 2 from previous row)
3-19: Repeat row 2
Fasten off, leaving long tail for sewing bag together
Flap:
Ch 4, sl st through first ch to form a ring
1: Ch 3 (=DC), 6 DC into ring (=7 DC in total)
2: Ch 3 (=DC), turn your work, place a DC into 1st DC from previous row (=2 DC in same stitch), 2 DC into each DC from previous row
3: Ch 3 (=DC), turn your work, place a DC into 1st DC from previous row (=2 DC in same stitch), [DC into next DC, 2 DC into next DC] until eor
4: Ch 3 (=DC), turn your work, place a DC into 1st DC from previous row (=2 DC in same stitch), [DC into next 2 DC, 2 DC into next DC] until eor
5: Ch 3 (=DC), turn your work, place a DC into 1st DC from previous row (=2 DC in same stitch), [DC into next 3 DC, 2 DC into next DC] until eor
6: Ch 3 (=DC), turn your work, place a DC into 1st DC from previous row (=2 DC in same stitch), [DC into next 4 DC, 2 DC into next DC] until eor
7: Ch 3 (=DC), turn your work, place a DC into 1st DC from previous row (=2 DC in same stitch), [DC into next 5 DC, 2 DC into next DC] until eor
8: Ch 3 (=DC), turn your work, place a DC into 1st DC from previous row (=2 DC in same stitch), [DC into next 6 DC, 2 DC into next DC] until eor
9 (frilly edging row): Ch 3 (=DC), 3 DC into next DC until last DC, place 1 DC into last DC
Fasten off, leaving long tail for sewing
Strap: if you are not using rope:
Ch 202
HDC into 3rd ch from hook and into each ch until eor, fasten off. Leave long tail for sewing into project
Sew project together:
Place both front and back panel on top of each other. Make sure they are symmetrically placed. This will be the inside of the bag as we will be turning it inside out to hide seam. Start sewing up one side, onto the bottom side, and then up the second side. Fasten off, tidy up loose ends.
Sew on the flap to the back panel. Turn your project inside out, and secure your flap onto the back panel with the pins. Sew the flap onto back panel, fasten off and tidy up loose ends.
Place strap into bag, inside the side of each side of the project, making sure you have 4 cm (=1,5 inches) inside the bag.
If using the cotton strap from this pattern, sew into project with cotton yarn.
If using a rope, sew into project with darning needle and thread.
Make sure you sew the strap very securely onto project.
Fasten off, tidy up all loose ends and line bag if you wish.


You May Also Like
Crochet The Wild at Heart Shawl
Crochet Feminine Hexagon Cardigan Free Pattern