Crochet Sunburst Granny Square Bag Free Pattern
Crochet Sunburst Granny Square Bag Free Pattern
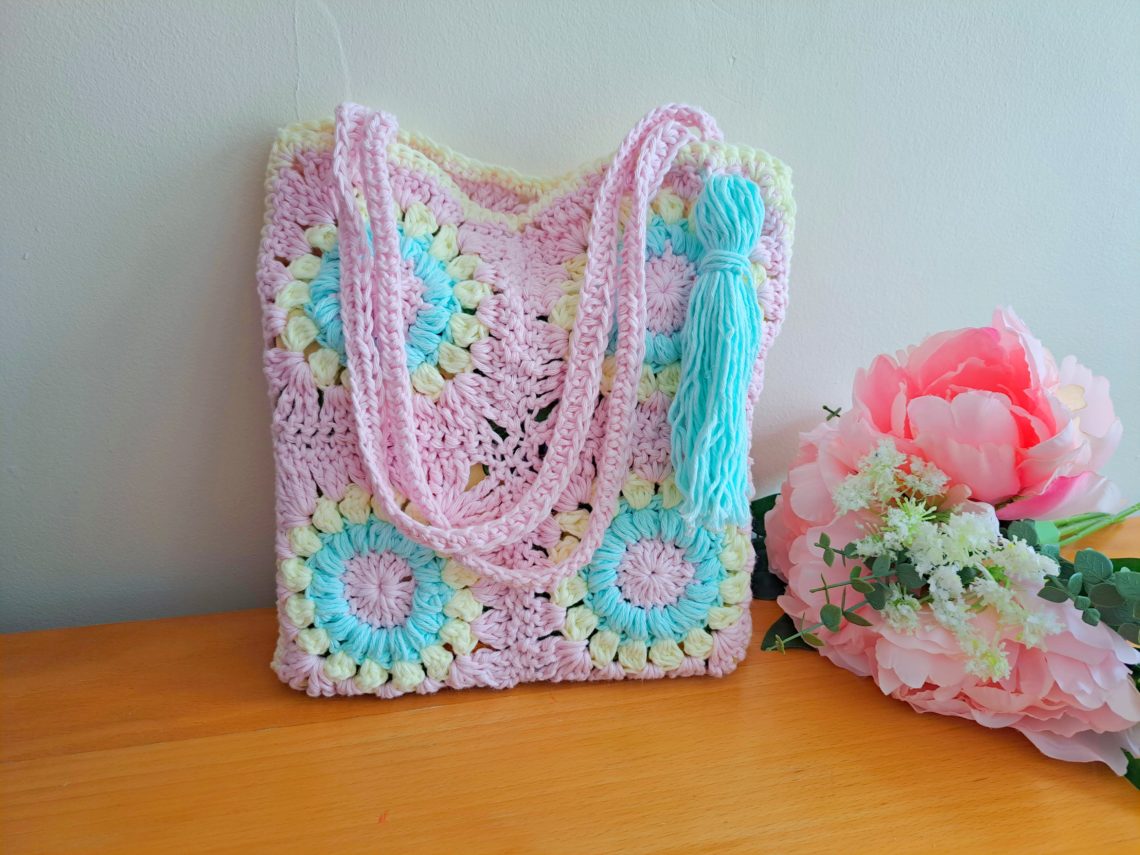
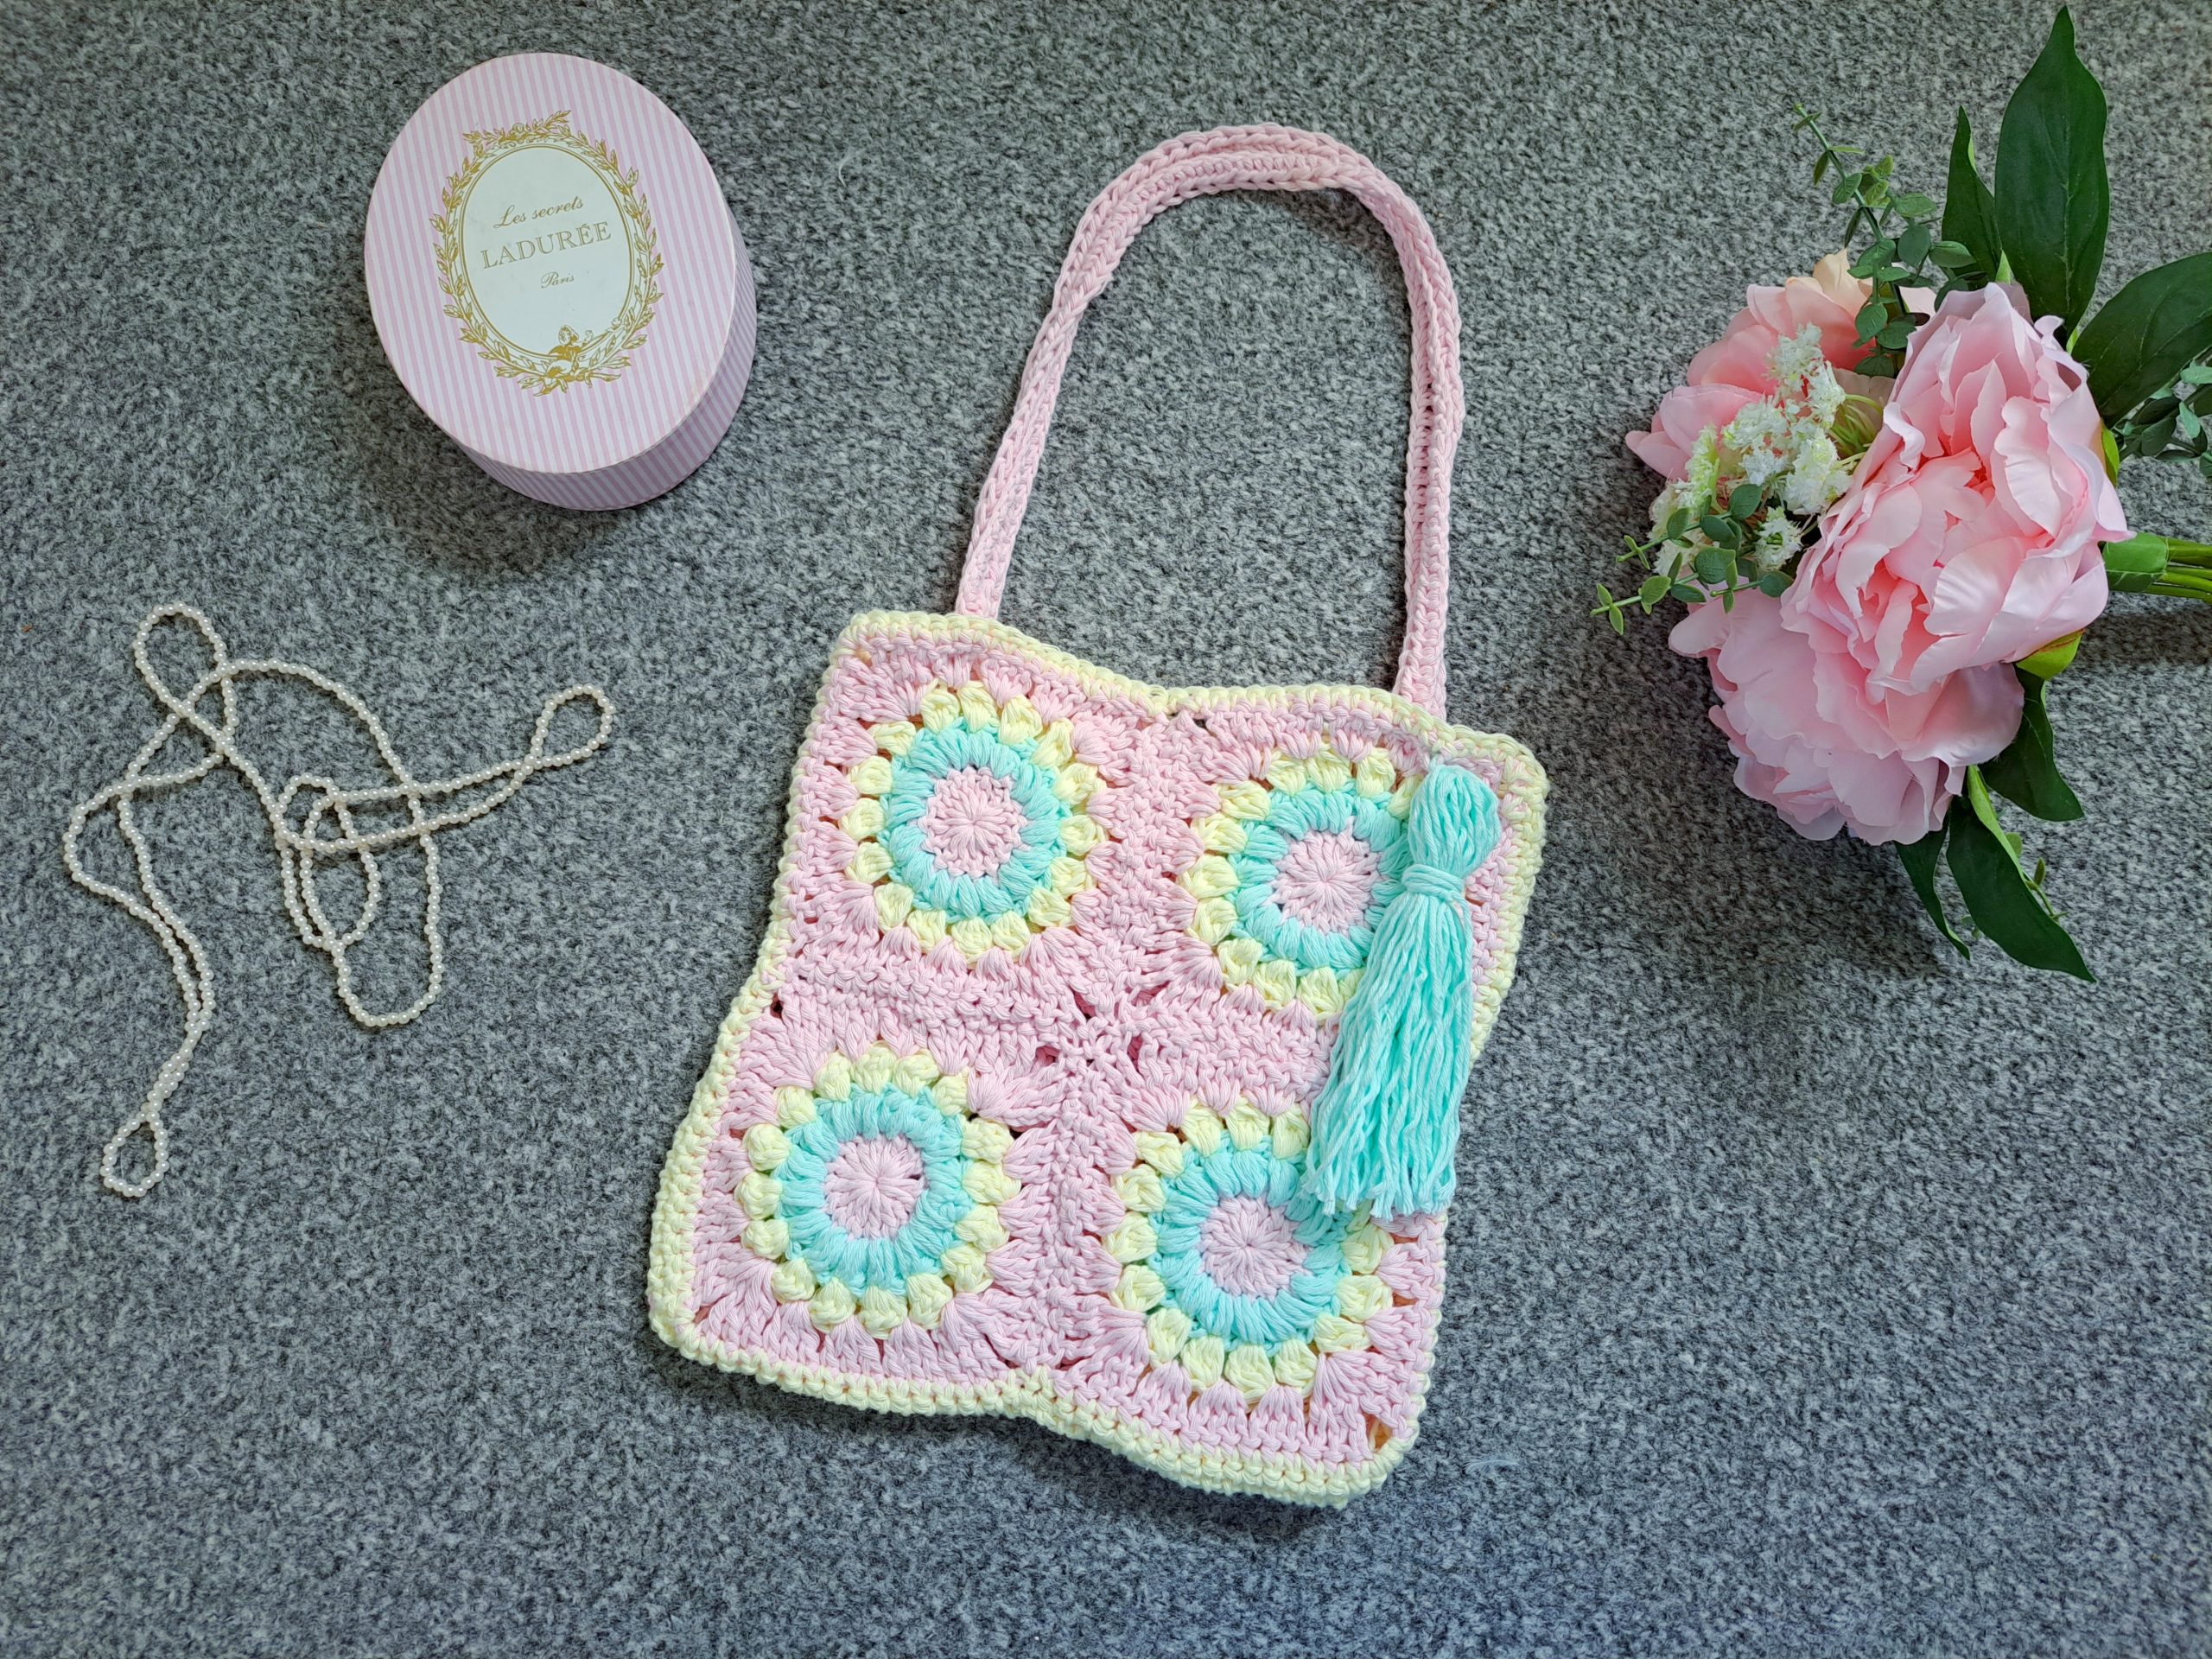
Hi everyone, this week I am bringing to you this crochet Sunburst Granny Square Bag free pattern. I am so pleased with how this Boho crochet project has turned out! Indeed, I love Boho bags, and this new design is no exception. I really enjoyed working on every step of this project, and I hope you do too!
The video tutorial for this project can be found here:
Crochet Sunburst Granny Bag Free Pattern: The Inspiration
For a long time I have been wanting to crochet a Sunburst Granny Square bag. I crocheted this feminine tote bag a couple of weeks ago, and I love it so much! However, I still need to line it before using it. I will probably be lining this new Sunburst Granny Square Bag at the same time, and to be honest, I really fancy lining these bags with a silky fabric.

Before this project, I have to admit I had never created a single project using the Sunburst Granny Square. Indeed, even though I love these Granny Squares, I had never had the time in recent months to learn a new type of Granny Square. This pattern is my very own, I am proud to say that I have practiced quite a bit over the last weeks to come up with this final version.
Crochet Sunburst Granny Bag Free Pattern: An Easy Project
Last year I crocheted The Sweet Sixteen Boho Bag, which is based on a “solid” Granny Square pattern. This pattern has been relatively popular, and I really wanted to crochet another Boho
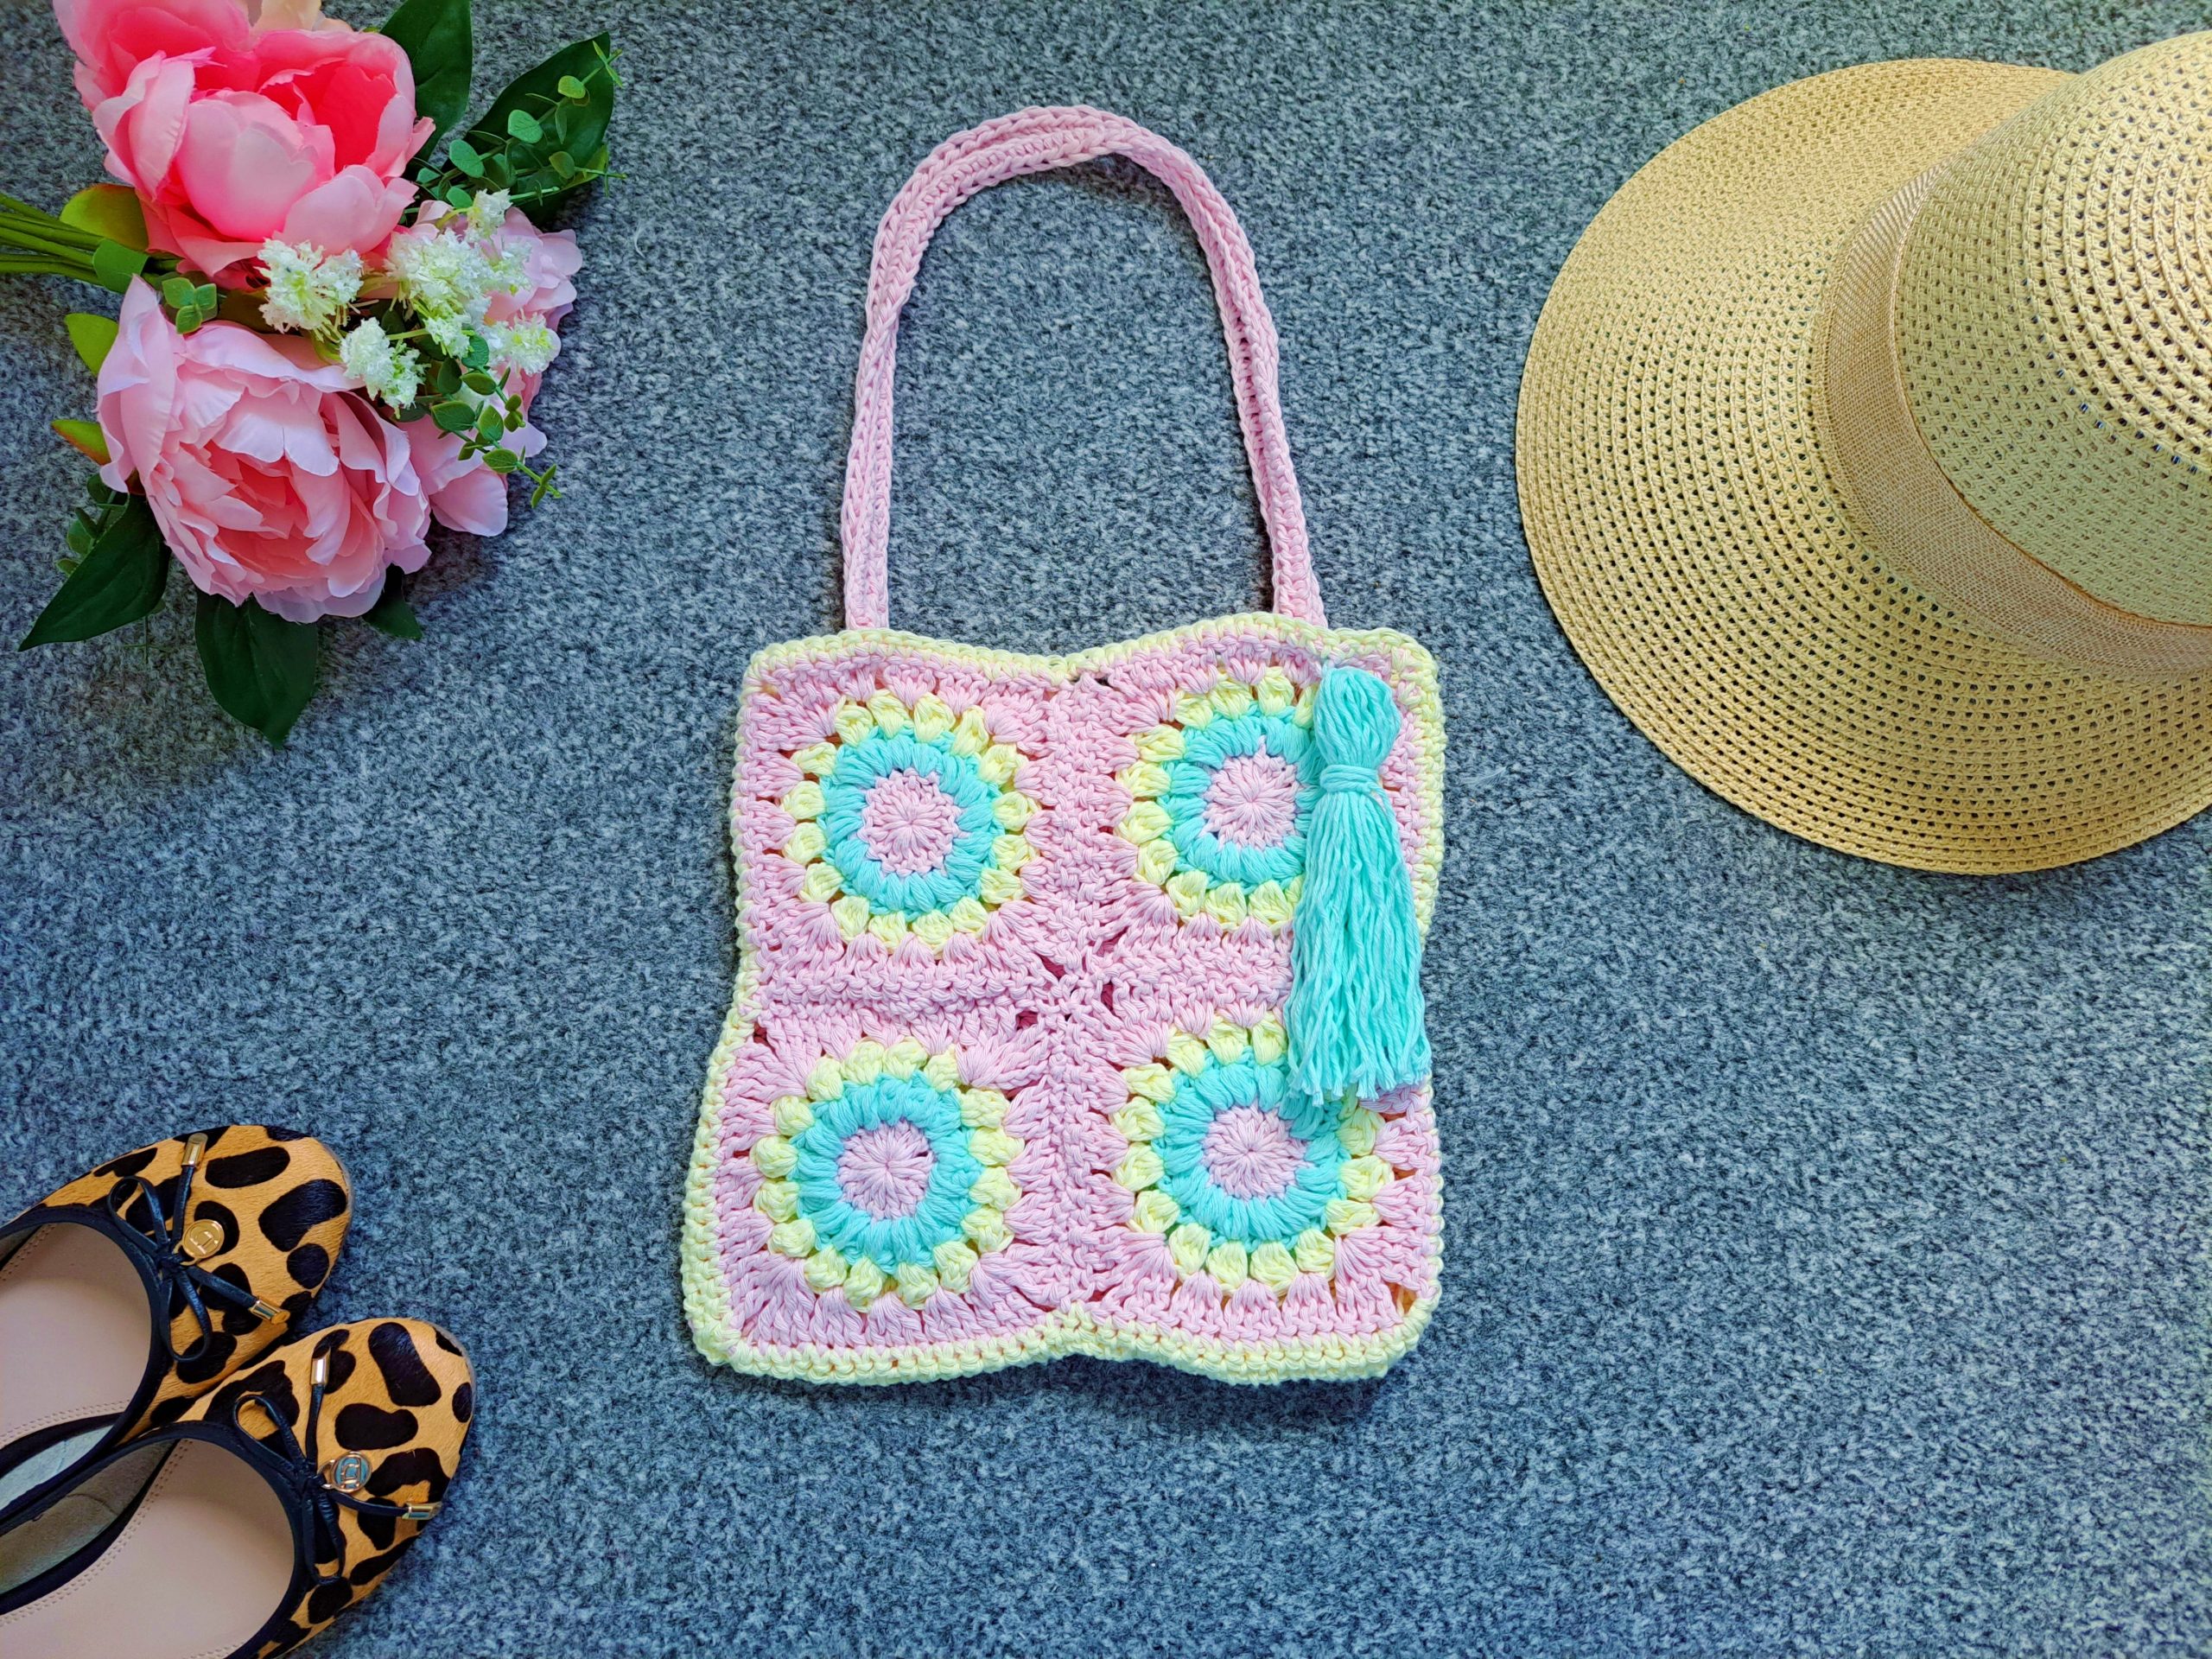
Summer bag. I have to admit, I am so pleased with the end result. I love the colors, I love the design, and I love the little tassel too! This new bag will definitely be a staple in my wardrobe, and I will be buying some fabric (probably tomorrow) to line this project with. Let me know if you like this project as much as I do. One thing I know for sure is that I will be making many more crocheted Sunburst Granny Square projects!
I am also planning to release a stand alone crochet tutorial and pattern explaining the Sunburst Granny Square. This is such a lovely pattern! I have become obsessed with it, and I am itching to crochet another bag using this design, so watch this space! I am thinking about a more neutral toned bag, maybe featuring fringes and tassels too.
Crochet Sunburst Granny Bag Free Pattern: The Yarn
For this project, I used Paintbox Cotton Aran yarn. This is a beautiful and vibrant yarn that I am absolutely in love with. I had never used this yarn before, but I know for certain I will be using it again. I used three different shades which I find look absolutely stunning together. These colors are pastel, yet very vibrant. Once crocheted, these colors look absolutely stunning together. I know I just love this bag so much, and am certain of using it throughout the Summer, especially on beach days. Let me know if you enjoy it as much as myself. Also, I absolutely adore how Boho this project looks.
As said above, I had never used Paintbox Cotton Aran yarn before. It is a great yarn for a bag I find, as it is soft, yet dense, perfect for a project such as a bag. Indeed, I generally prefer cotton yarns for bags and hair accessories for example, as I find that cotton does not stretch out as much as acrylic or wool yarn. Cotton can be quite stiff and resistant, which is what I am looking for in a bag. Cotton is also beautiful and natural, and has a raw quality that looks perfect for Boho clothing and accessories.
This bag will be perfect for festivals and Coachella! I can’t wait to showcase my crochet accessories and items this Summer, especially my newest hairband design from a few months ago. I am so excited to be wearing all of my crochet designs. And I am even more excited to be designing many more crochet pieces that have a Boho hippie vibe!
Let me know what you think of this project in the comments section. I always love to hear from you, and hope you enjoyed this project!
Connecting with you
I would like to take a moment to thank every single one of you, for supporting me and my crochet journey. Indeed, I absolutely am so touched by all your messages, comments, and every person who has become a patron of my work through Patreon. Thank you!
I love connecting with my Crochet Community through my blog and Social Media. You can find me on Youtube, Instagram, and Pinterest. I would love to connect with you on these platforms.
You can also join my private Facebook group to connect.
Join my exclusive and fun Patreon community, a haven for feminine crochet and so much more!
You can subscribe to my weekly newsletter here, where you will be updated every time I release a new free pattern and video tutorial.
Crochet Sunburst Granny Bag: The Pattern
You can purchase the ad free, large print, PDF pattern from my Etsy shop here: Crochet Sunburst Granny Square Bag PDF Pattern
You can purchase the ad free, large print, PDF pattern from my Ravelry store here: Crochet Sunburst Granny Square Bag
Level: Easy +
Gauge
Gauge is not crucial for completion of this project. Please refer to individual Sunburst Granny Square measurements for gauge information.
Size of each Sunburst Granny Square:
4,5”x4,5” (11,5 x11,5 cm)
Size of finished project (excluding straps):
10” (25,5 cm) x 9,5” (24 cm)
Notes:
I will be using US terms (British terms in brackets)
Materials
- 1 skein each of Paintbox Cotton Aran yarn in shades:
650 Candyfloss Pink
621 Banana Cream
670 Macaron Green
- A 4 mm crochet hook
- A 4.5 mm crochet hook
- A pair of scissors
- A tapestry needle
- A book measuring about 6” (15 cm) across to create tassel
- Sewing pins (optional)
Abbreviations
Ch : chain
Sl st : slip stitch
St: stitch
Sk: skip
SC: Single Crochet (UK Double Crochet)
DC: Double Crochet (UK Treble Crochet)
TC: Treble Crochet (UK Double Treble)
EOR: End of round/End of row
Pattern begins here
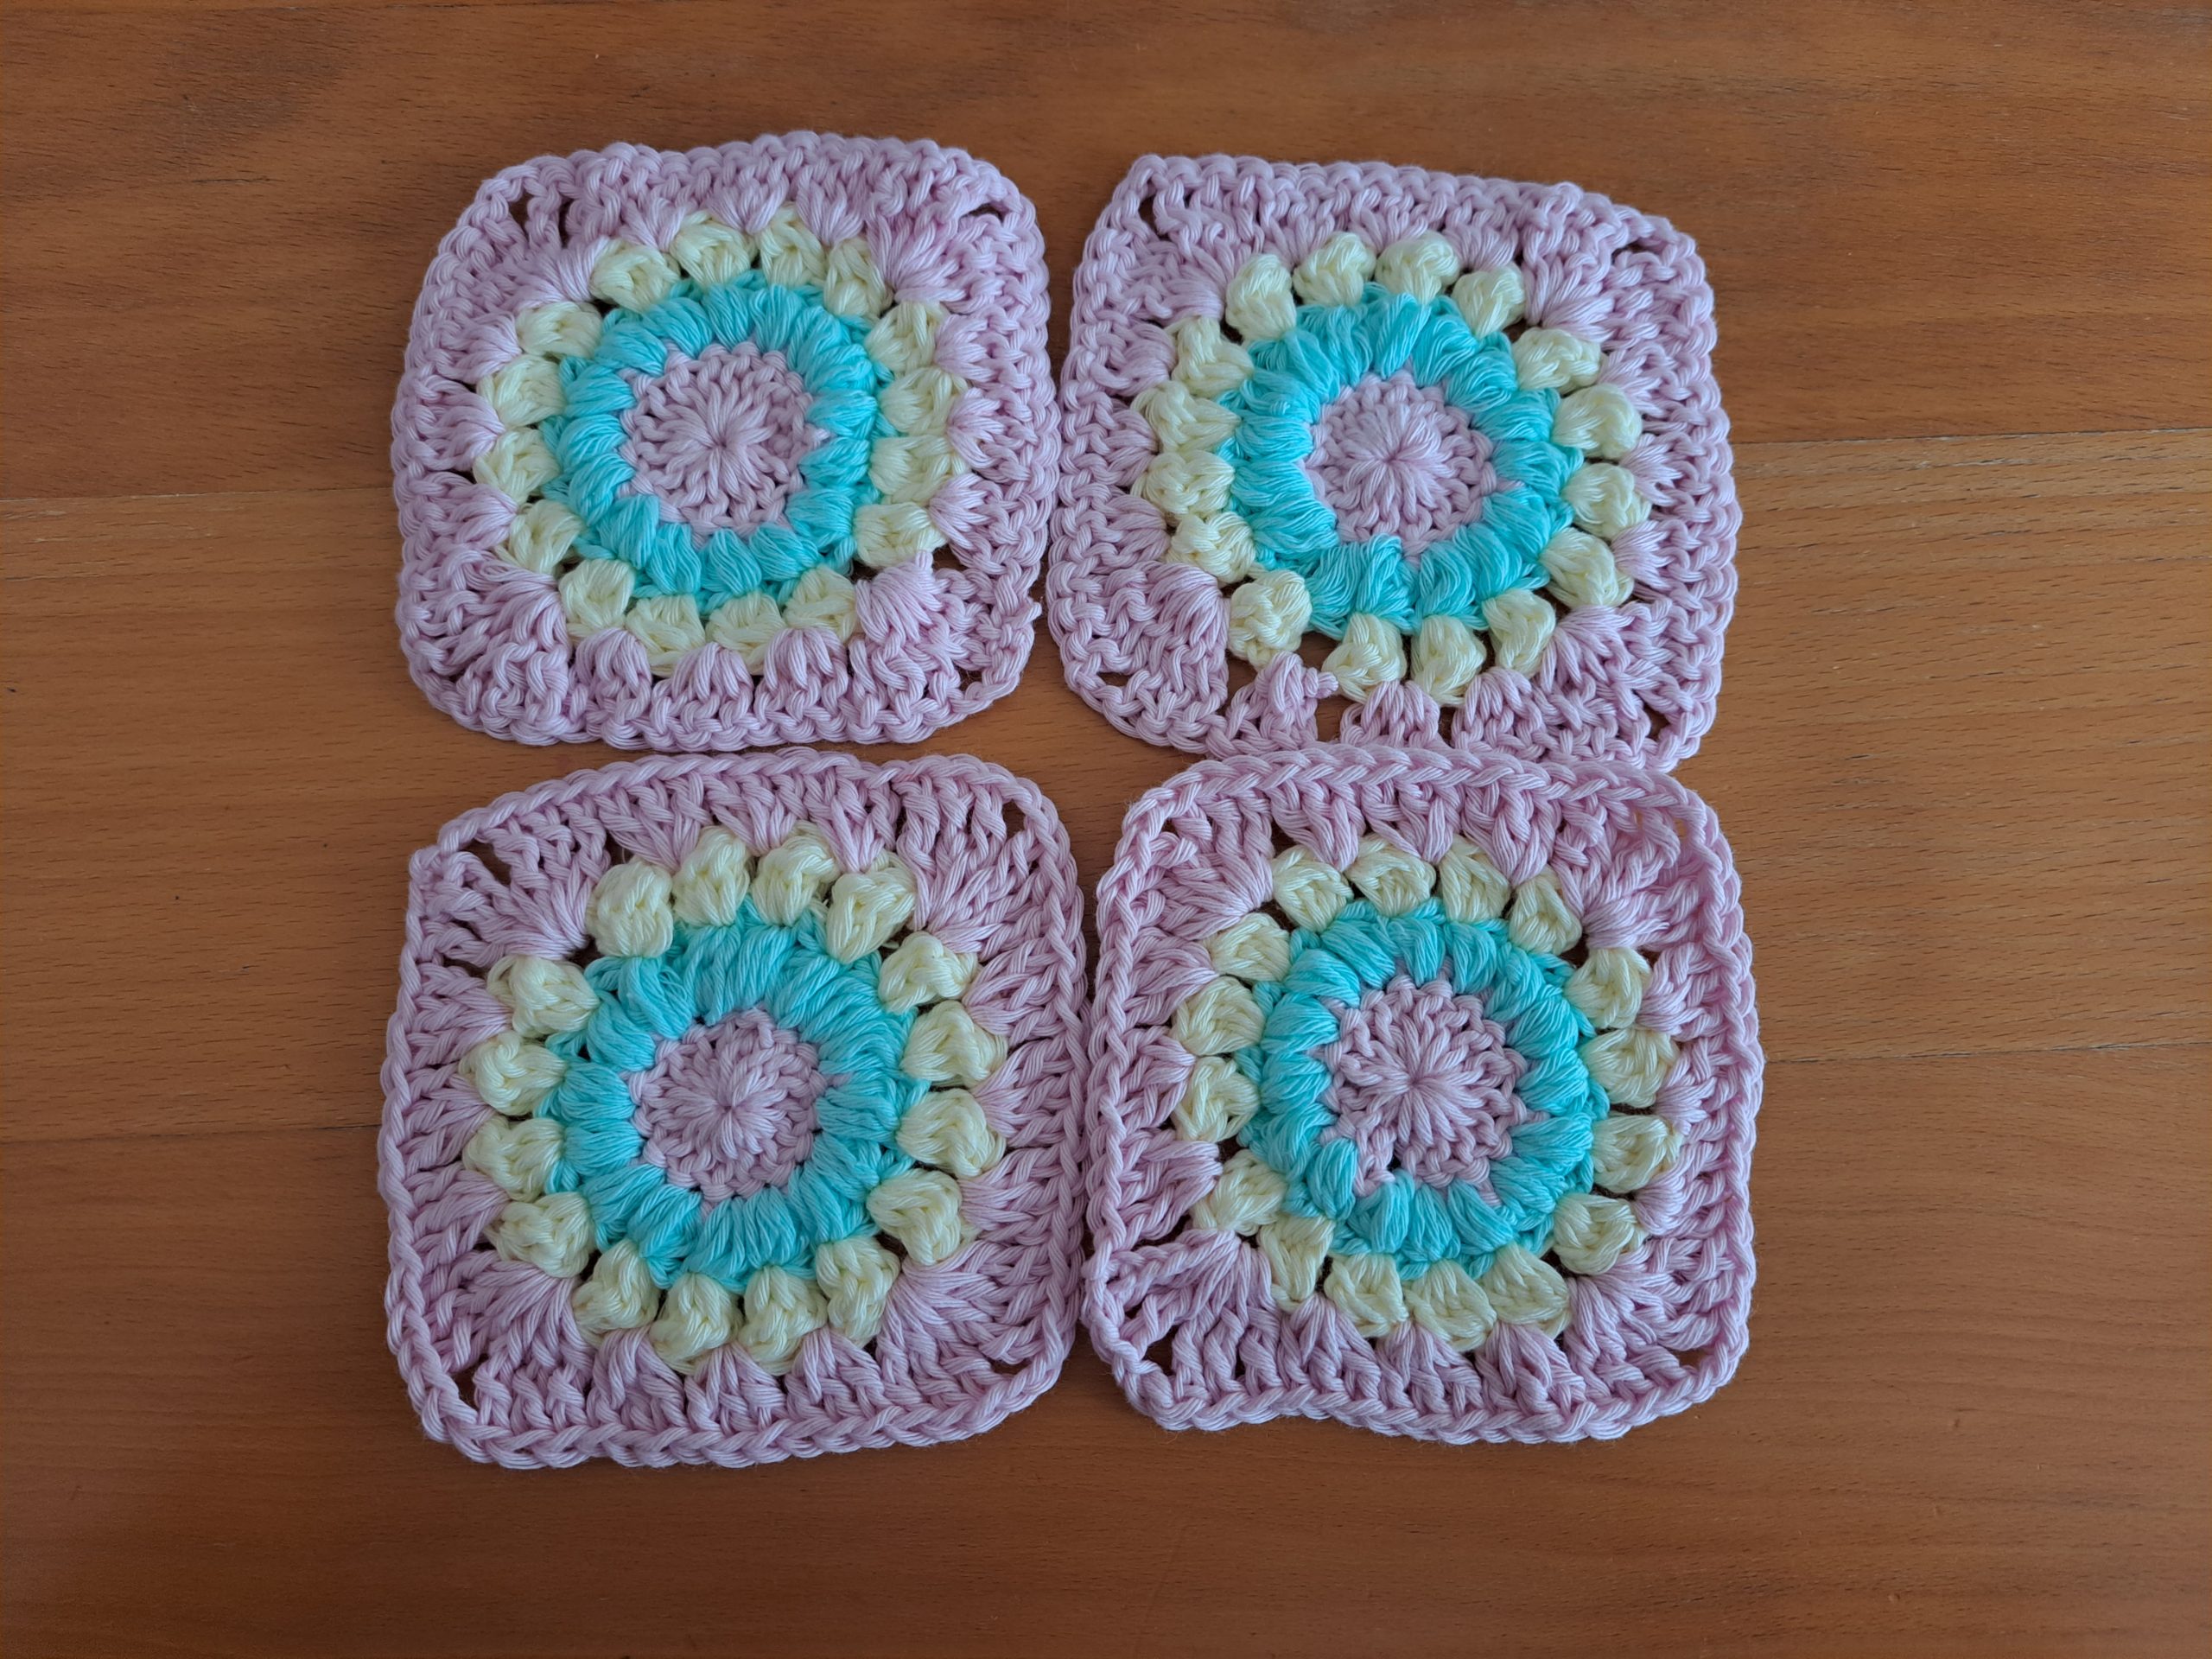
For this project, we will start by making 8 individual Sunburst Granny Squares in the three different colors indicated above, and as explained step by step in this pattern. Once all these squares are crocheted, we will be sewing them together to create the front and back panels (identical).
Once these three elements are assembled and a SC border is added to each panel, we will sew them together as explained step by step in this pattern. We will then crochet the two identical straps directly onto the assembled bag.
The tassel is then created and added to the finished bag.
If you wish to line your crochet bag, as I will be doing, please refer to my “how to line a crochet bag” video tutorial which you can find here: https://www.youtube.com/watch?v=GdABlIhau0c
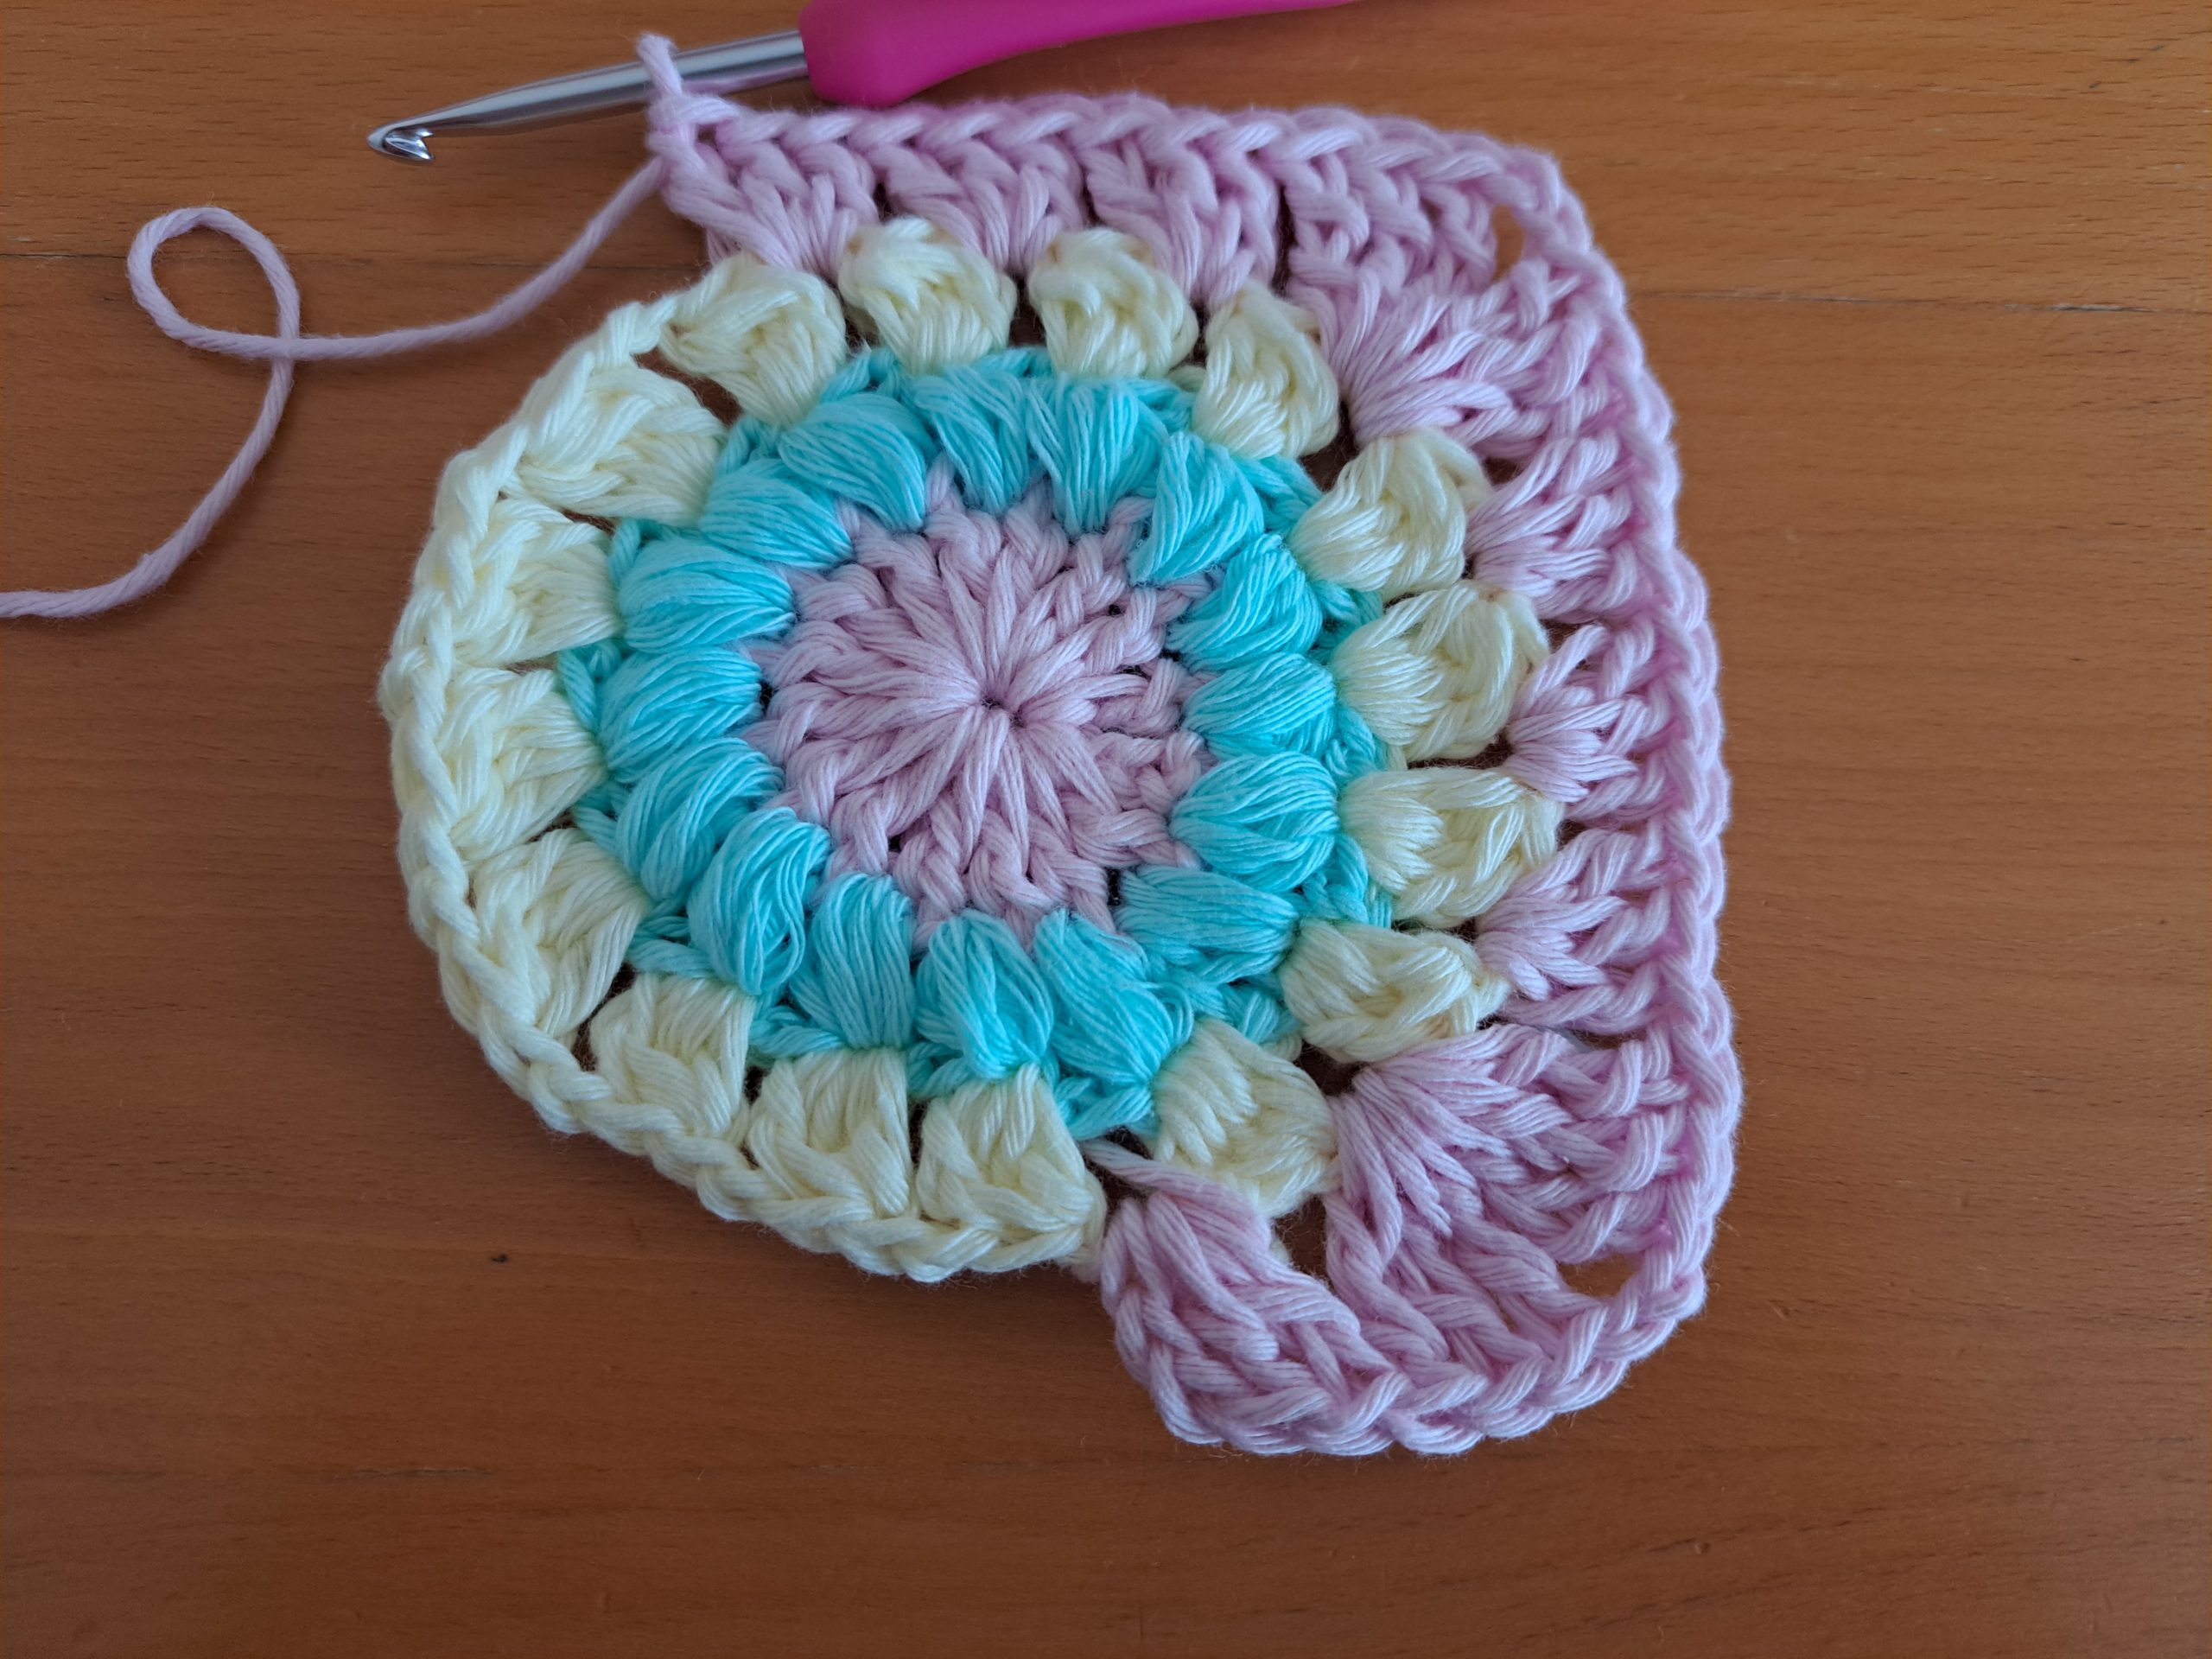
Sunburst Granny Square (make 8):

You will be using the 4 mm crochet hook for this part.
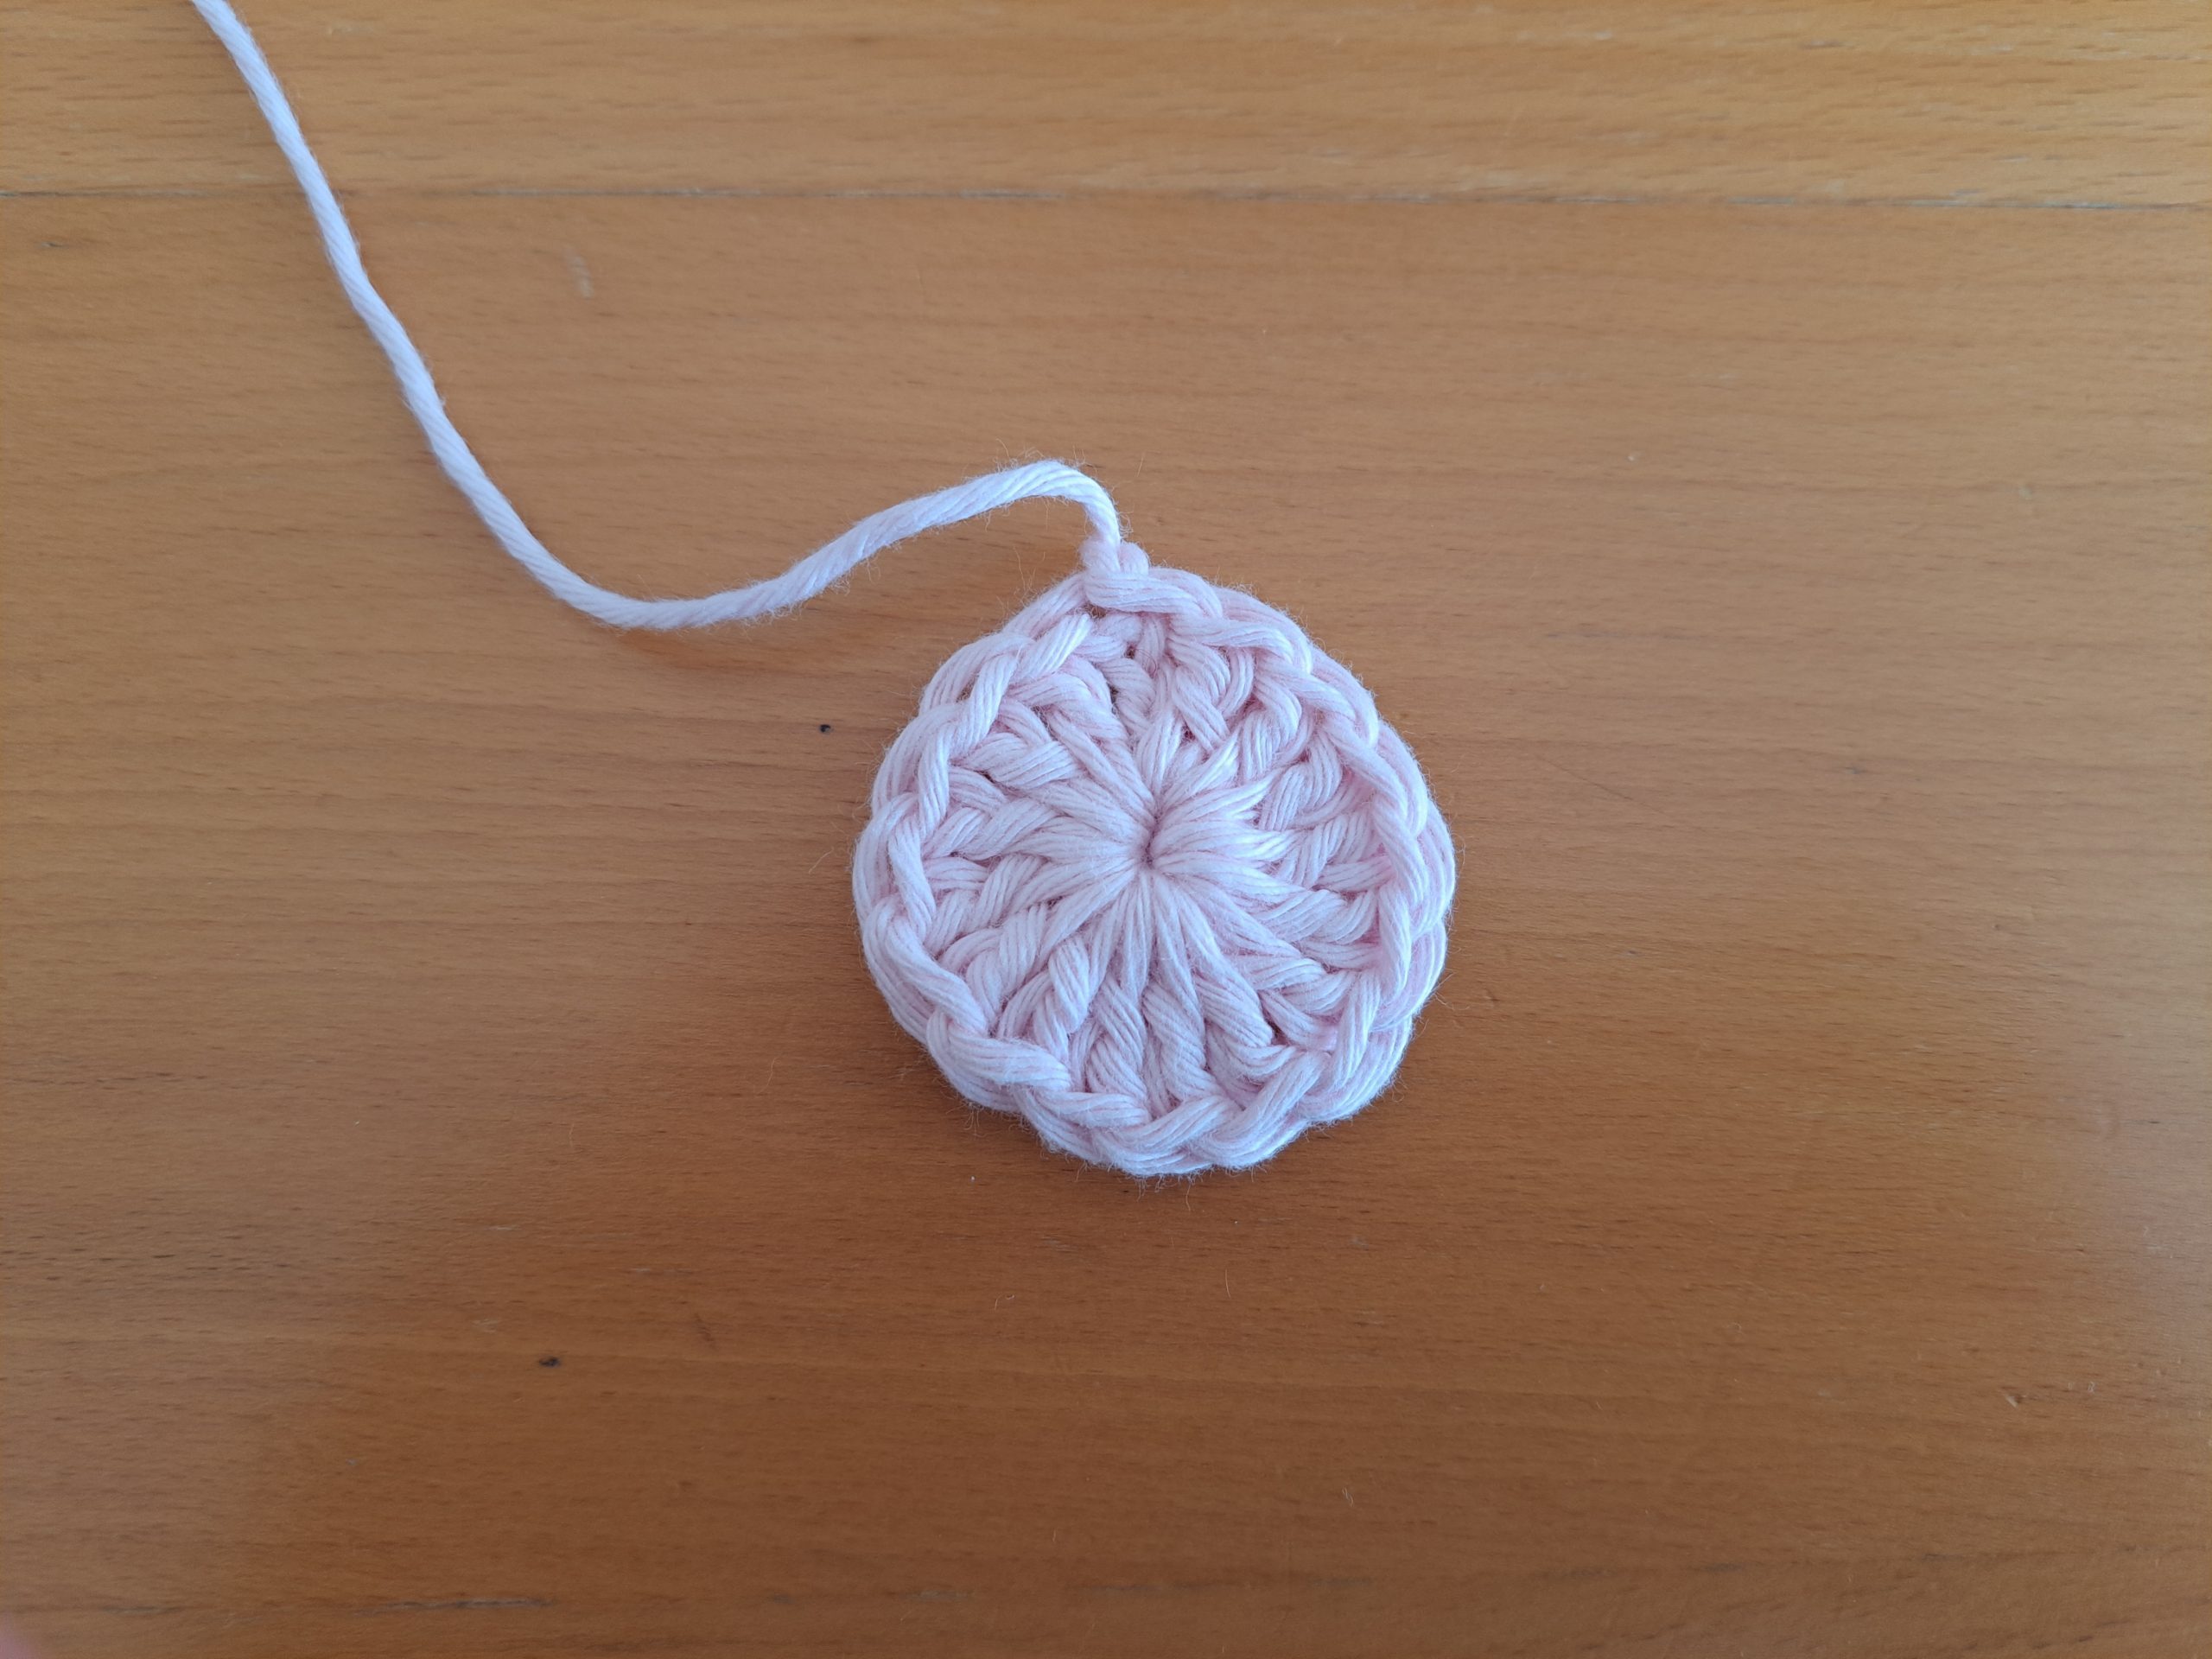
With shade Candyfloss pink, make a slip knot.
Ch 4, sl st to 1st chain to create a circle into which we will be working.
Note: you can use the magic circle to begin if you prefer.
Round 1:
Ch 3 (=DC), place 15 DC within the center circle (=16 DC total). Please note you will need to fasten in loose end as you place your 15 DCs around circle, so that when you have finished placing your 15 DCs and you pull on loose end, it closes center circle.
Fasten off color Candyfloss pink.
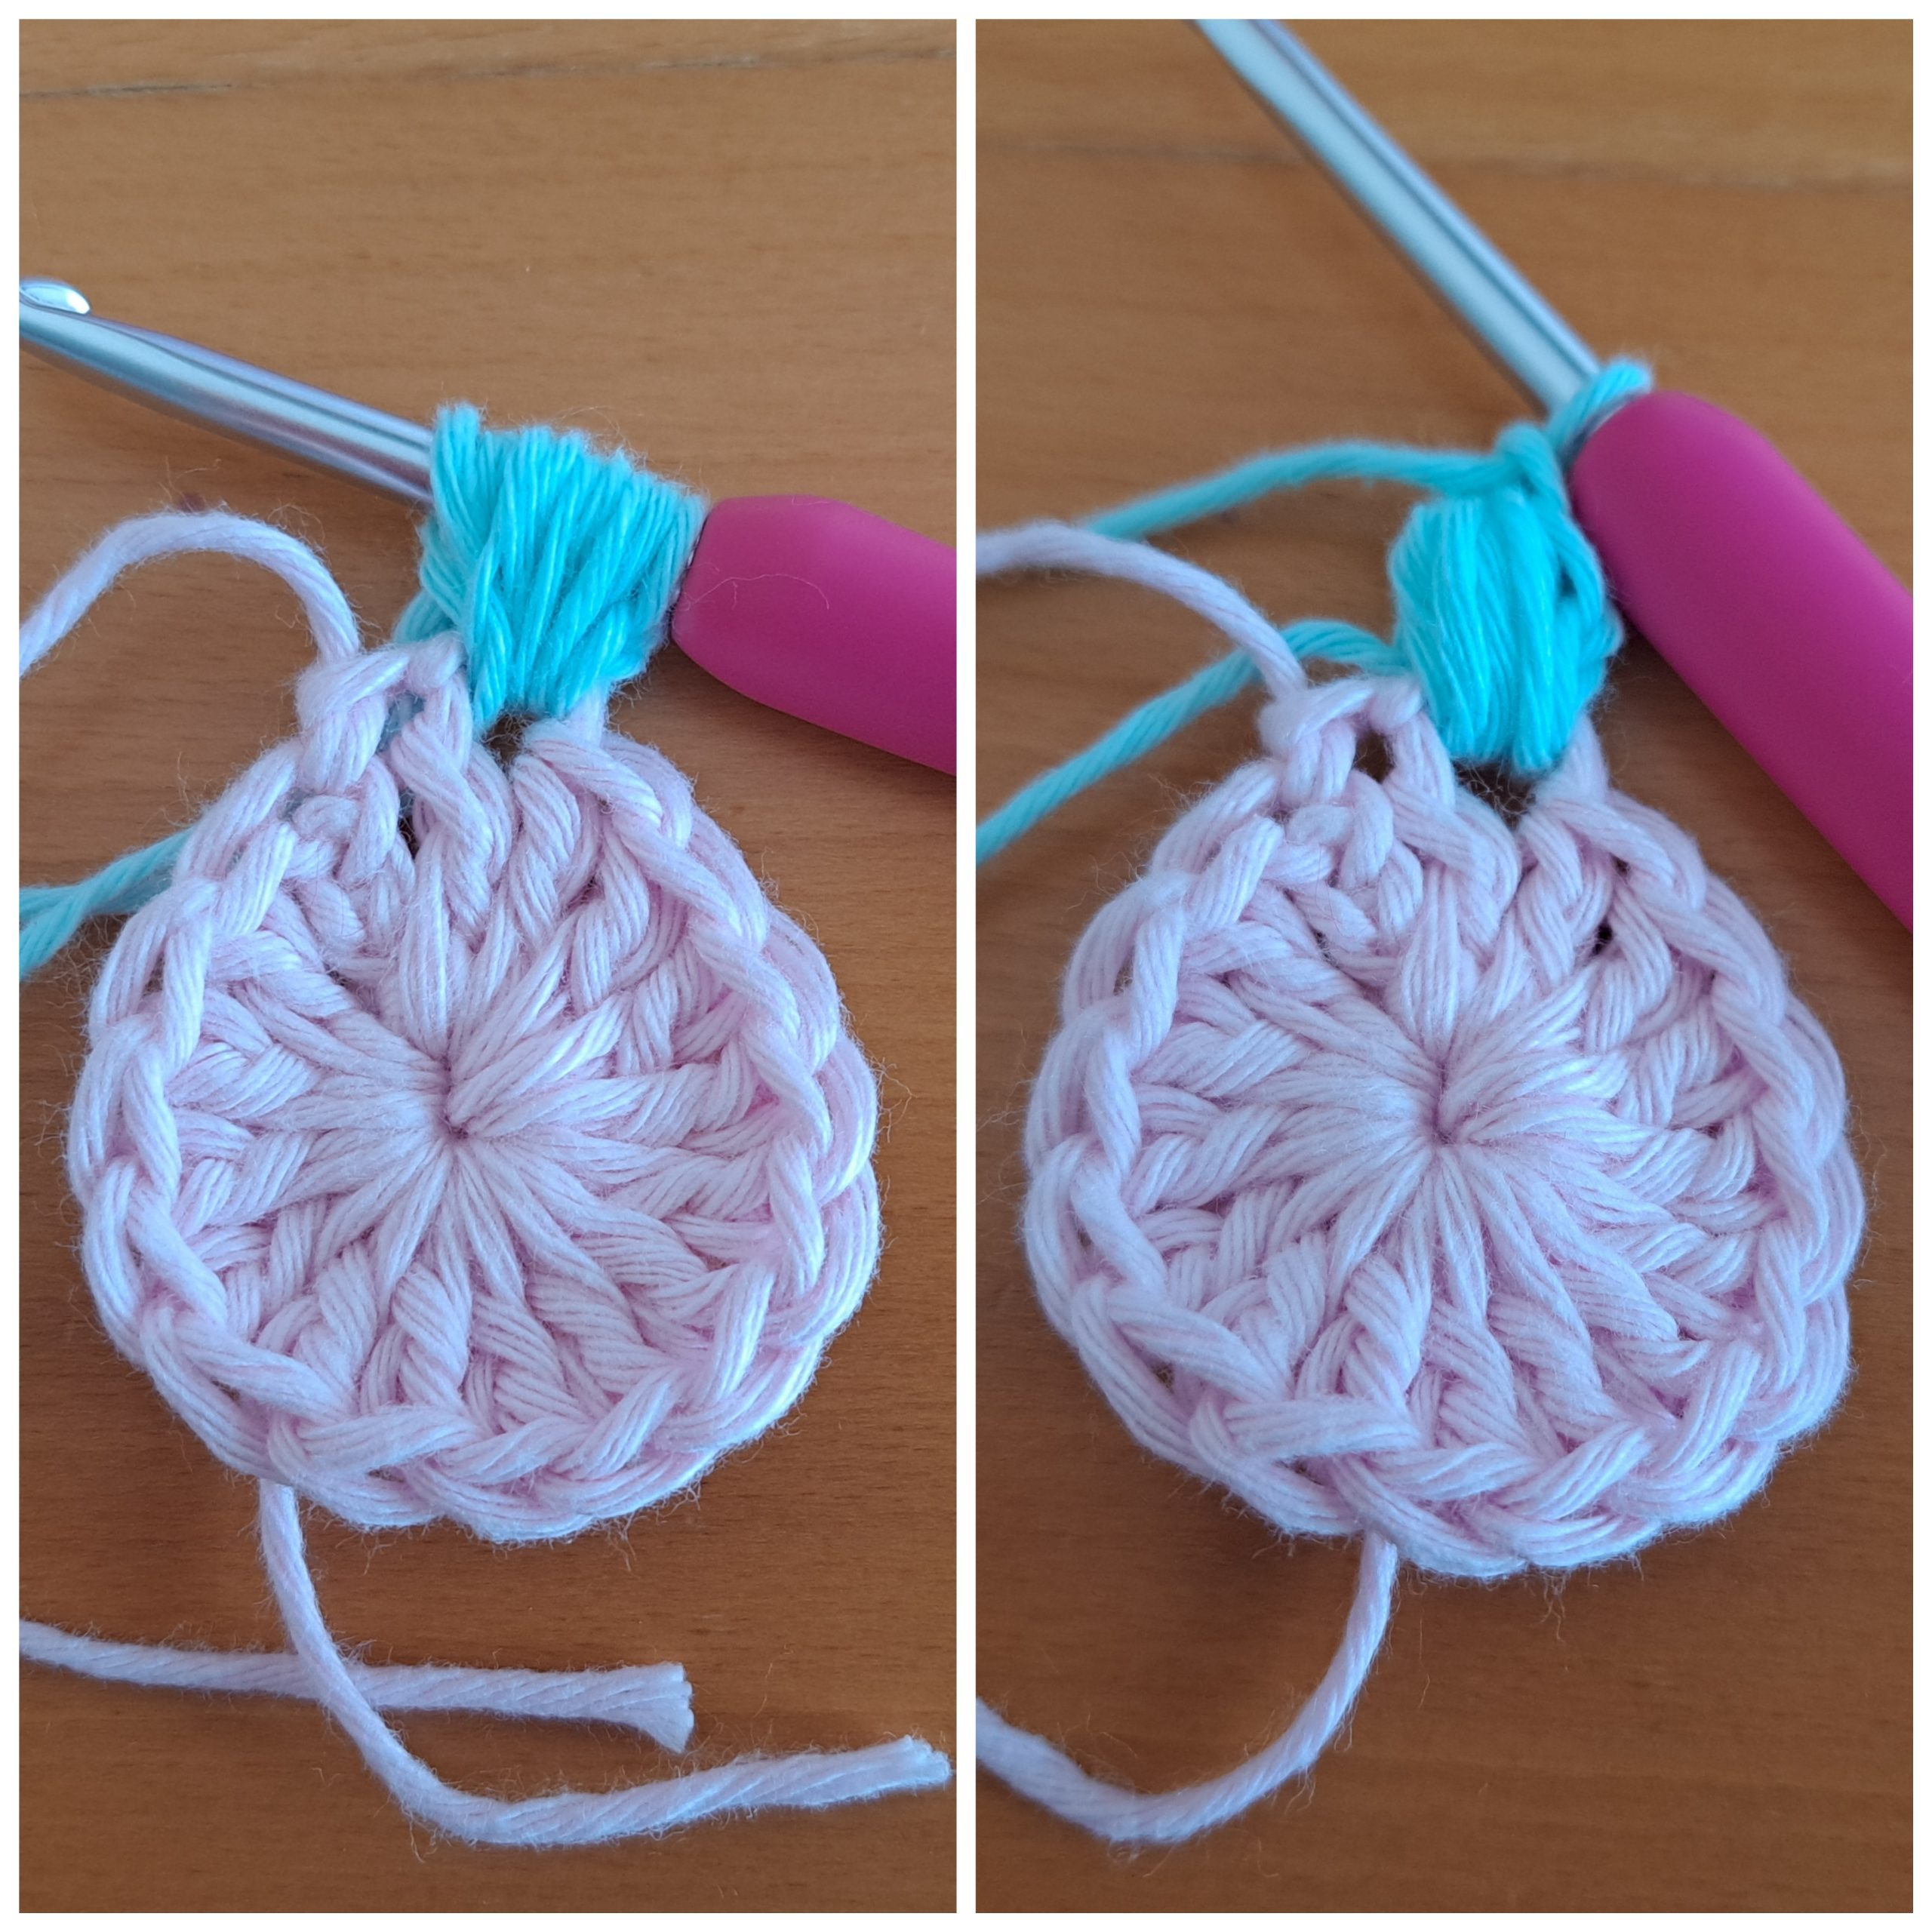
Round 2:
Attach color Macaron Green to any stitch.
Ch 1 (does not count as stitch throughout), * yarn over, go back into stitch, pull up a loop, and pull yarn up gently to create a “height” to the stitch * 4 times. Now yarn over and go through all loops on hook to create petal. Ch 1. (=1st petal)
Now to create next petal throughout round (there will be 16 petals total):
Yarn over, go directly into next stitch, pull up a loop and pull yarn up gently to create a “height” to the stitch 4 times. Now yarn over and go through all loops on hook to create a petal, ch 1.
Repeat this process into each and every stitch from previous round (=16 petals).
Once you finish last petal, sl st to first petal to close off round. Fasten off color Macaron Green.
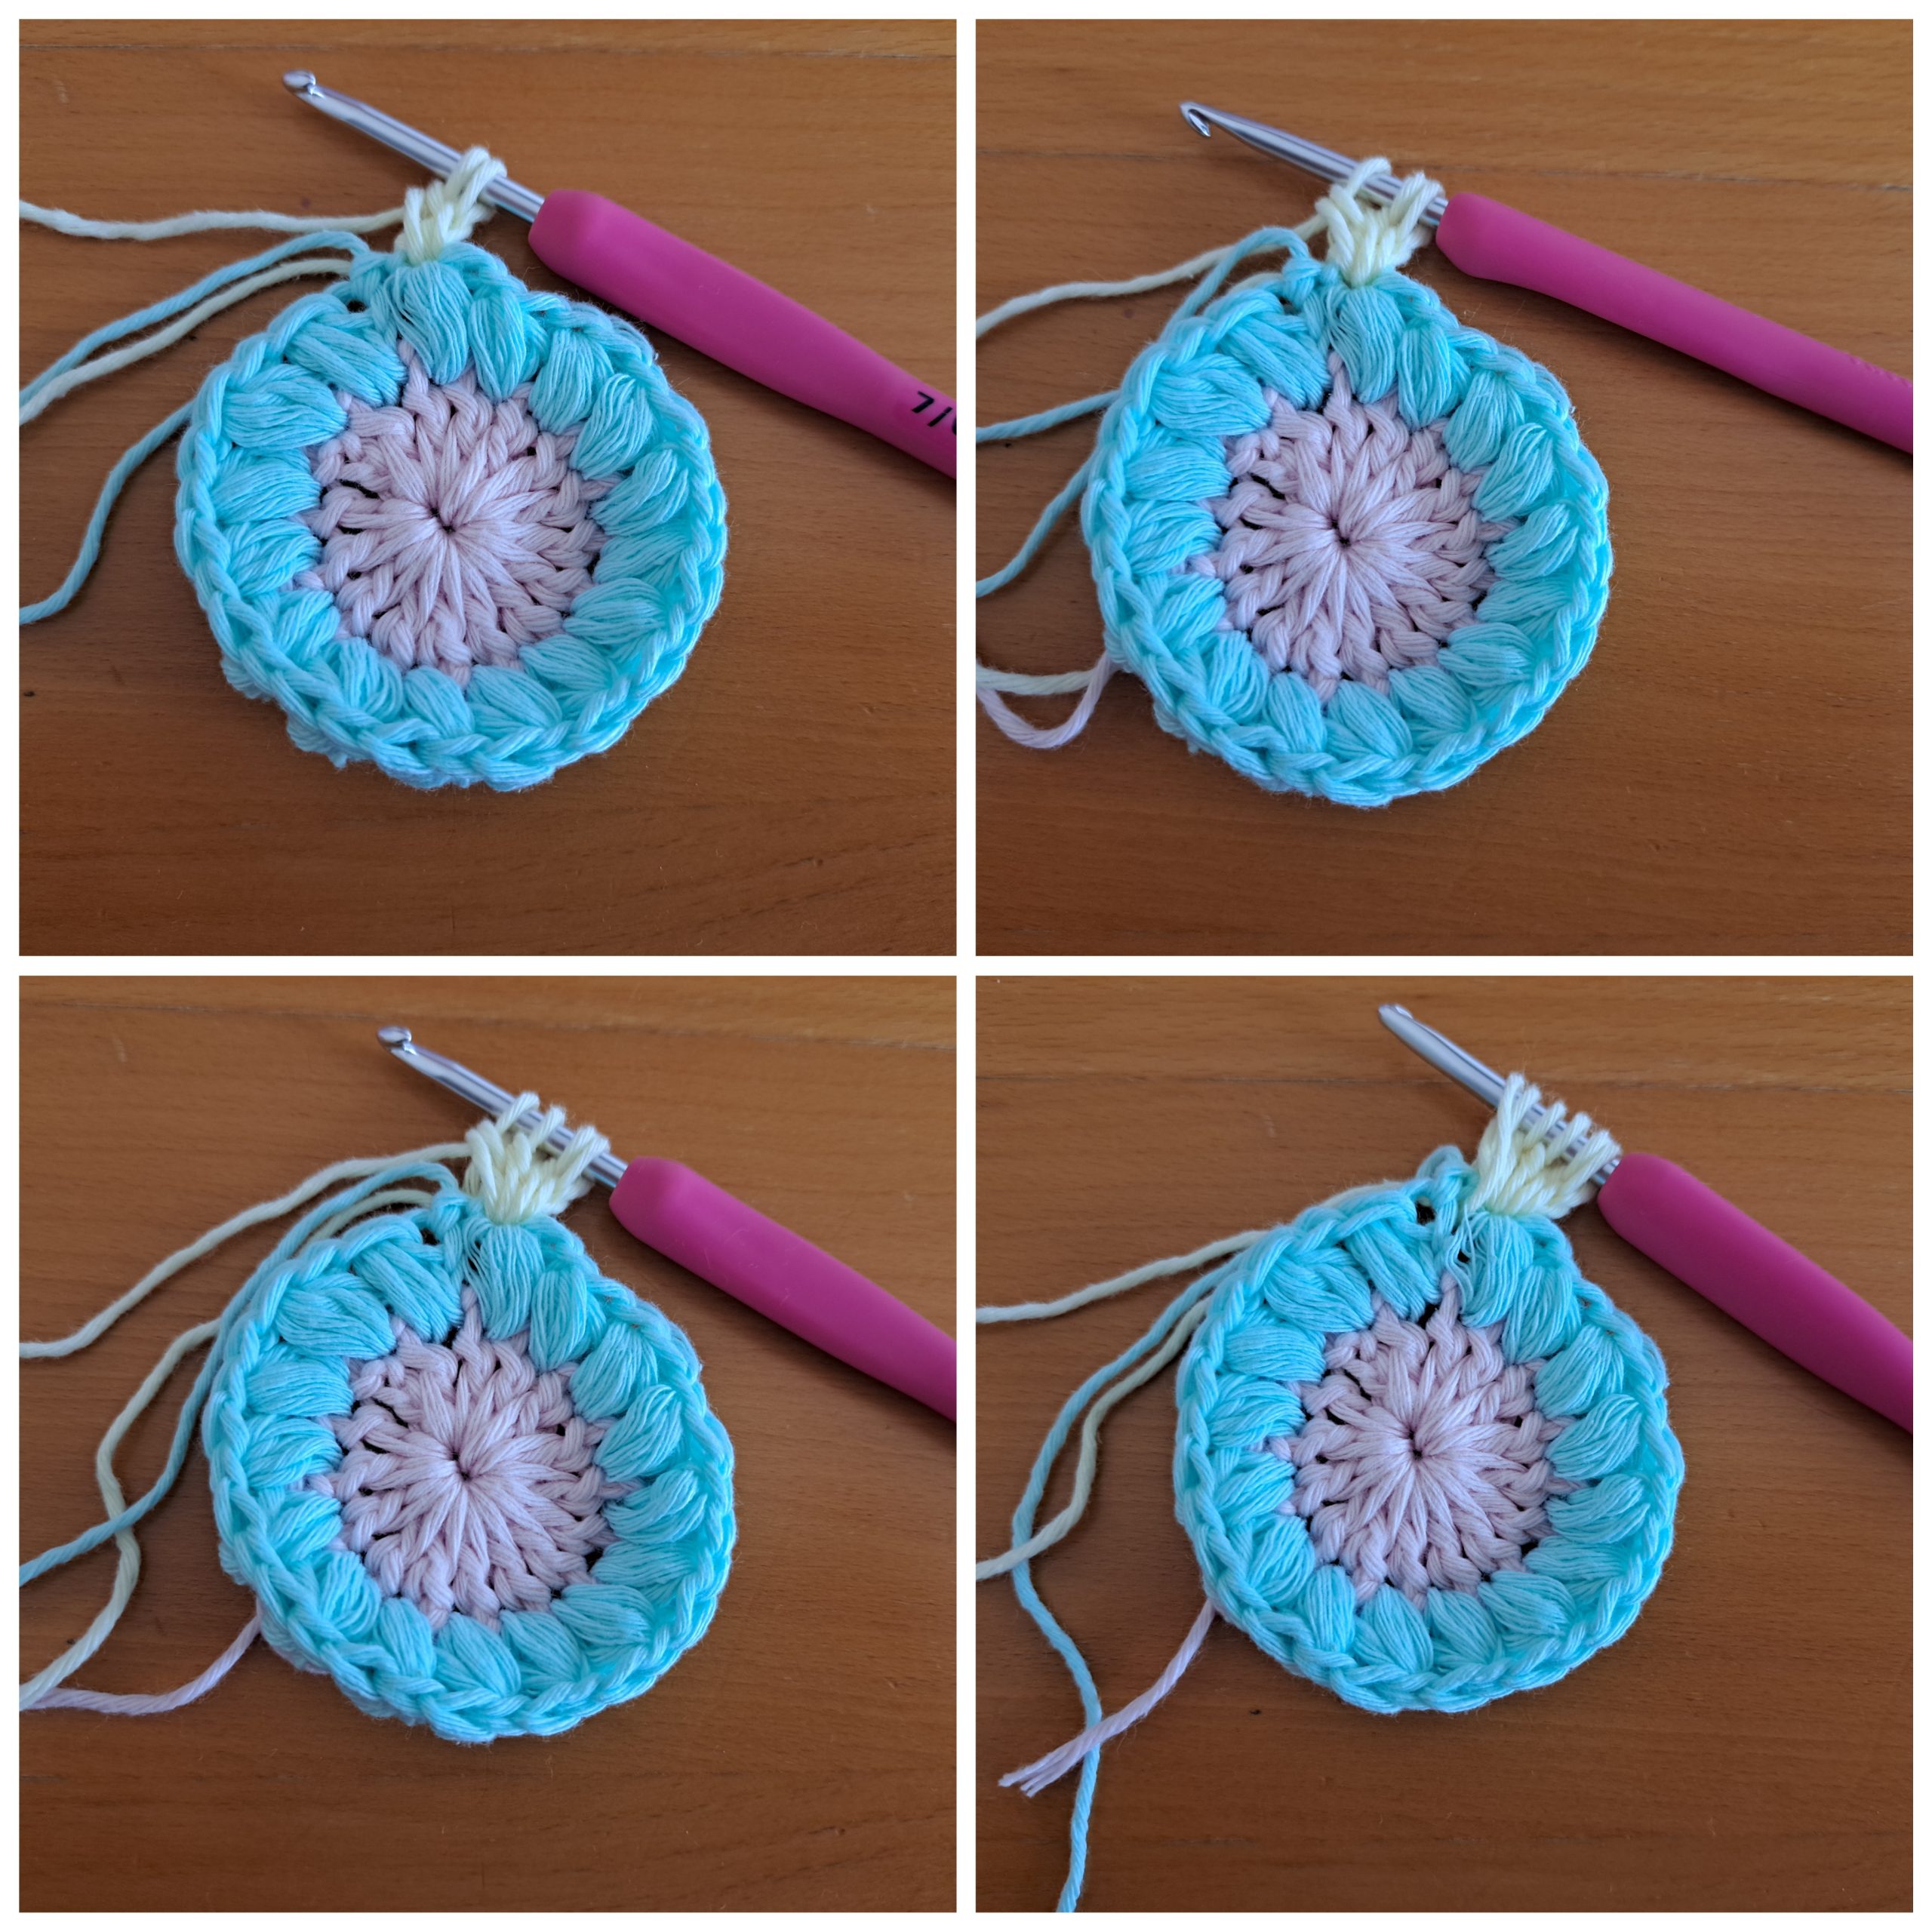
Round 3:
Fasten on Banana Cream yarn on top of any petal from previous round.
Note: We will be placing this round’s stitches directly on top of each petal from previous round.
Ch 1, * yarn over, go back into st, yarn over, pull through 2 loops * 3 times; yarn over and pull through all loops on hook, ch 2 (this is your first petal).
Go directly into top of next petal from previous round; * yarn over, go back into st, yarn over, pull through 2 loops * 3 times. Yarn over and pull through all loops on hook, ch 2 (2nd petal).
Repeat this process 14 times until you have 16 petals total. Sl st to top of 1st petal to finish off round. Fasten off shade Banana Cream.
Round 4:
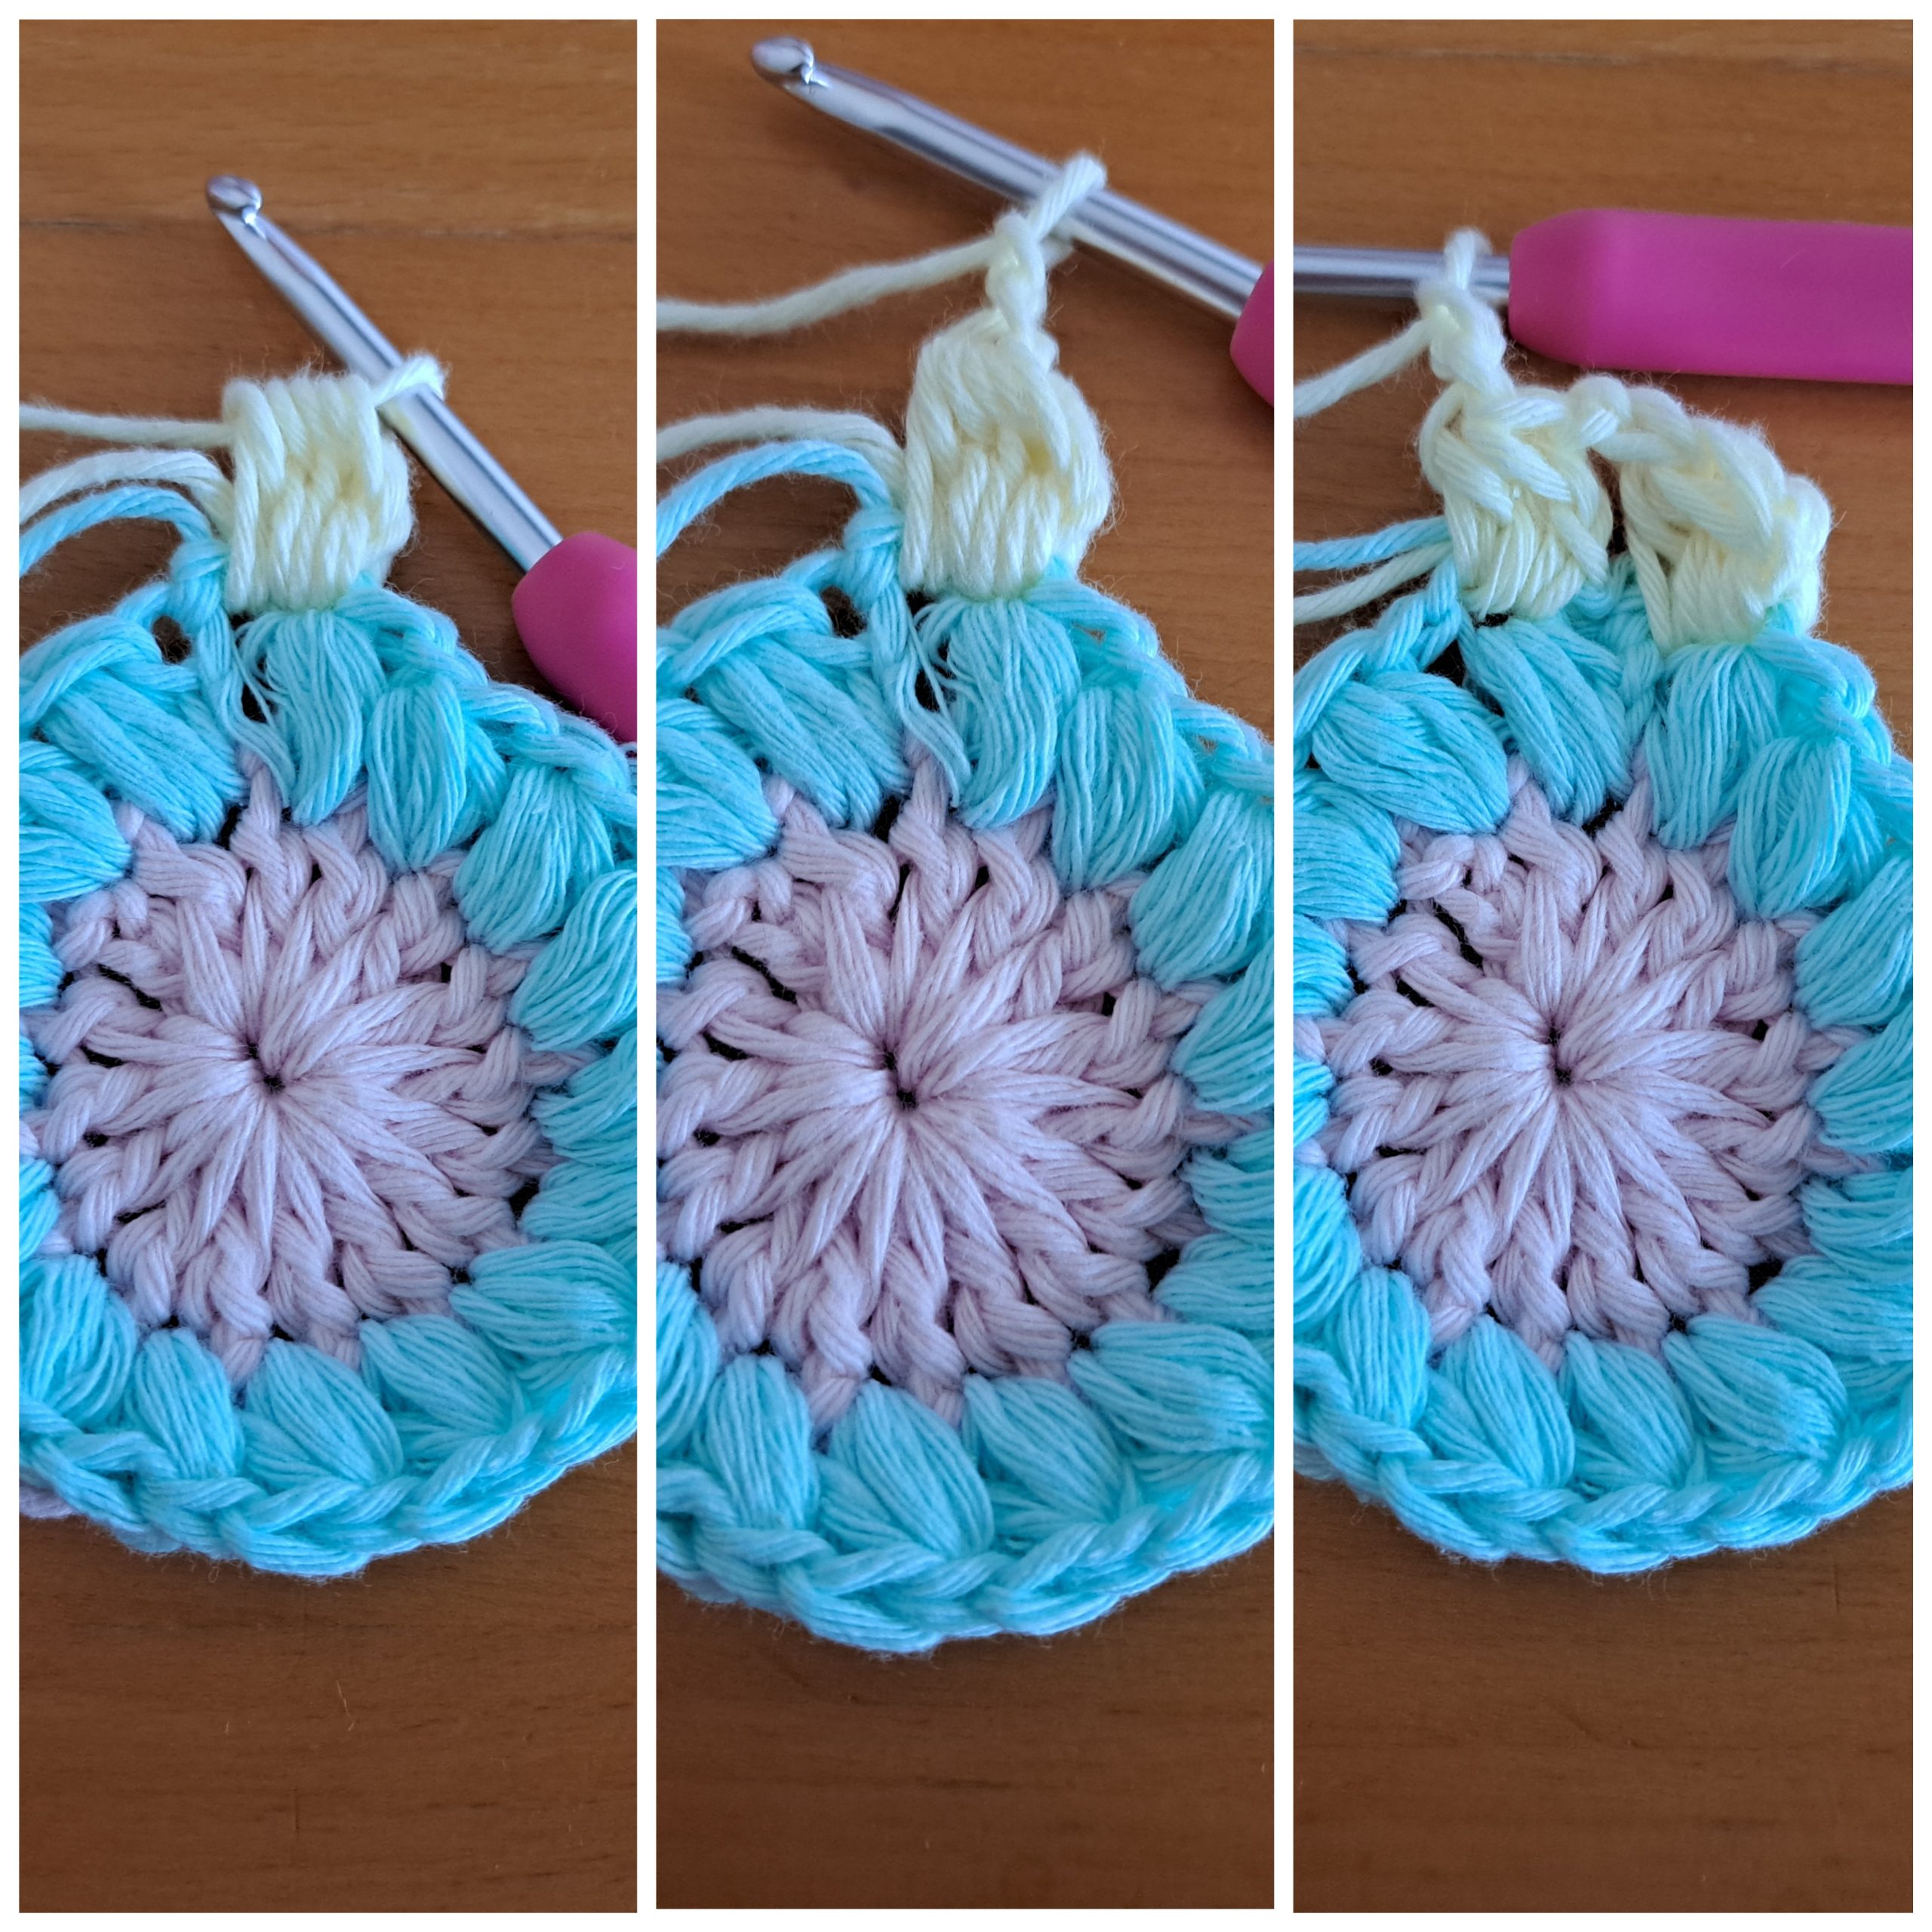
Attach Candyfloss pink yarn to any space between petals from previous round.
Ch 3 (=DC), place 2 DC in same space (=cluster of 3 DC); [sk petal and go directly into next sp with 3 TC, ch 2, 3 TC (=corner stitch), sk next petal and place 3 DC into next 3 spaces] 3 times; sk petal, go directly into next sp with 3 DC 2 times, sl st to 1st ch 3 to close off round.
Tidy up all loose ends.
Create front and back panels
Place 4 Sunburst Granny Squares as follows (see photograph), on a flat surface:
With tapestry needle and piece of pink yarn, sew the 4 squares together using the mattress stitch.
Repeat process for the back panel.
Edging around front and back panels
Create a SC edging all around the front and back panels.
Attach yarn at one corner of the front panel, ch 1 (does not count as a stitch).
Round 1: SC, ch 2, SC into corner space; place a SC into next st, and every stitch across, going around the 4 sides of the front panel. Make sure you place 1 SC, ch 2, 1 SC into each corner (4 corners total).
Fasten off, leaving long tail to sew bag together.
Repeat process on back panel.

Sew bag together
Choose your right and wrong side. The right side is the side which will be facing the outside of the bag, so this has to be the neater side of the front and back panels.
Place both squares on top of each other on a flat surface, making sure it is inside out.
Start sewing your bag by either using the long tail left on the top corner of your bag (either corner is fine), or if you do not have a long tail left for sewing, attach a piece of yarn to any top corner of bag.
Start sewing down the seam using the mattress stitch, and sew all the way around the bag. Sew all the way down the first side, then across the bottom, and then up the other side of the bag. Once you reach the top corner of the bag, fasten off yarn and tidy up all loose ends.
Crocheting your straps onto the bag
Once all the parts of your bag have been sewed together, make sure your bag is still inside out so as to start crocheting your straps directly onto the bag.
We will start crocheting the first strap of the bag on the front panel (inside out).
Attach yarn to the cluster of 3 DC that is the closest to the edge of the side of the bag, at the top, on either side (near the top corner of the bag). Ch 68, and making sure you do not twist the chain, attach it to the other side of the bag. Attach the chain to the cluster of 3 DC the closest to the edge of the side of the bag at the very top (exactly opposite the starting point of chain).
Ch 2 (=HDC), HDC into next ch until eor.
Once you reach the other side of the chain, slip stitch to the cluster of 3 DC at starting point.
Fasten off.
If needed, go back into the base of each strap with a piece of yarn and tapestry needle to make sure it is very well secured to the project.
Repeat the same process on the other side of the bag/back panel for the second strap.
Fasten off, and tidy up all loose ends.
Turn your project inside out, so that the right side is now facing out.
Create tassel
With Macaron Green yarn, and book, start making your tassel.
Cut out 2 pieces of yarn measuring about 10″ each, place them to the side.
Go round your book at least 25 times with your green yarn. Once you are satisfied with the number of times you have gone around (this will be the fullness of your tassel), you will slide your wound up yarn off the book. Lay it on a flat surface, and taking one of the 10” pieces of yarn you set aside previously, insert it through the center of the wound up yarn you just created.
Tie this piece of yarn tightly at the top, so as to secure all the strands of yarn together.
Take the second 10″ piece of yarn and place it horizontally on the flat surface. Place the tassel on top of this piece of yarn, making sure that your piece of yarn is placed approximately an inch below the top of the tassel. Gently tie a knot across the tassel, then go around the tassel once again with the piece of yarn, and make a second knot at the front. Fasten off piece of yarn
Pulling gently on the wound up yarn, take your scissors and cut the bottom pieces of yarn so as to create the tassels. Make sure all the tassel pieces are equal. Trim the pieces of yarn at the bottom if needed.
Attach tassel to the front top of your bag, to the right.
To fasten on tassel, use the piece of yarn we used at the beginning to secure the top of the tassel. You can use your crochet hook to help with securing the tassel.
If you wish, you can line your crochet bag with fabric (see “how to line a crochet bag” video indicated above).


You May Also Like
Crochet Romantic Bow Free Pattern
Crochet The Claire Highlands Shawl Free Pattern