Crochet The Bella Flower Cardigan Free Pattern
Crochet The Bella Flower Cardigan Free Pattern
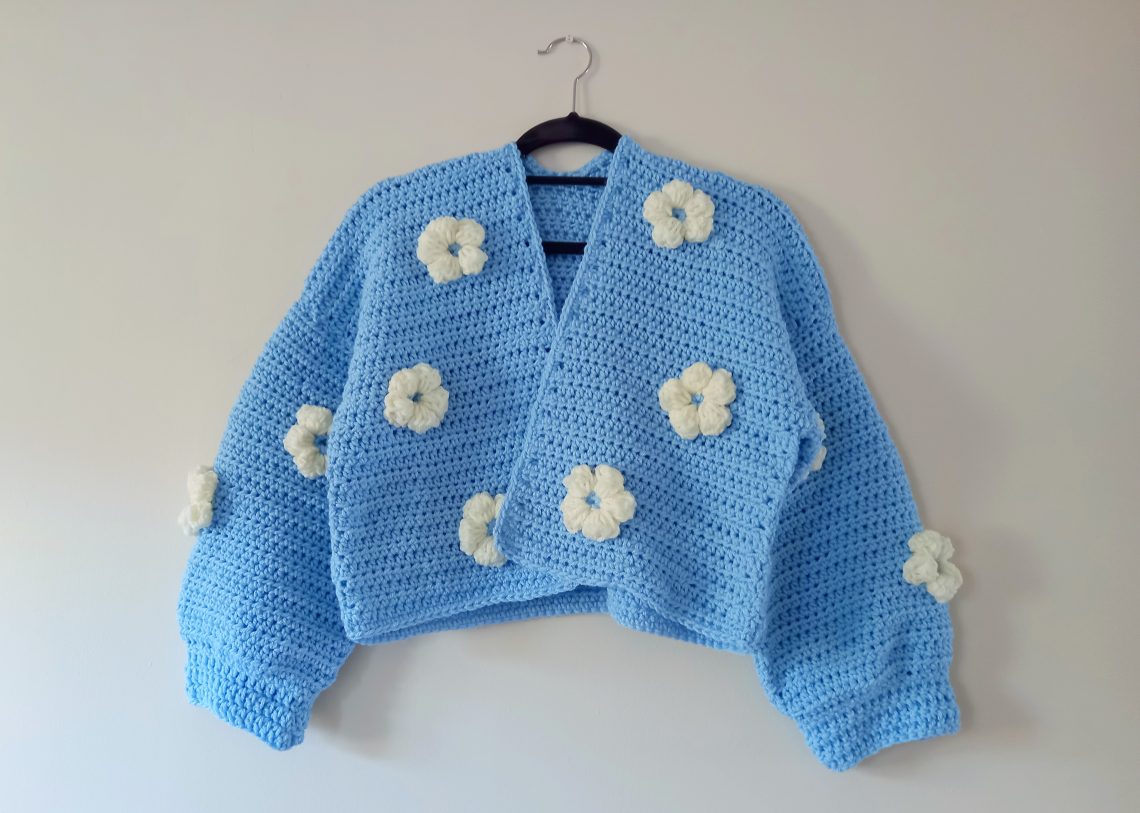
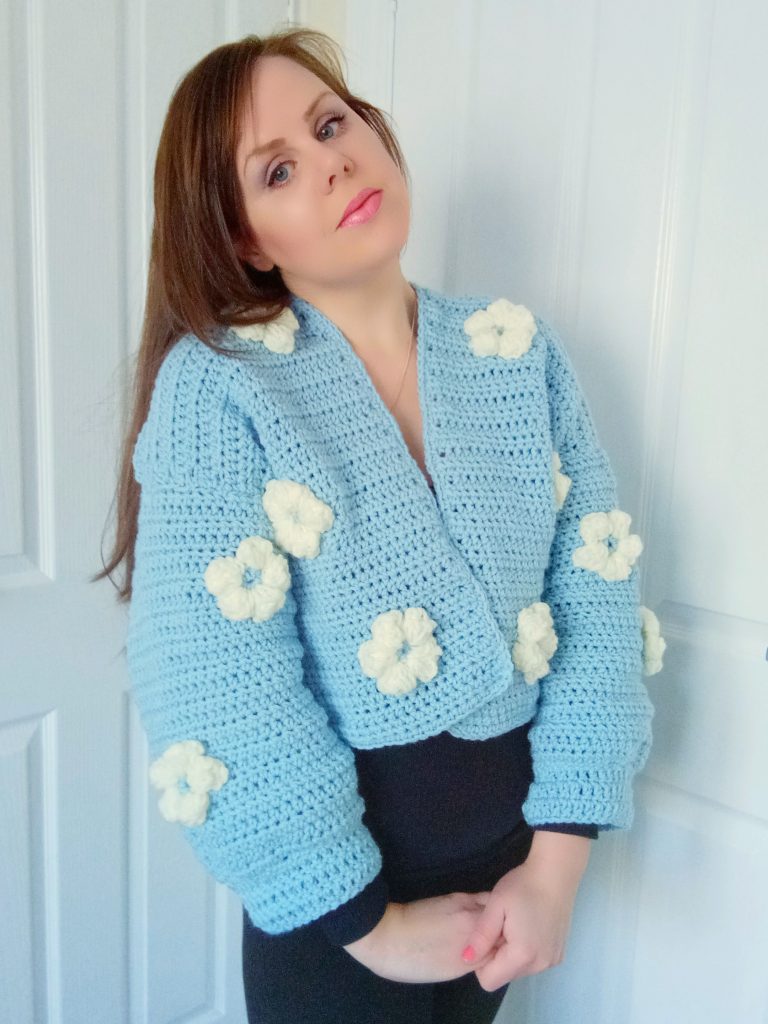
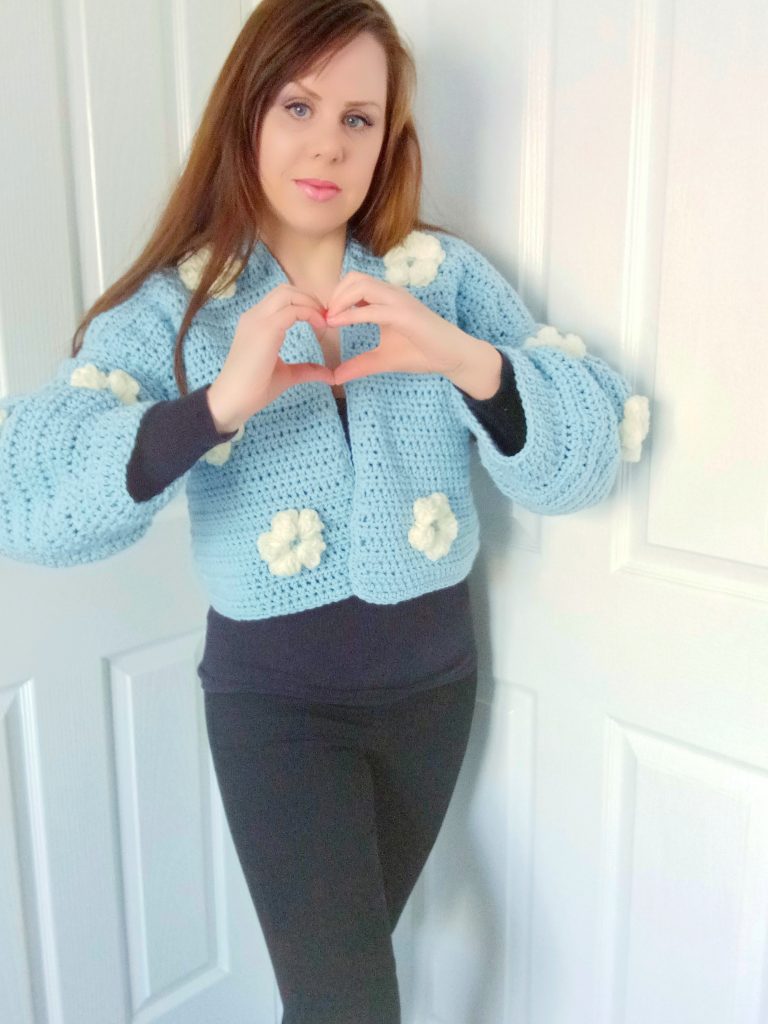
Hi everyone, this week I am bringing to you a new tutorial on how to crochet The Bella Flower Cardigan (free pattern). I absolutely love this new project! This cardigan was very much a labor of love to make, and I absolutely adore the result. I know I will be wearing this garment a lot, and I am so inspired to make it in so many colors too. This project comes in sizes S to XXXL. This Boho cardigan features a slightly cropped look (which can be made longer if desired), and beautiful chunky puff flowers.
The video tutorial can be found here:
Crochet The Bella Flower Cardigan Free Pattern: the inspiration
I had wanted to crochet this cardigan for a long time, and I am so pleased with how it’s turned out. Indeed, I absolutely love this crochet cardigan. The chunky puff flowers featured on this design are so pretty and feminine. I don’t normally “rave” about my own projects, however this is one design I am so proud of. Maybe this is due to the fact that it came out even better than I expected. This crochet cardigan is very versatile in that it is very easily customizable. Indeed, at first glance it is a cropped design, however it can very easily be made longer. To make it longer, just add as many rows as you wish to the front and back panels (this is a very easy to understand process). The colors of this cardigan can be changed also to suit your preference.

For this project, I used Paintbox Simply Chunky yarns. I used the shade Duck Egg Blue for the body of the cardigan; I used this same shade for the center of each puff flower, before crocheting the petals in shade Champagne White. Paintbox Simply Chunky yarns are one of my favorites, as this is a high quality yarn, and comes in a variety of different colors. This yarn is also soft and easy to crochet with. It also works up in such a way that is not bulky. All in all, I think this is a great yarn for making this type of large project, as it is very budget friendly also. It is also available to both Europe and America, which is also a huge bonus.
Crochet The Bella Flower Cardigan Free Pattern: the flowers
I had wanted to crochet a cardigan featuring chunky puff flowers for a long time. Indeed, this type of cardigan is so stunning in my opinion. This cardigan has a Boho vibe, as well as being super feminine and delicate. It is a statement piece that just looks beautiful. I am feeling in a very Spring mood at the moment, which is why I chose these delicate colors.

Crocheted flowers are always such a big love of mine. I have a few different flower designs, all of which are available on my blog. This puff flower pattern is new, and differs slightly from my original puff flower tutorial I released last Summer. Both last year’s and this new pattern are great ways to crochet puff flowers, and both are very beginner friendly. It’s just that I like to switch up my crochet techniques from time to time, and I really enjoyed creating this new pattern for puff flowers.
I love the fact that these flowers are chunky, yet delicate. The flowers just look so stunning. This cardigan is very trendy, and I have seen this type of project being very popular over the last few months. I believe this type of crochet project captures the essence of crochet so well: this design is Boho, yet feminine and easily wearable. It is also very reminiscent of the 60’s and 70’s, crochet’s Golden Age. I can definitely picture someone like Stevie Nicks wearing this cardigan during the 70’s.
Crochet The Bella Flower Cardigan Free Pattern: an easy project
This beautiful cardigan is first and foremost a very easy project to crochet. It looks very pretty and feminine, yet it is a very striking design. Worn over a simple top or henley (think Free People type of long sleeved garment) and a simple pair of jeans, and voila, you have a complete original yet totally wearable cardigan.
This cardigan could easily be crocheted and sold as part of a capsule collection for a designer brand. I have to say it has been a long time since I have loved one of my designs so much!
I hope you don’t mind me gushing over one of my own designs. However, I will not apologize for this as I love this project so much! And I am sure you will once you crochet this Bella Cardigan. Please do let me know what you think of this design, I love to hear your feedback.
Connecting with you
I love connecting with my Crochet Community through my blog and Social Media. You can find me on Youtube, Instagram, and Pinterest. I would love to connect with you on these platforms.
You can also join my private Facebook group to connect.
You can also subscribe to my weekly newsletter. Indeed, this newsletter is sent out once a week and will update on of my news, from my new free pattern releases, to my video tutorials and giveaways.
Crochet The Bella Flower Cardigan: the pattern
You can purchase the large print, ad free, PDF pattern from my Etsy store here: Crochet The Bella Cardigan With Puff Flowers PDF Pattern
You can purchase the large print, ad free, PDF pattern from my Ravelry store here: Crochet The Flower Cardigan Pattern
Level: Easy +
Notes: I will be writing in US terms
Materials
6 skeins of Paintbox Simply Chunky in shade Duck Egg Blue (size S), 7 skeins for sizes M & L, 8 skeins for sizes XL to XXXL.
2 skeins of Paintbox Simply Chunky in shade Champagne White.
A 6 mm crochet hook
Tapestry needle
Pair of scissors
Gauge
4” (10 cm) = 12 DC
4” (10 cm) = 9 rows
Sizes of finished jumper
These are the sizes measured once jumper has been assembled and all edgings and borders have been added. The measurements for the body of the cardigan is given from top to bottom edge, and from shoulder to shoulder.
S: 17,5” (44,5 cm) in length x 20” (51 cm) in width
M: 18” (45,7 cm) in length x 21” (53cm) in width
L: 18,5” (47 cm) in length x 22,5” (57 cm) in width
XL: 19” (48 cm) in length x 24” (61 cm) in width
XXL: 19,5” (50 cm) in length x 26” (66 cm) in width
XXXL: 20” (51 cm) in length x 28” (71 cm) in width
Size of sleeves (after sewing into project, including cuffs)
S: 8.5” (22 cm) x 15” (38 cm)
M: 8,5” (22 cm) x 15,5” (39,5 cm)
L: 9” (23 cm) x 16” (41 cm)
XL: 9,5” (24,5 cm) x 16,5” (42 cm)
XXL: 10” (25,5 cm) x 17” (43 cm)
XXXL: 10,5” (27 cm) x 17,5” (44,5 cm)
Size of finished flower (approximately)
3” (8 cm) x 3” (8 cm)

Abbreviations
ch: chain
sk: skip
St: stitch
Sl st: Slip stitch
SP: space
SC: Single Crochet (= UK Double Crochet)
HDC: Double Crochet (=UK Half Treble Crochet)
EOR: End of row
Sizes will be indicated like this
S, (M), [L], {XL}, *XXL*, XXXL
Pattern begins here
Please note this is a cropped cardigan, if you wish to make it longer just add as many rows to the front and back panels until you reach the length you desire.
Back of cardigan
Ch 56 (59) [64] {68} *74* 80
Complete rows as follows
1: HDC in 3rd ch from hook, and into each ch across until eor (first chain 2 counts as a
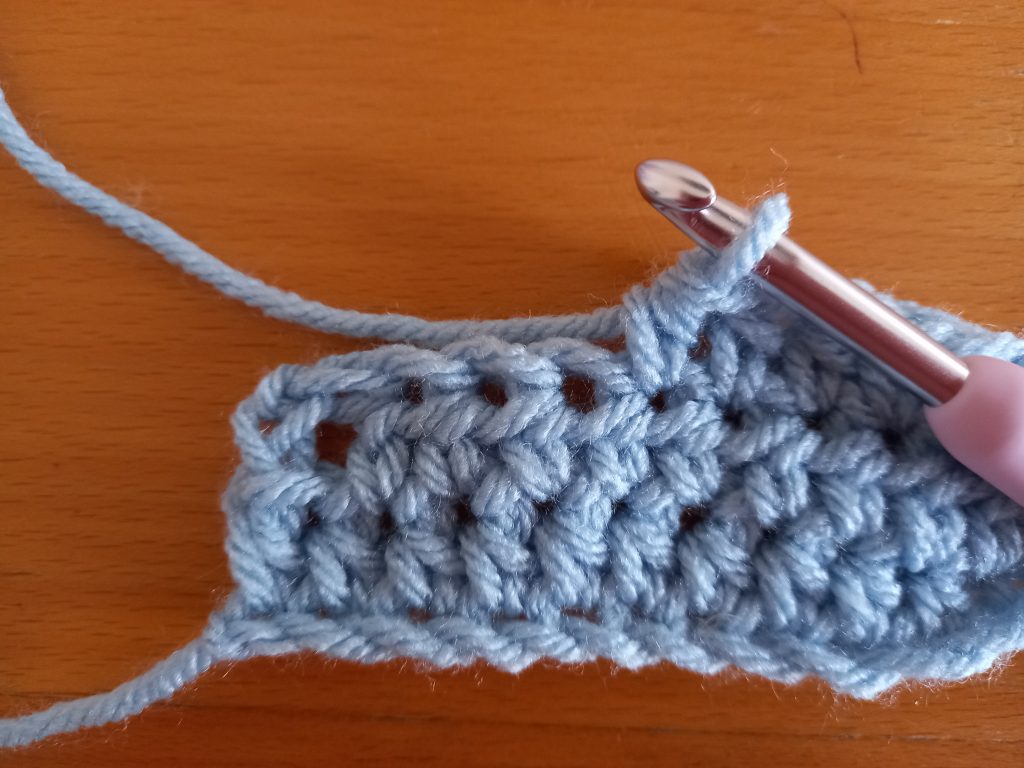
HDC).
2: Ch 2 (counts as HDC throughout), HDC in 2nd and every HDC from previous row until eor.
3-37 (38) [39] {40} *41* 42: repeat row 2
Fasten off, leaving a long tail for sewing.
Front of cardigan (make 2)
Ch 29 (30) [32] {34} *37* 40
1: HDC in 3rd ch from hook, and into each ch across until eor (first chain 2 counts as a HDC).
2: Ch 2 (counts as HDC throughout), HDC in 2nd and every HDC from previous row until eor.
3-37 (38) [39] {40} *41* 42: repeat row 2
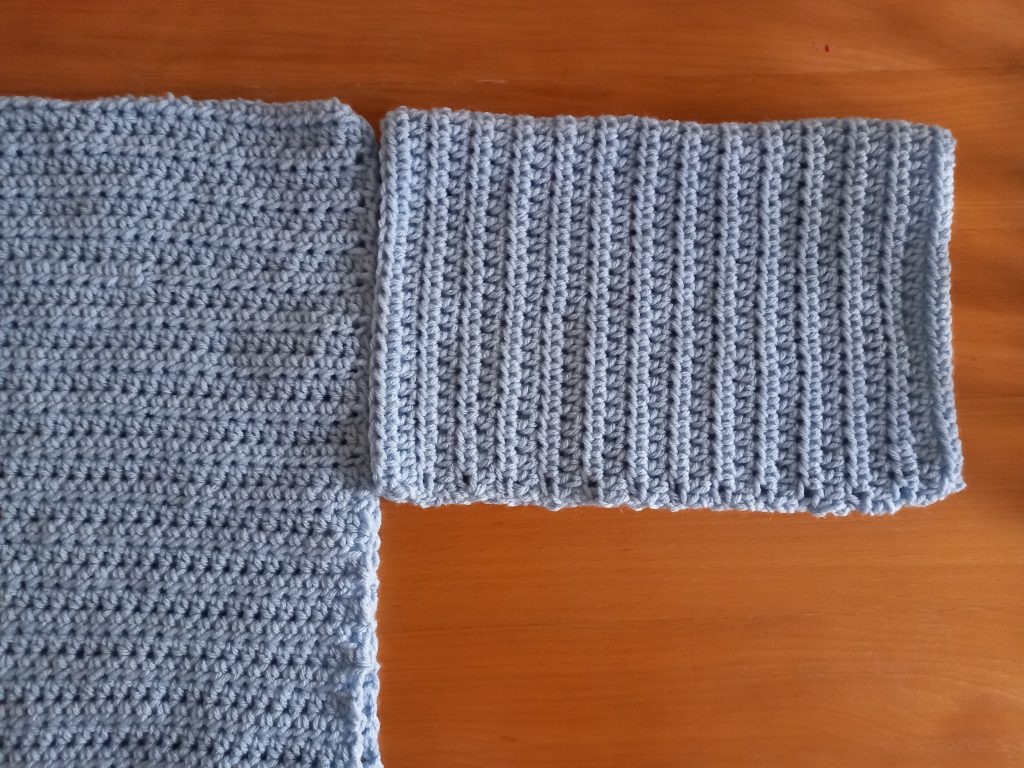
Sleeves (make 2)
Ch 48 (48) [52] {56} *60* 64
1: HDC in 3rd ch from hook, and into each ch across until eor (first chain 2 counts as a HDC).
2: Ch 2 (counts as HDC throughout), HDC in 2nd and every HDC from previous row until eor.
3-27 (28) [29] {30} *31* 32: repeat row 2
Once you have these 4 elements, you can start assembling your jumper together.
Assembling your cardigan together
Start by folding sleeves in half, and seaming the sleeves together, using tapestry needle and loose end.
With wrong side facing, place the back of your cardigan onto a flat surface. Now place both front panels flat onto the back of the cardigan.
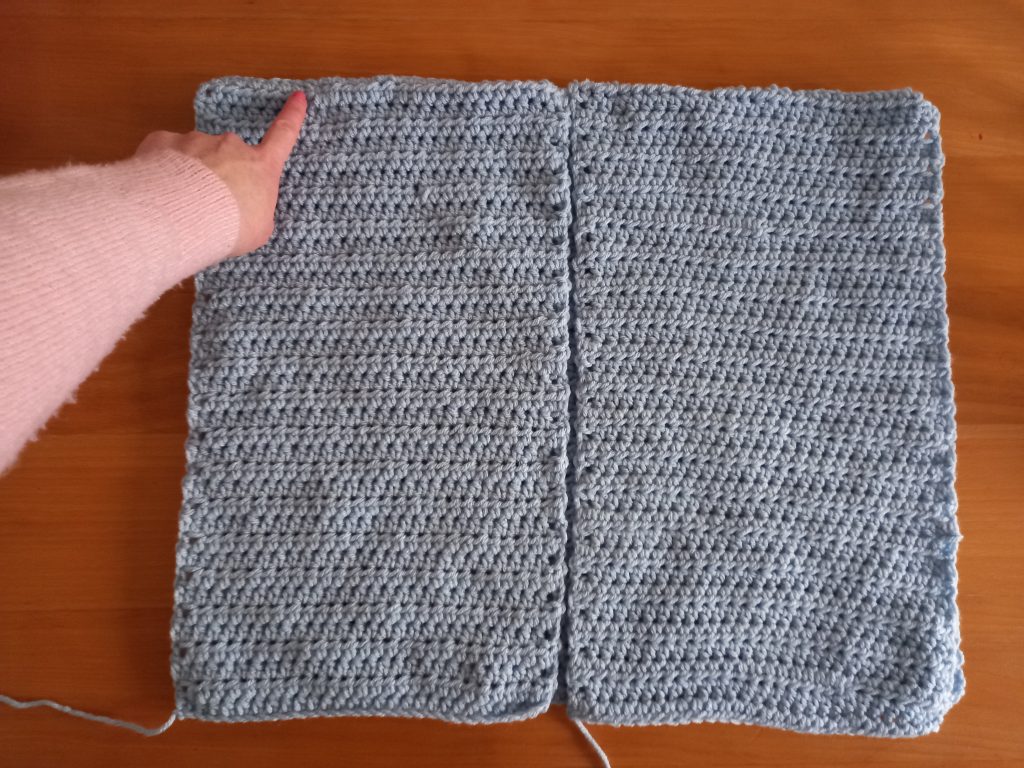
Now sew the shoulder seams at the top of the jumper, using the mattress stitch.
Then attach sleeves to each side of the cardigan, sew sleeves from the top of project, working all the way down to the bottom of the cardigan.
You can then sew the “back” side of the sleeve to the back side of the project. This creates a more seamless stitching.
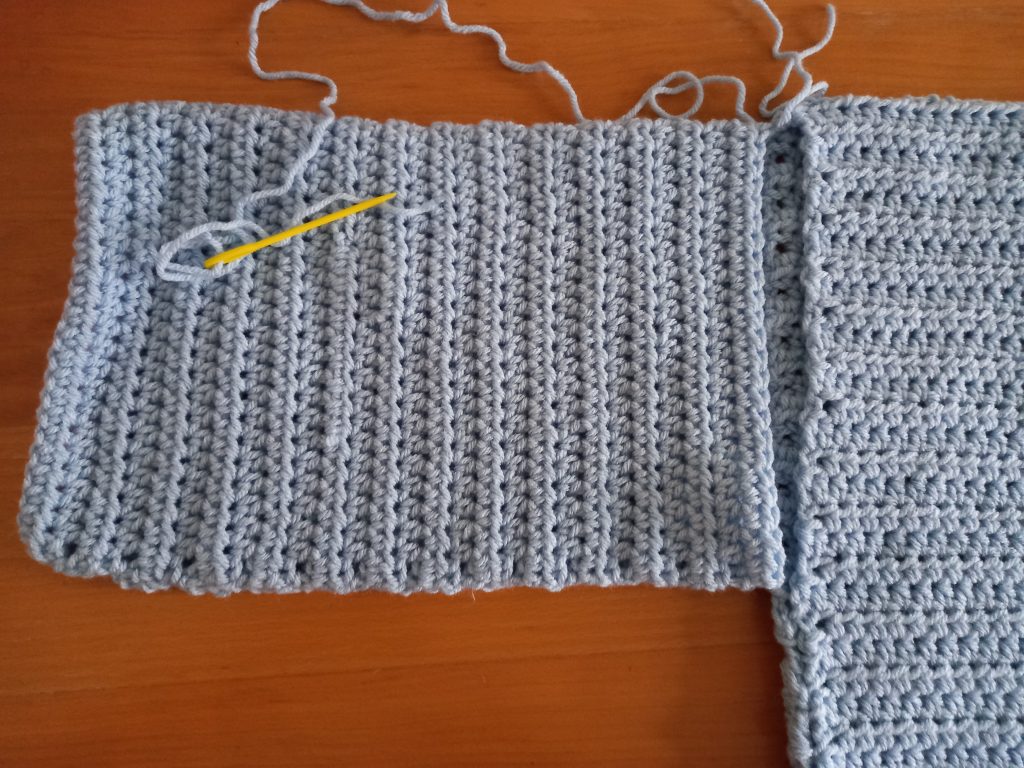
Do this on both sides of the cardigan for each sleeve and side of project.
Fasten off, tidy up all loose ends.
Front opening and bottom edging
Fasten on yarn to the bottom edge of the cardigan (on whichever side you prefer). You will be going all the way around the front opening and bottom of the cardigan with SC to create a neat edging. After attaching your yarn on one side of the front opening, just go around the front opening on one side, then all the way around the bottom of the cardigan, and then the other side of the front opening of the cardigan all in one go (detailed pattern below).
Round 1: ch 1 (counts as a SC); SC into each stitch across, making sure you space your SC equally, as there will not be clear stitches across the front opening. Sl st to ch 1 at beginning of round.
Fasten off, tidy up all loose ends.
Sleeve cuffs
Repeat this process on each sleeve.
Attach yarn to cuff.
Complete rows as follows
1: Ch 1, SC into next 2 stitches, [sk 1 stitch, SC into next 2 stitches] until eor, sl stitch to close off round.
2: Ch 3 (=DC), place a DC into next stitch until eor. Sl st to first chain 3 to close off round.
3-4: Repeat row 2.
Fasten off, tidy up all loose ends.
Make 17 flowers
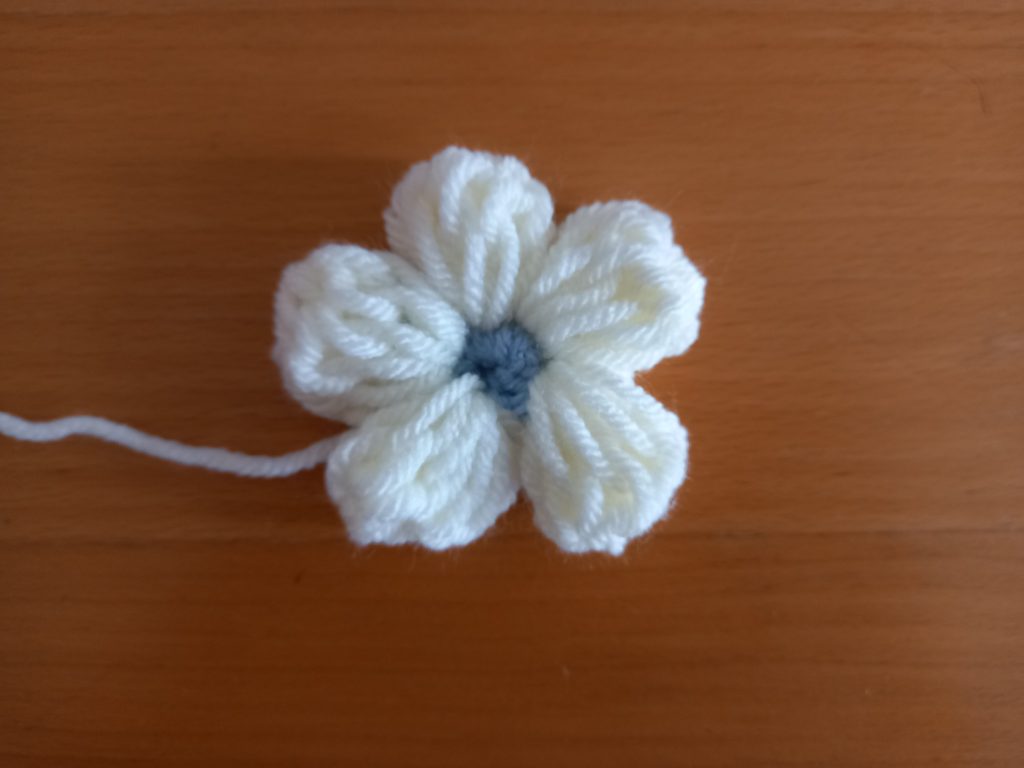
You will need your 6 mm crochet hook and both yarns (Duck Egg Blue and Champagne White) for this part.
With blue yarn, ch 4 and sl st through 1st stitch to form a ring.
Round 1: Place 5 SC into the ring.
Fasten off. Attach Champagne White yarn to the same stitch you fastened off.
Round 2: Ch 4, yarn over and go through same 1st stitch. Pull up a loop, and lift stitches up about 1.5” (3 cm) to create height; take yarn and pull through 2 loops. [Yarn over again and go through the 1st base chain once again; pull yarn to create lift once again (1.5”), take yarn and pull through 2 loops] 4 times more. Take yarn and pull through all the loops remaining on the hook (6 loops).
Chain 3, and sl stitch through the next SC from base ring.
Repeat round 2 four more times, creating a petal in all 5 SC of the base ring (there should be 5 petals in total).
Once you have completed your 5 petals, sl st through the 1st SC of the first petal to close off flower.

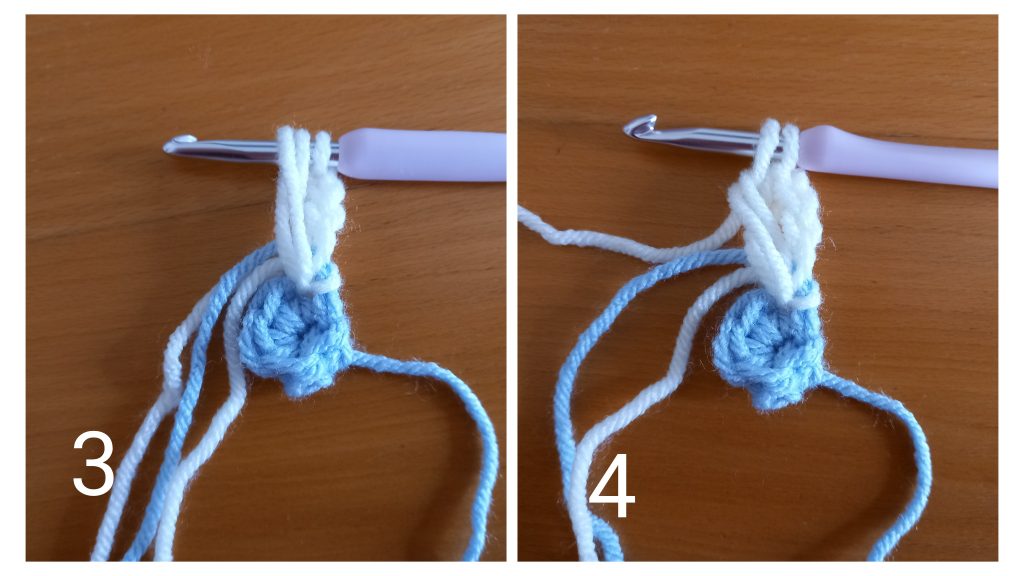
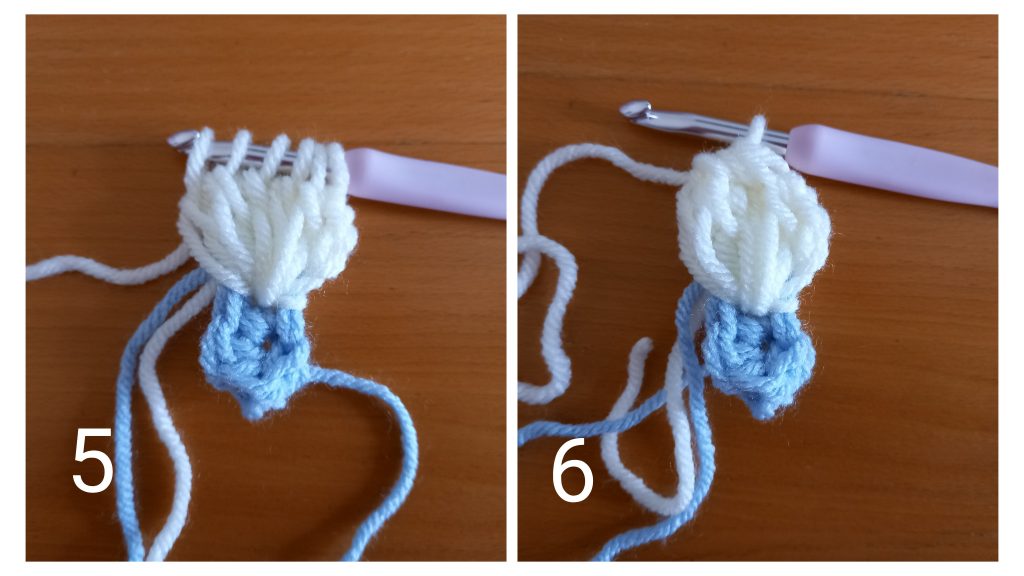
Fasten off, leaving a long tail for sewing flower onto cardigan.
Sewing your 17 flowers onto your cardigan
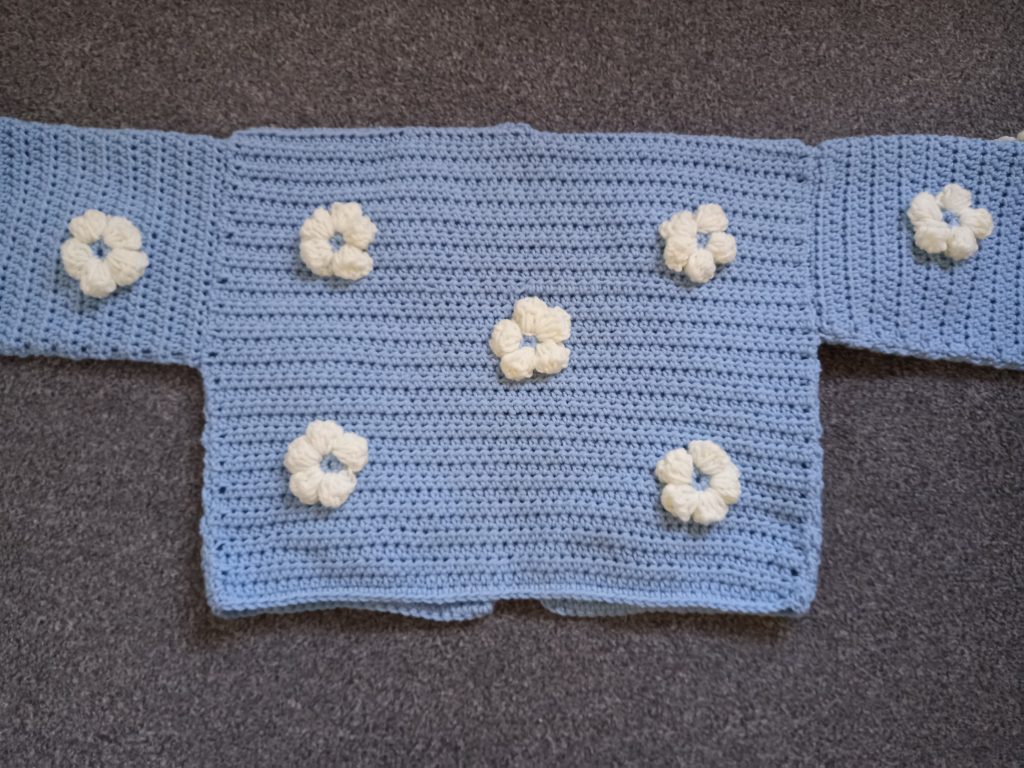
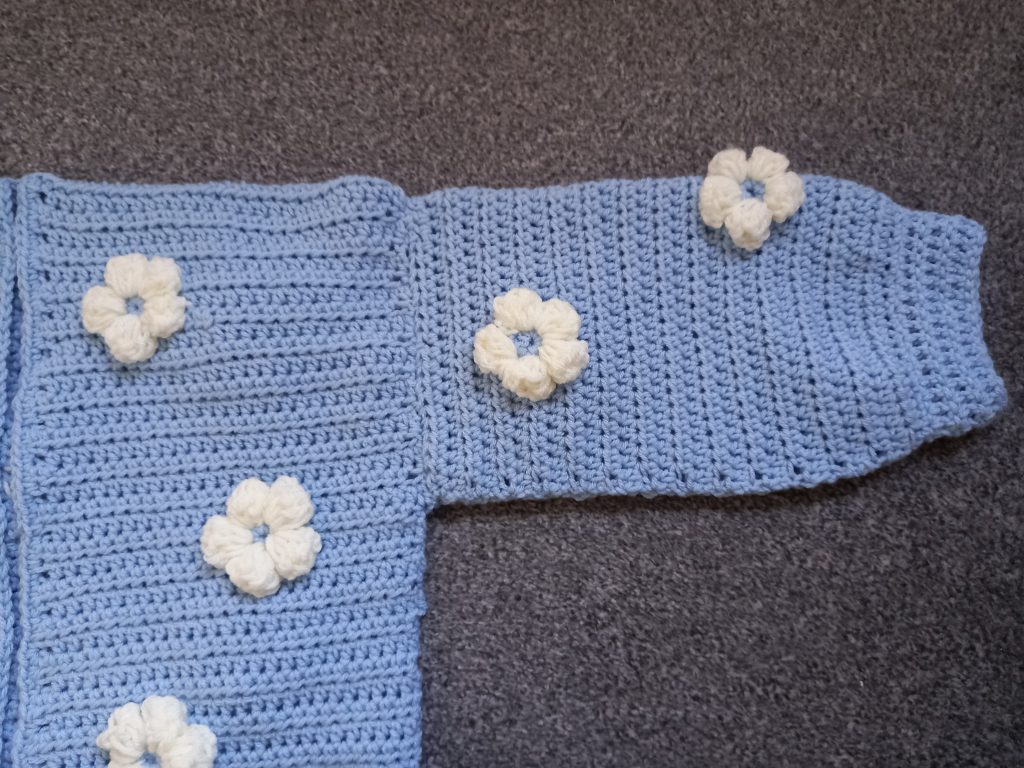
I will be posting photographs of my cardigan if you wish to place your 17 flowers onto your cardigan the same way as I.
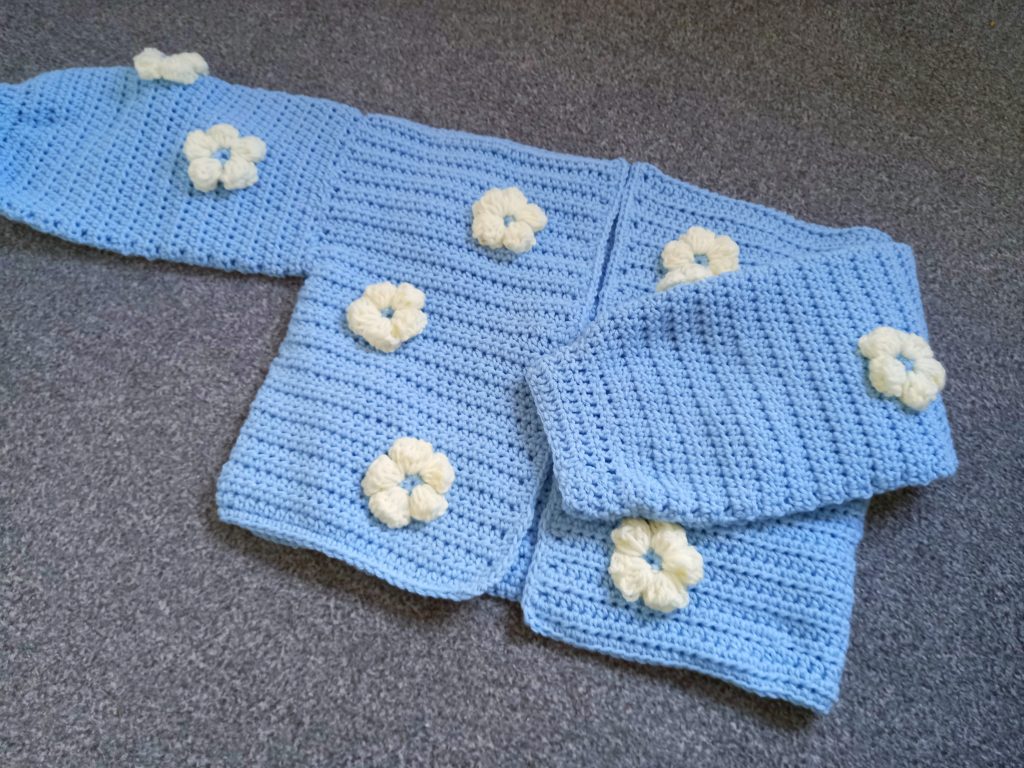
For information, I placed 6 flowers on the front, 3 flowers on each sleeve, and 5 on the back.

To sew your flowers in, you will need to place each flower individually where you wish to sew on the cardigan.
With the help of your loose end and tapestry needle, start delicately sewing your flower into the cardigan, starting with securing the center of the flower. Once you have done this, sew each petal into the cardigan by going around each one.
Once you are satisfied with your sewing, make a knot or 2 with your loose end at the back of the flower (reverse of cardigan), and fasten off.
Repeat process for each flower.


You May Also Like
Crochet A Fall Pocket Shawl
Crochet Baby Hat With Ears Free Pattern