Crochet The Iconic Patchwork Cardigan
Crochet The Iconic Patchwork Cardigan
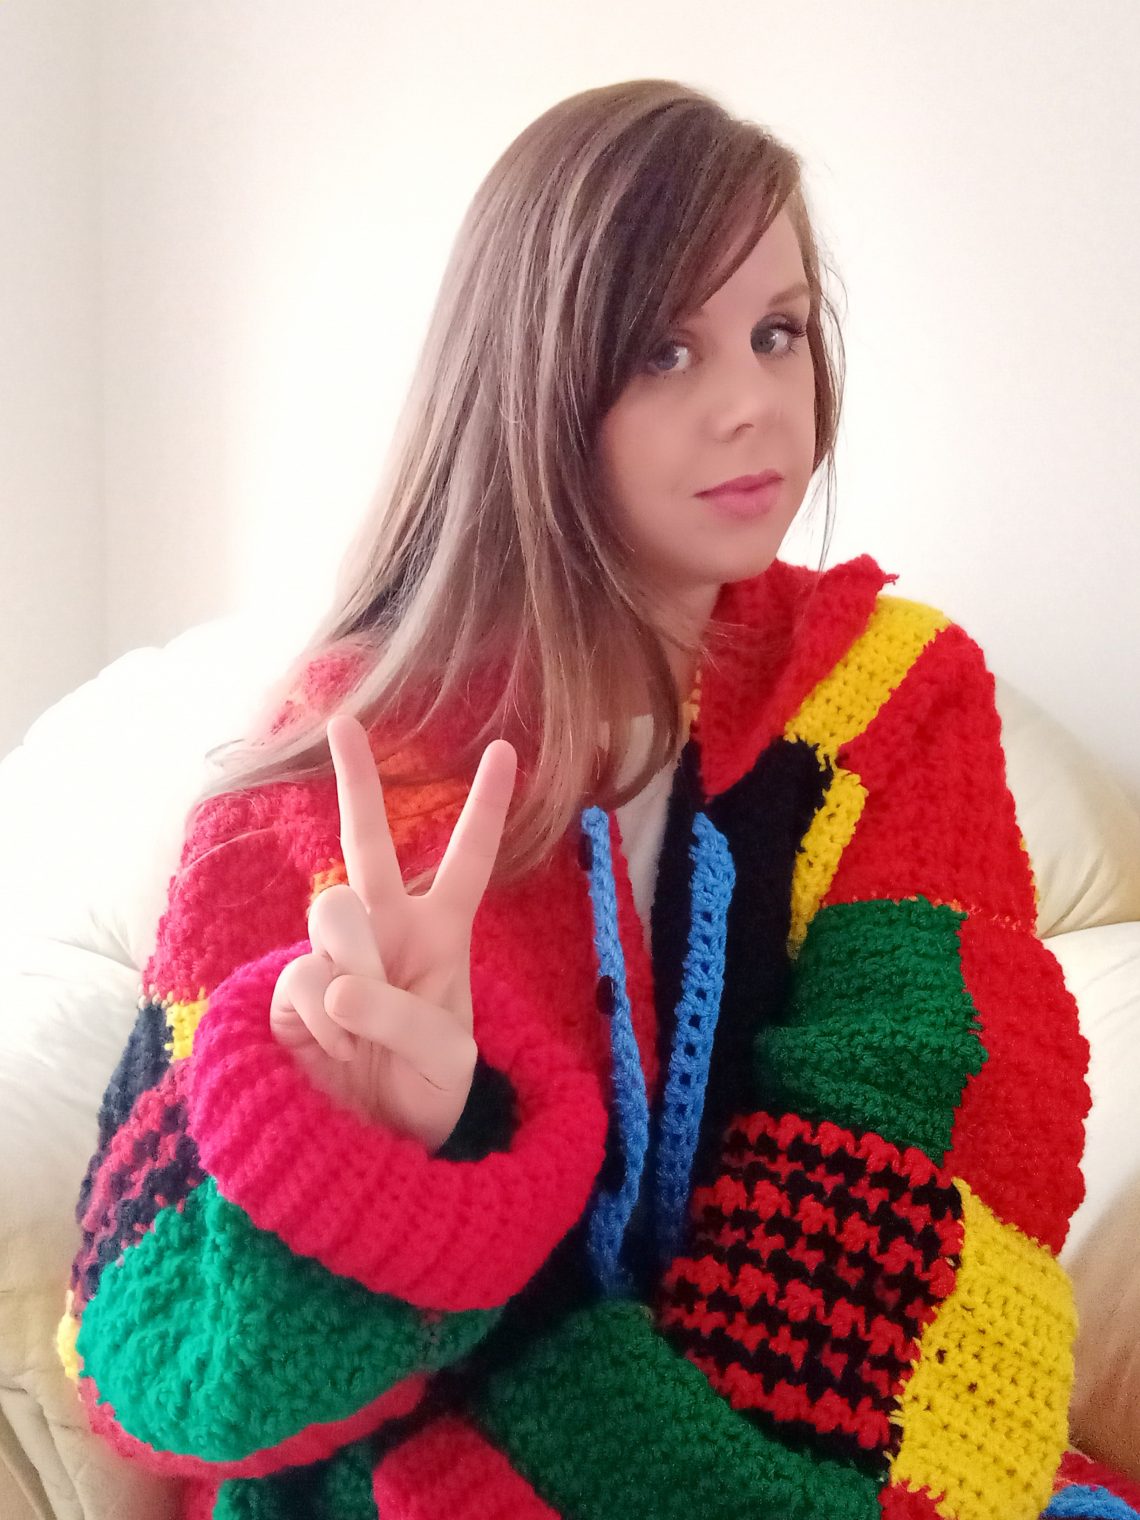
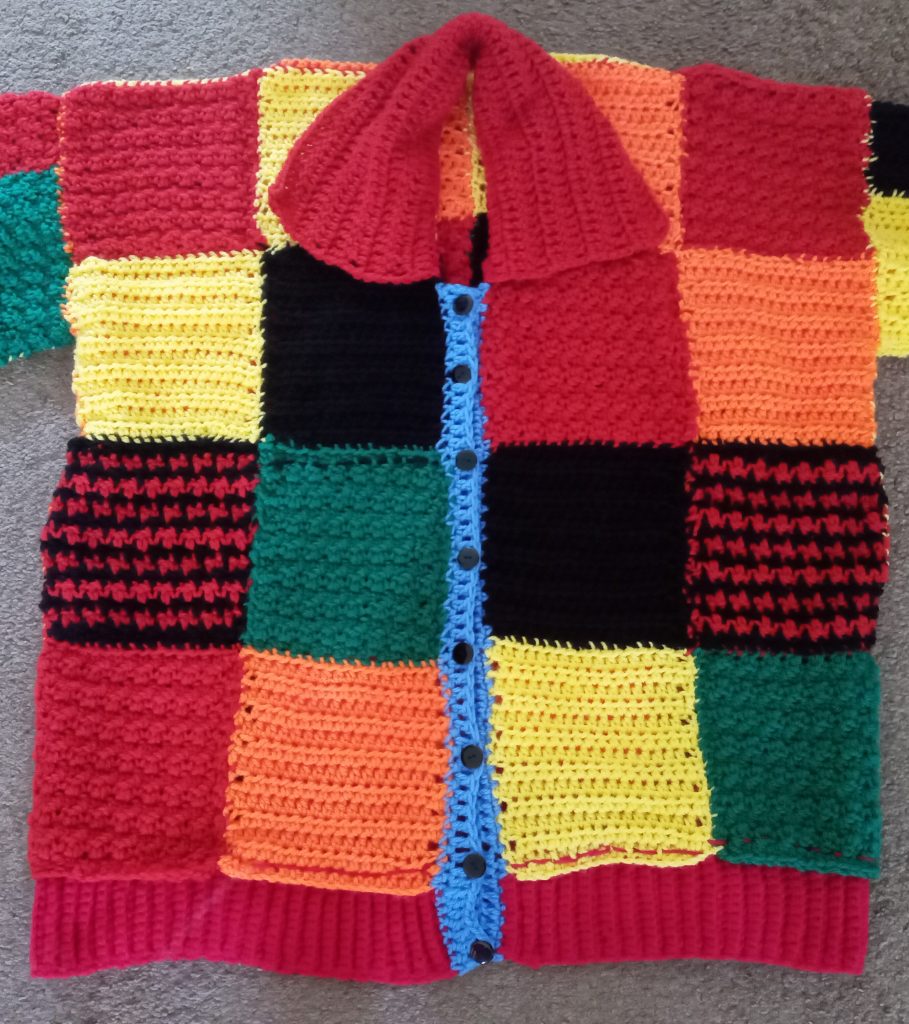
Hello my lovelies! This week I am bringing to you a really exciting new project to crochet. Indeed, I have recreated my own version of the iconic patchwork cardigan worn by Harry Styles.
You can purchase the ad free, large print, PDF pattern from Etsy: Crochet The Iconic Patchwork Cardigan PDF Pattern
I am so happy to finally reveal my crochet version, as it was a true labor of love. The final result is however really worth all the efforts I invested into this recreation.
You can also check out the pastel version of this cardigan, which comes in sizes S to XXXL. It is also a wonderfully fun and iconic project to crochet!
My version is a crochet version of course. You can find the video tutorial on Youtube here:
A viral crochet and knit project
As some of you probably know, this cardigan has gone viral on Tik Tok. I have to say I do understand why! It’s so unique and gorgeous.
JW Anderson’s unique design style and boho vibes can definitely be spotted in this garment. I love how well Harry Styles wears it too! He makes crochet and knit look even more cool!
The original knit pattern by JW Anderson for this cardigan can be downloaded if you follow this link: JW Anderson Patchwork Cardigan Knit Pattern
Crochet The Iconic Patchwork Cardigan
This was a really fun project to crochet. The original version of this patchwork cardigan by JW Anderson is beautiful piece of art.
To begin with, I had a good look at the photographs of the original garment. You can find my board on Pinterest if you like: Iconic Patchwork Cardigan Pinterest Board Inspiration
I then downloaded the original pattern from JW Anderson’s website. Later, I read the pattern and looked at all the knit techniques used for the project. I wanted to really have a close resemblance to the original pattern whilst still using my own crochet ideas. Hopefully this makes sense.
Crochet The Iconic Patchwork Cardigan: the design
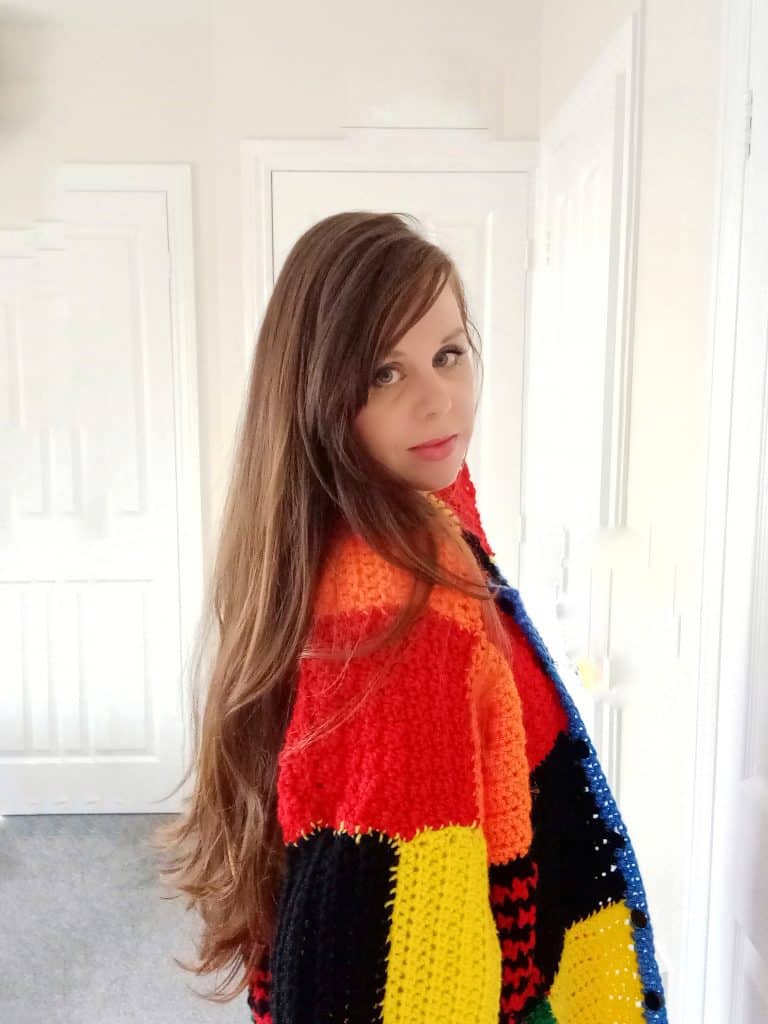
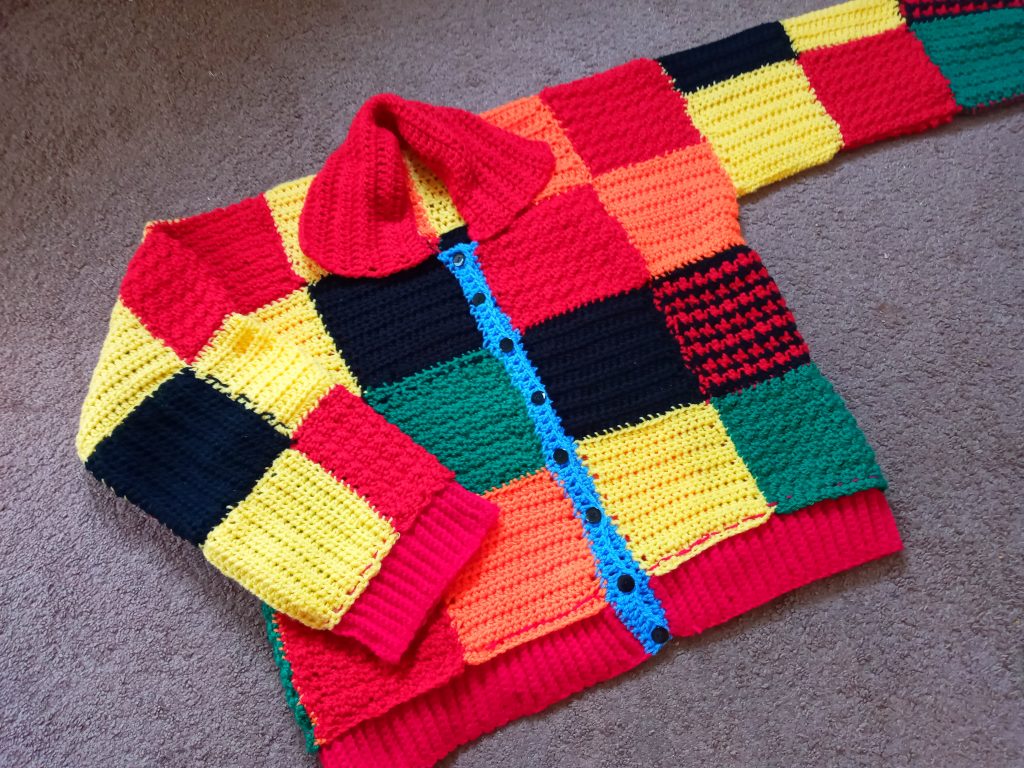
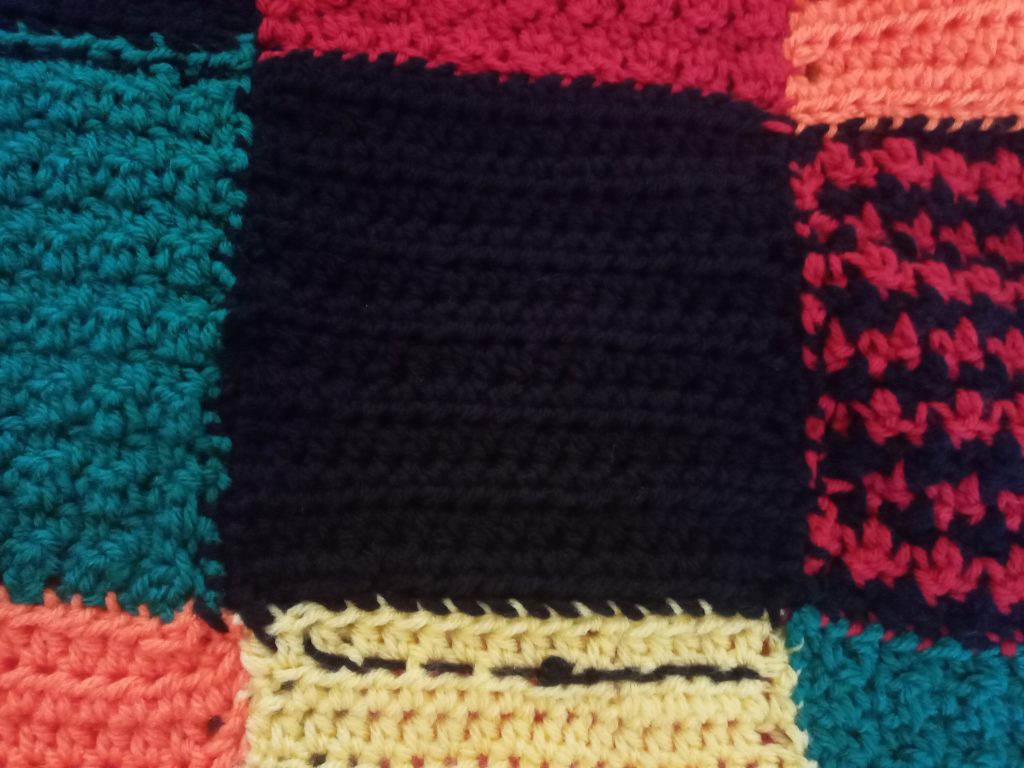
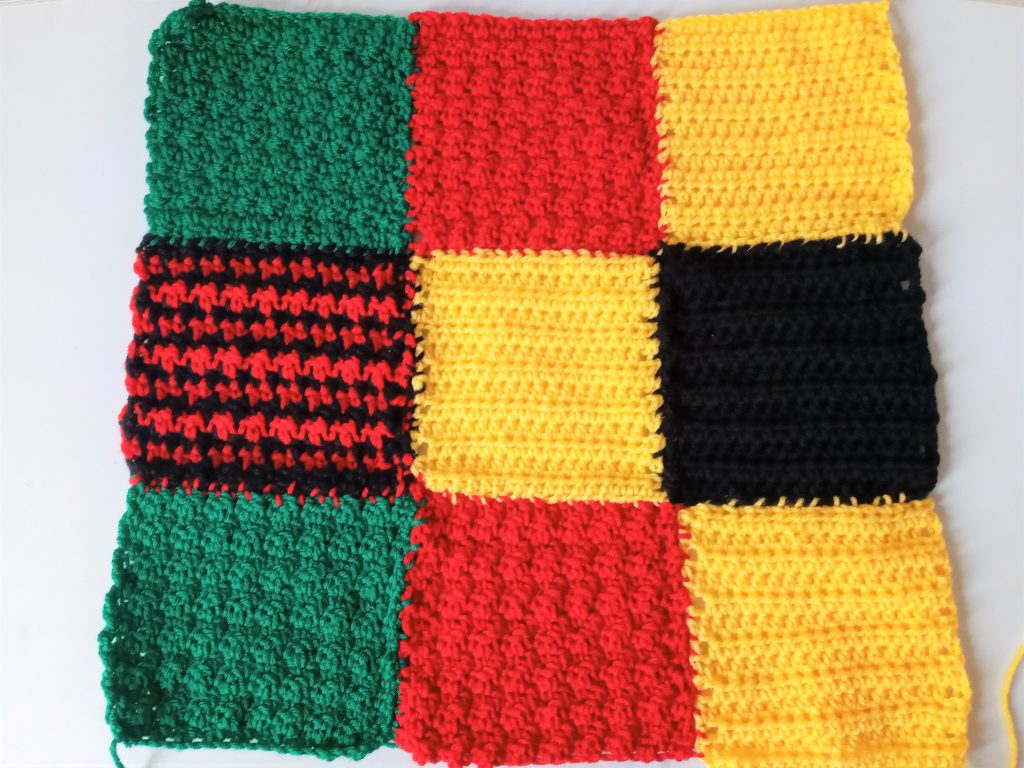
This crochet design is made out of squares that are later stitched together. I decided to make two different squares patterns. I then used the different colors to give the cardigan dimension.
After that, I made up the red collar and sewed it onto the project. Then I crocheted the ribbed bottom edge. After that, I created the cuff edgings too. I finished off by crocheting the front blue edging on the front of the cardigan, and sewed on eight buttons.
Every step of this cardigan is explained in my pattern down below, and my video tutorial on Youtube.
Crochet The Iconic Patchwork Cardigan: Create your own custom sized cardigan
You can create your very own custom sized cardigan with this pattern. Indeed, I am going to give you some pointers on how to crochet this cardigan to your size.
The cardigan I made is a universal size large I would say (=size M in USA for men). I hope this is helpful.
For information, I am a very petite person. I wear a UK size 8/S, which is a US 4. I am 5 foot 2, which is quite short. You can therefore see on the pictures that my own cardigan is quite large.
To make your cardigan smaller, you can either use one of the following methods.
- You can use the same hook and yarn size, but make each square smaller. Your cardigan will therefore be smaller as a result.
- You can follow the exact pattern, but switch your yarn to Aran weight, and your hook to a 5 mm.
Please if you are doing this, make a swatch and measure this just to be on the safe side. I have written down all the measurements for the squares, as well as the cardigan as a whole for reference (see pattern below for all the information). I think these two methods are great to make a made to measure cardigan!
Connecting with you:
I love connecting with my Crochet Community through my blog and Social Media. You can find me on Youtube, Instagram, and Pinterest. I would love to connect with you on these platforms.
You can also join my private Facebook group to connect.
Join my exclusive and fun Patreon community, a haven for feminine crochet and so much more!
Take care,
Xoxo Selina.
Crochet The Iconic Patchwork Cardigan: The Pattern
Level: Easy/beginner
Gauge (= size of a square): 6,3”x6,3” (16×16 cm)
Size of finished cardigan:
Body of cardigan: 27”x26” (69 x 66 cm)
Sleeves: 9,5”x21,5” (24x 55 cm)
Notes:
I will be using US terms (British terms in brackets)
Pattern written in one size
Materials:
2 skeins each of Cygnet Chunky in shades Orange, Black, Citrus, Emerald (you can substitute this yarn with Paintbox Simply Chunky yarn, for example)
3 skeins of Cygnet Chunky in shade Red (you can substitute this yarn with Paintbox Simply Chunky yarn, for example)
1 skein of Cygnet Chunky in shade Saxe (you can substitute this yarn with Paintbox Simply Chunky yarn, for example)
1 skein of Stylecraft Special Aran in shade Lipstick (You can substitute with Paintbox Simply Aran in shade Red)
A 6 mm and 4,5 mm crochet hooks
Pair of scissors
Tapestry needle
Darning needle and black thread
8 black buttons (15/18 mm)
Abbreviations:
Ch : chain
Sl st : slip stitch
St: Stitch
SC: Single crochet (UK Double Crochet)
HDC: Half Double crochet (UK Half Treble Crochet)
DC: Double Crochet (UK Treble Crochet)
Begin pattern here:
You will be crocheting all the squares needed for the back panel, the 2 front panels, and the 2 identical sleeves to begin with.
Then the collar, ribbed edgings (1 for each sleeve, and also one for the bottom of the cardigan) are crocheted separately.
Once you have crocheted all these elements, the squares are sewn together to form the back panel, the two front panels, and the sleeves.
Then, all the elements of the cardigan will be sewn together. After all these elements are assembled, you will be creating the front edging with buttons at the opening of the cardigan.
This is explained step by step in this pattern.
You will be making two different square patterns as follows:
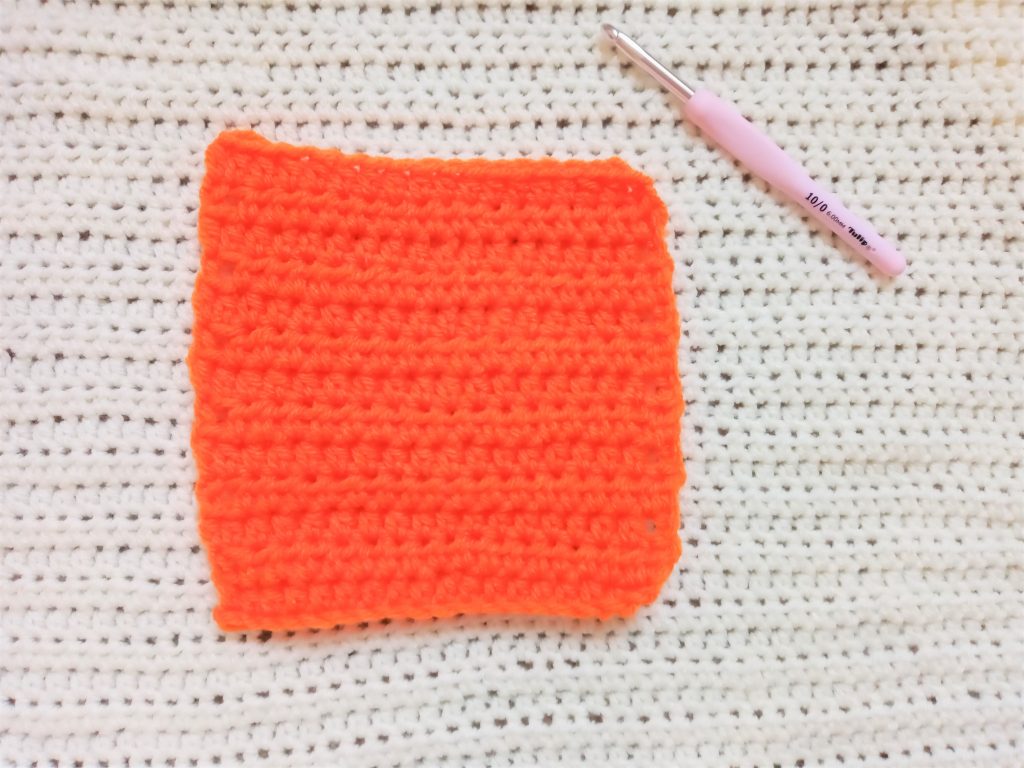
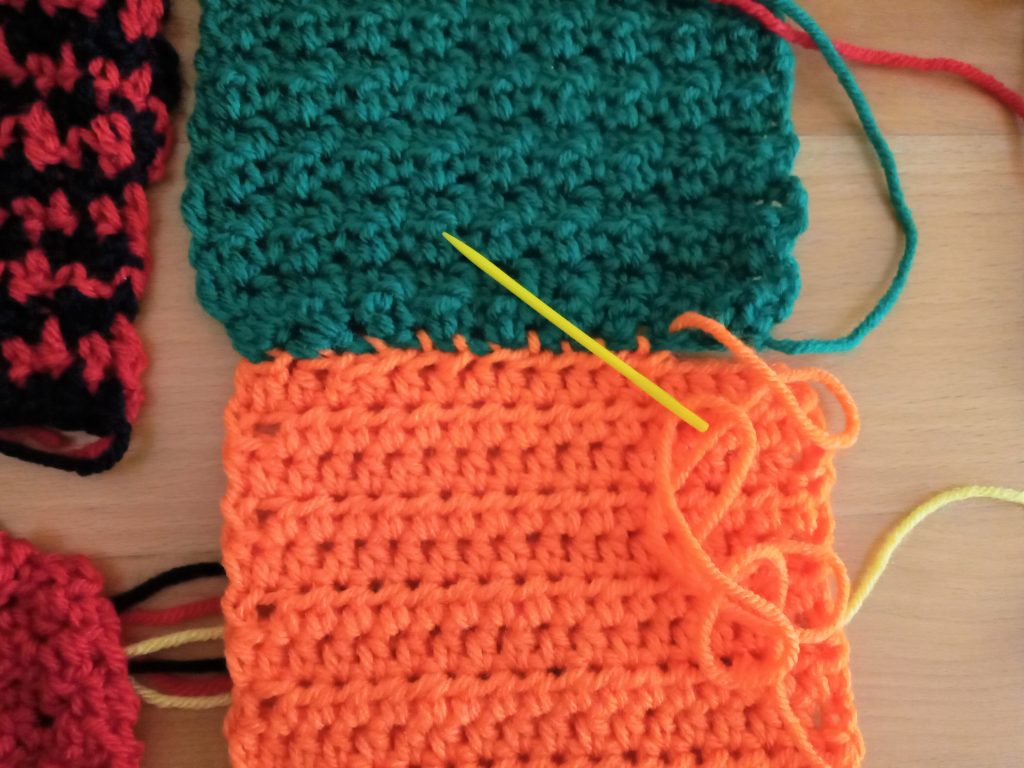
Square n°1 for 12 yellow, 6 orange and 6 black squares
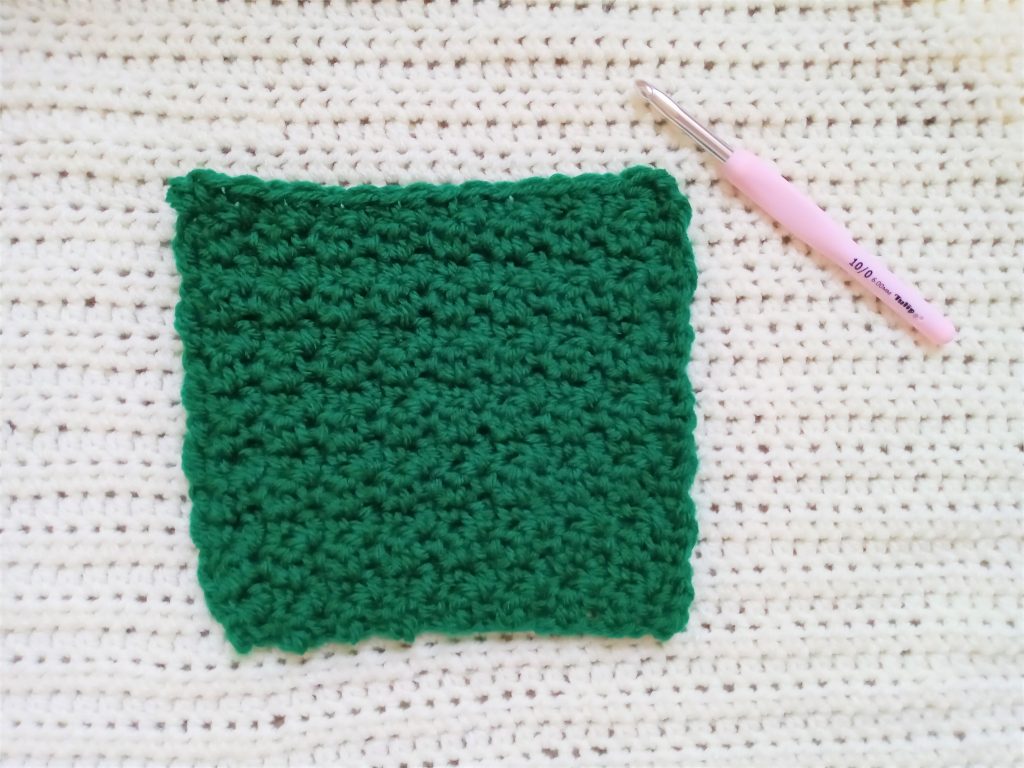
Square n°2 for 8 green, 12 red and 6 black/red squares
See photographs for details
Square n°1:
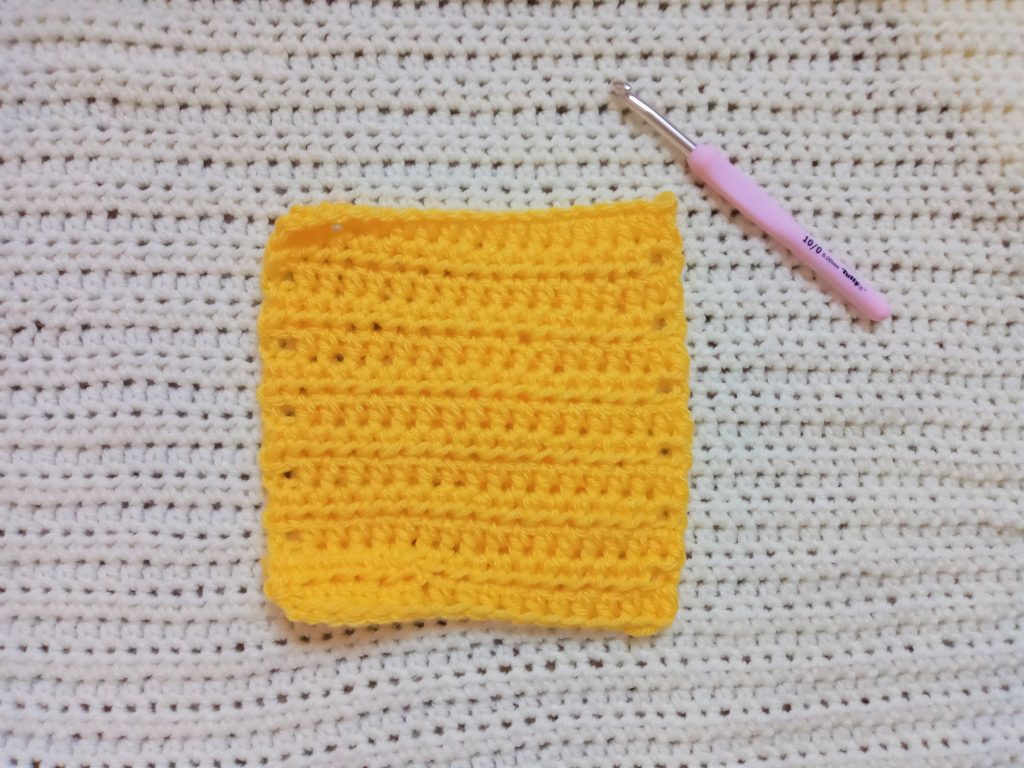
Using chunky yarns and 6 mm crochet hook
Ch 19
Complete rows as follows:
1: HDC in 3rd ch from hook, and HDC into next ch, and all chains across = 18 HDC total.
2: ch 2 (=HDC), turn your work, HDC in 2nd ch and all HDC from previous row until eor.
3-13: Repeat row 2.
Fasten off, leaving long tail for sewing squares together later.
Square n°2:
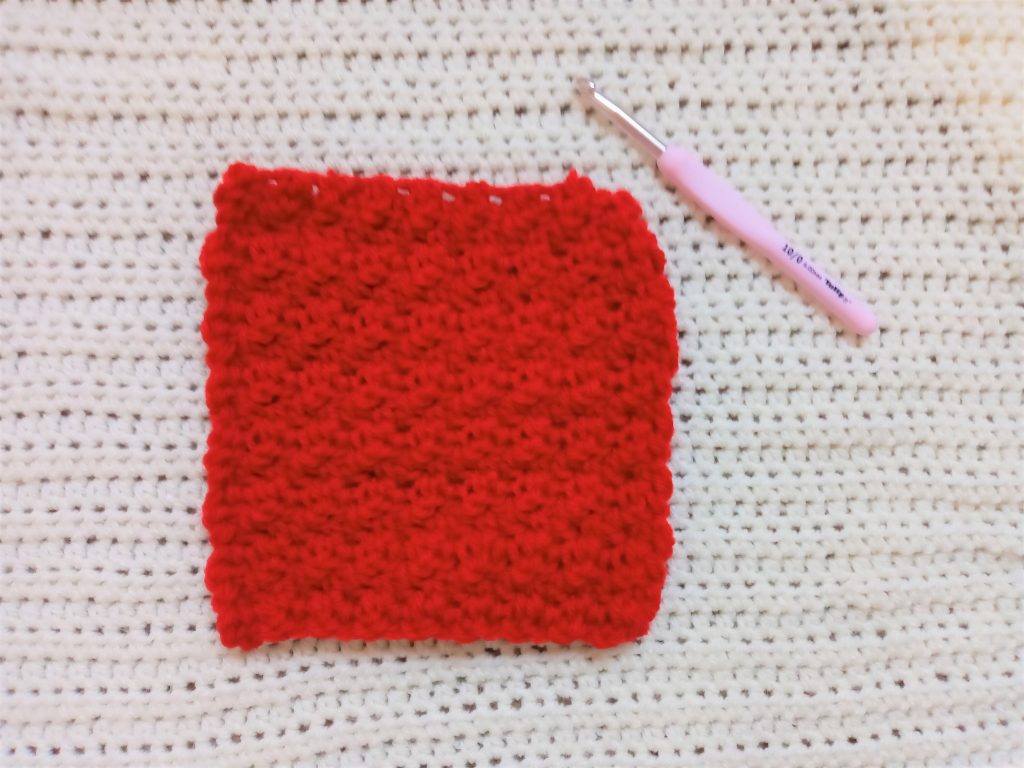
Using chunky yarns and 6 mm crochet hook.
Ch 19
Complete rows as follows:
1: DC in 2nd ch from hook, [SC in next ch, DC in next ch] until eor (1st ch counts as a SC)=19 stitches total.
2: Ch 3 (=DC), [SC into next st, DC into next st] until eor, placing last DC into ch 1 from previous row.
3: Ch1 (=SC), [DC in next st, SC into next st] until eor, finishing on a SC.
4-15: Alternate rows 2 and 3.
For the black and red version, start chaining with black yarn, and crochet row 1 with black yarn. Fasten off yarn and attach red yarn to create row 2. Alternate both colors from row to row until end of square, finishing on black. Tidy up all loose ends.
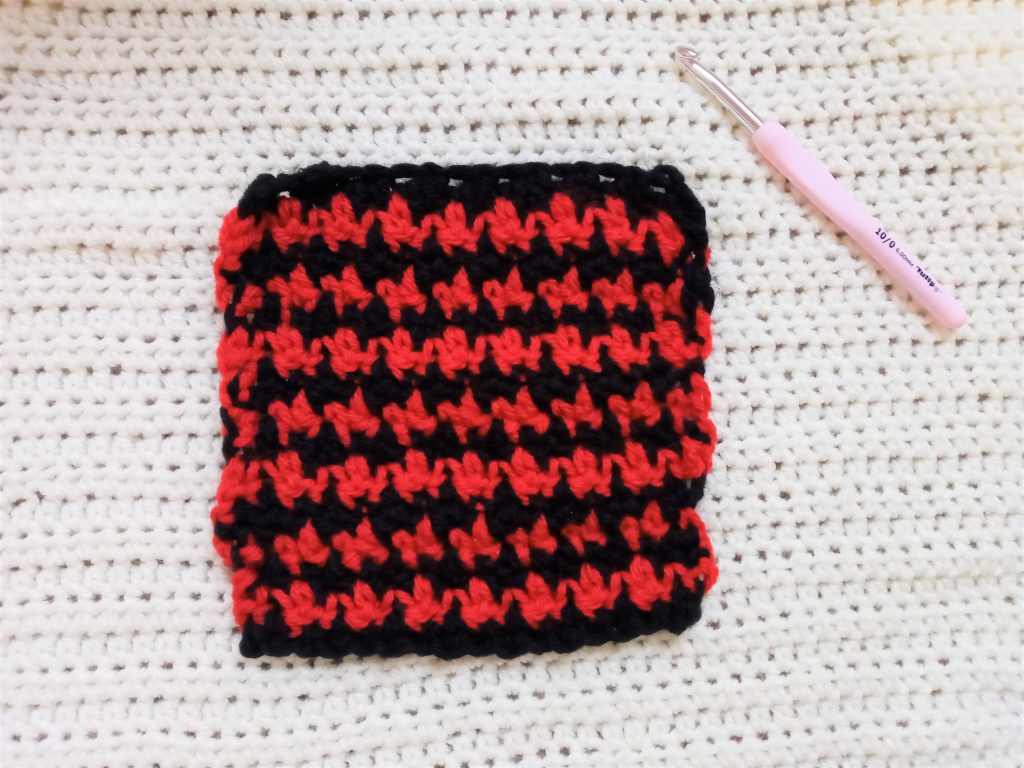
Fasten off, leaving long tail for sewing squares together.
Collar:
Using 6 mm crochet hook and red chunky yarn
Ch 54
Complete rows as follows:
1: Dc in 4th ch from hook, place a DC into the next ch, and into each chain across
2: Ch 3 (=DC), place a DC into 2nd st, and into each st across until eor
3-9: Repeat row 2
Ribbed edging (bottom edge):
With Stylecraft Special Aran in shade Lipstick and 4,5 mm hook
Ch 14
Complete rows as follows:
1: SC into 2nd ch from hook, and SC into each chain across
2: Ch 1 (=SC), SC into the back loop only (BLO) of the 2nd st and each st across
3-end (until piece measures 126 cm/49,5”): Repeat row 2
Ribbed edging (make 2 for each sleeve):
With Stylecraft Special Aran in shade Lipstick and 4,5 mm hook
Ch 14
1: SC into 2nd ch from hook, and SC into each chain across
2: Ch 1 (=SC), SC into the back loop only (BLO) of the 2nd st and each st across
3-60: Repeat row 2
To sew your cardigan together :
Back panel:
Place squares for back panel consulting the photograph

Once squares are placed, start sewing them together using a mattress stitch. The look we are going for is slightly “untidy”. Use any colour yarn you prefer to sew in your squares.
For the black squares, you can add a stitch just underneath it on square placed under it to create the full effect (consult photographs to see effect).
Front panels:
Place squares for both front panels consulting my photograph:
Once squares are placed, start sewing them together using a mattress stitch. The look we are going for is slightly “untidy”. Use any colour yarn you prefer to sew in your squares.
For the black squares, you can add a stitch just underneath it on square placed under it to create the full effect (consult photographs to see effect).
Sleeves (make two identical):
Place squares for both front panels consulting my photograph.
Once squares are placed, start sewing them together using a mattress stitch. The look we are going for is slightly “untidy”. Use any colour yarn you prefer to sew in your squares.
For the black squares, you can add a stitch just underneath it on square placed under it to create the full effect (consult photographs to see effect).
Start sewing your cardigan together:
Start by sewing seams of sleeves. To sew your sleeves together, take the first sleeve and place it on a flat surface. Fold in half (you can fold lengthwise or widthwise as sleeves are squares, and this won’t make a difference).
Once the sleeve is folded in half, sew the seam of the sleeve from top to bottom, leaving a long tail for sewing into project later.
Repeat process on the other sleeve.
Now:
Place your back panel onto a flat surface. Place your 2 front panels symmetrically on top of the back panel, start sewing the top of the project straight across at the very top of project. This means you will attach yarn onto a side, then just sew the front panels to the back panels using the mattress stitch (or whichever stitch you prefer).
The front opening of the cardigan will therefore be created by the opening of the front panels which have just been stitched at the top to the back panel.
Once this is done, you will be sewing each side of the cardigan, with the sleeves sewn into each side as we do this. Place sleeve (with seam facing down) onto the side of the cardigan, so that the top part of the sleeve forms a straight line symmetrical to the top of the cardigan which you have just sewed. Remember your sleeve seam should be facing down.
Once you have placed your sleeve, start sewing your sleeve in at the top of the cardigan, starting with the front part of the cardigan. So you will be attaching a piece of yarn at the top of the sleeve (where the sleeve and the front panel touch), and start sewing the front part of the sleeve to the front part of cardigan with the mattress stitch. Now go down the whole of the sleeve, sewing it to the front of the cardigan. Once you reach the end of the sleeve, just carry on sewing until you reach bottom of seam (ie bottom of cardigan). At this point (from the end of the front side of the sleeve), you will have sewed part of the front and back panels together.
Once this is done, flip your cardigan onto its front, and sew in the back of the sleeve to the back of the cardigan.
Repeat this process on both sides so that you have sewed both sleeves and front and back panels together.
Fasten off and tidy up all loose ends.
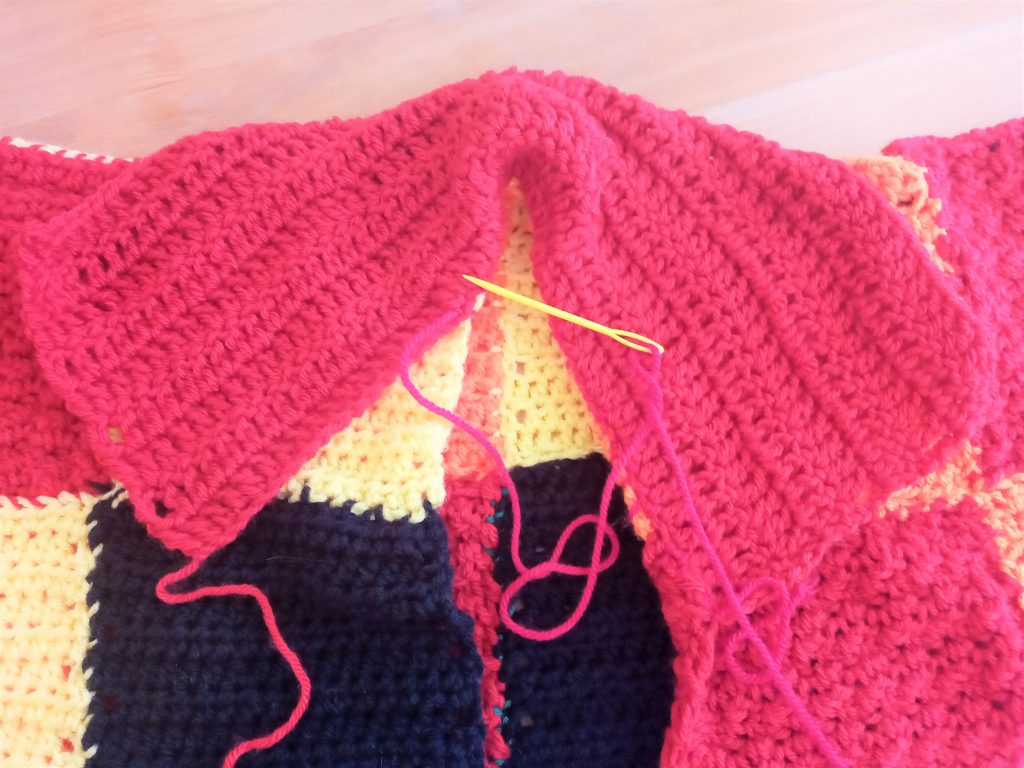
Sew on your red collar:
Sew on your red collar by placing it symmetrically on the top of your front panel. You can help yourself by placing a safety pin in the centre to secure the collar.
Add bottom ribbed edging and sleeves cuffs:
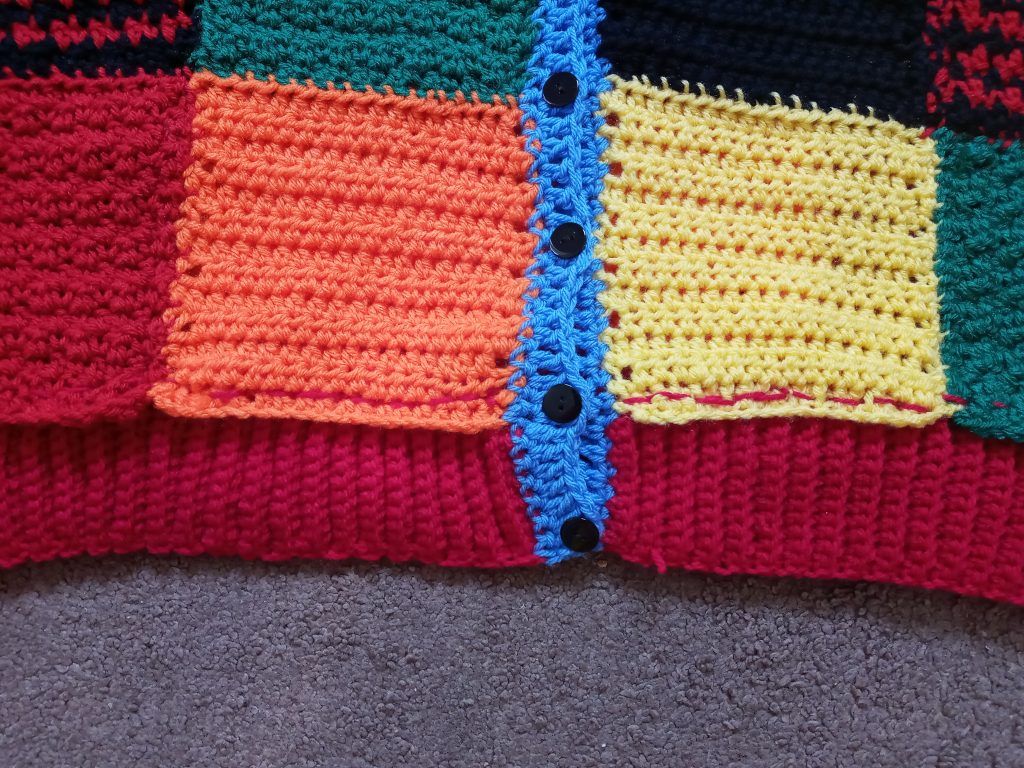
Place your ribbed bottom edging underneath the bottom edge of your cardigan. Sew this in, using a visible seam on the top of edge (see photographs for detail)
Place your sleeve cuffs underneath the bottom of the sleeves. Sew these in using a visible seam on the top of edge (see photographs for detail)
Crochet the front button edge onto cardigan:
With 6 mm crochet hook and Cygnet chunky yarn in shade Saxe, attach your yarn just underneath the collar of cardigan on each side.
Row 1: Ch 1, and proceed on placing SC equally all along the front edging, including the bottom ribbed edging.
Once you reach the bottom, ch 3 (=DC), turn your work.
Row 2: Place a DC into 2nd SC from previous row, and into each SC across until eor.
Fasten off, tidy up all loose ends.
Do the same on other side of the front of the cardigan.
Sew on your buttons:
Sew on 8 buttons to the blue opening of cardigan, on the left side. With darning needle and black thread:
Place 1st button on the top, and then place each of the remaining buttons at a 3” distance from each approximately.


85 Comments
Pingback:
Linn
great! My grabd-daughtervasked for a cost but the official one was only a knitted one. Thank you for the crochet one, I’m ceackingbin with it now !
Selina Veronique
Hello and thank you for your message. I am very happy that you enjoy this pattern, take care xx
gordon duncan
Hi Selina, I have enjoyed making this cardigan, I have followed your pattern exactly. I am away to run out of Lipstick arran, your pattern says 1 ball will do but I think this is incorrect, I will require 2. Has anyone else had this issue? Thanks.
Selina Veronique
Hello and thank you for your comment. One skein of Lipstick aran yarn was enough for me, but it is not uncommon to run out of yarn sometimes if you have a looser gauge for example. Have a great day!
haley hutchinson
hello where can i find the yarn you used? i’m trying to get the same colors as the original
Selina Veronique
Hi! I think you can get the yarn from Wool Warehouse I believe
Denae Benson
Hi! Thanks for making this pattern. I’m having a super hard time with square two. What’s happening is that I when I’m ending a row, all of my chain 1s are on the same side and all of my chain 3s are on the other so it seems lopsided. Is that right? Shouldnt it alternate? Or will the rows ending in a single crochet/chain 3 always be on one side and will the double crochets/chain 1 always be on the other? This was the best I could do at explaining my problem, I hope it makes sense! Thanks in advance!
Selina Veronique
Hello and thank you for your message! I am not sure I understood exactly what you meant, however, for square 2: on one row you should start and finish with ch 1, and on the next row, you should start and finish with ch 3. And just alternate these rows. I hope this helps! Have you checked out my video tutorial for this project, it may help a little more? Take care, and let me know if you need any more help.
Lilian Morrison
Hi there, you don’t really explain how to make the cardigan bigger?
Selina Veronique
Hi, you could always use a bigger hook? Always make a swatch first, hope this helps
Dina
Thanks so much for posting this pattern.
Quick question. Could I use sport weight instead of chunky? And could you tell me the approximate size of each square.
Thank you.
Selina Veronique
Hello and thank you for your comment! If you use lighter yarn you should use the corresponding hook, however then it will be a very different size, so make sure you swatch. All the dimensions are written down on the pattern which you can download for free.
Ash Hinton
Hi thank you so much for posting this pattern! Would you be able to link the supplys you used i want to make sure i get the right yarn and stuff because i am a begginer! 🙂
Selina Veronique
Hi! Thank you for commenting. The exact supplies are linked in the pattern on the blog post. If you live in the US you can also use Paintbox Simply Chunky yarn.
I hope this helps!
Keely
Hi! I’m working on square 1, but after row 1, the square keeps continuing to widen. I think I don’t quite understand where to start with the HDC after chaining two and turning.
Selina Veronique
Hello, thank you for your comment. Once you ch 2 and turn, you need to HDC into the second stitch from hook. Have you watched the video tutorial for this project linked in the blog post? I hope this helps!
Pingback:
Pam G
I am not able to find the same weight yarn in the right colors as in your pattern The weight I have says to use a 9mm crochet hook. Should I use the 9 or stick to the 6 as recommended in your pattern? thanks!
Selina Veronique
Hello, if you use a 9 mm hook the jumper will be really a lot larger. I really recommend sticking to regular chunky yarn and a 6 mm hook, as if you use a 6mm hook with your bulky yarn it might be very bulky… I hope this helps,
Glee Workman
I’m just starting this with 4 ply Red Heart. One question, when you say Chain 19, should I then have 18 stitches across row ??
Selina Veronique
Hello. It depends, for square number 2 yes
Glee Workman
Would square # 1 not be 18 dbc across too too ??
Ivette
Thank you for this pattern my daughter is so excited. But I’m having the hardest time with square 2,(started with red) it just seems to keep widening. And I keep ending in different stitches then pattern calls at end of rows .
Selina Veronique
Thank you for your comment, so glad you like it! I think that maybe you are adding too many stitches. I would suggest you start over, and count the stitches that you have as you along. So just count the number of stitches you have for row 1, then make sure you have the same amount as you build up your square. Have you seen my video tutorial for this project? https://www.youtube.com/watch?v=7Q5U8X4LDBI&t=3s
Abby
What is the stitch that the red squares are made of called?
Selina Veronique
Hello, I do not know the name of this stitch in English
melissa
could it be MOSS STITCH in english. i like the texture.
Selina Veronique
Hello! Thanks for your comment, I think it is called the “Griddle” stitch
Pingback:
Becki
Hi! Thank you for posting this. I’m just getting started now, square one is rows of 17 stitches and square 2 is rows of 18 stitches, is this correct? Thanks in advance! 🙂
Selina Veronique
Hello, thank you for your comment! Yes that is absolutely correct.
Stella Pandian-Molenstra
hi, could i make larger squares to make the cardigan larger?
Selina Veronique
Hello, yes you could definitely make the squares larger to make the cardigan bigger. Either go up a hook size, or simply add some base chains. I would suggest crocheting a sample square and measuring it, then calculate how many you would need.
Hope this helps!
Sharon Penney
There is mention of the pattern being free but I am not seeing a link that is free. It keeps sending me to an Etsy site to buy the pattern. Do you have the link for the free PDF?
Selina Veronique
Hello, the free pattern is on the blog post, if you scroll it is written in the blog post if that makes sense. The PDF pattern is on sale on my Etsy store. Hope this helps!
Iris
What does eor mean please
Selina Veronique
Hi, it means end of row. Hope this helps
Mel Hannah
What size is the cardigan?
Selina Veronique
Thank you for your comment. As stated in the pattern, this is a one size fits all cardigan, which corresponds to a size L. Hope this helps.
Carlisle
Hi there! Thanks so much for the pattern! I was wondering what you did with all the ends on the red and black square; did you just weave them in?
Selina Veronique
Thank you for your comment! Yes, I just weaved the loose ends in like I would any other project. Hope this helps!
Mrs janet evans
Hi ive made the cardigan but im having trouble fixing the collar on .do you attach it to some of the back shoulder and then some of the front have you hot a before coolar puc i can see please
Selina Veronique
Hello, thank you for your comment. You need to attach it so that it goes all the way around from the front, all around the back, and then up to the very edge of the other side of the front if that makes sense. I suggest you watch my video tutorial linked on my post for more details, hope this helps!
Angie
I can’t seem to find Cygnet yarn in the US. Do you know a good, inexpensive website where I can find the yarn you specify?
Selina Veronique
Hello, thank you for your message! I don’t know which yarn shop in the US would sell this yarn, however you can try looking at the website yarnsub.com, where you can type in the yarn you wish to substitute. It will then give you plenty of substitution options, available from the US. Hope this helps!
rileigh
Hi, for the sleeve cuffs do you make 2 total, one for each sleeve, or 4 total, 2 for each sleeve? thanks!
Selina Veronique
Hi! Thank you for your comment, yes so you need to make 2 total, 1 for each sleeve
Nelson Morgan
What size should each square be?
Selina Veronique
Hello, each square should be 6,3”x6,3” (16×16 cm). It’s written in the pattern under the section “gauge”. Hope this helps!
Loriece
I live in the US. I see you use chunky yarn. My granddaughter gave me a pattern to make her this sweater by Valentina, AXXA Royal Silver Fox. His pattern says DK acrylic yarn, whatever that is. From what I can find on the internet it is a finer yarn then worsted. That seems to fine for this type of sweater. What do you think?
Thanks, Loriece
Selina Veronique
Hello, DK yarn is light 3 yarn in American terms. For my pattern, you need a chunky yarn which is a size 5 yarn. hope this helps
Melissa
What length should the tail be in each square?
Selina Veronique
Hello, I just left about 15 cm for each tail to sew in each square together. Then I just tidied up all tails as I would any other project.
Bailey Portillo
Hi i’m new to crochet and i’m confused on how to make the cardigan bigger? i’m thinking of making it a mens XL but i don’t know how to…
Selina Veronique
Hello and thank you for commenting. To make your cardigan bigger, you could use a slightly bigger hook than what is suggested (I would suggest going up on size). You should swatch however before making all the squares, so I recommend you swatch one square of the 2 different squares, measure them, and then add up if this is a good size for you by comparing to the measurements given for the size L. Hope this helps!
Sheila Larkin
Cannot wait to start this cardigan (once I have got all my wool together)
Selina Veronique
Amazing! Thank you for your comment.
Sophia Kramer
Hey, how do we connect the front panels to the back panel, leaving room for your neck to fit? I’m confused at that part, do we connect the entire front panel or only half of it?
Selina Veronique
Hi, thanks for your message. I would suggest you watch my video you can find it here https://www.youtube.com/watch?v=7Q5U8X4LDBI, it explains it really well in it. You need to connect the front panels directly and all along the back panels, the cardigan is slouchy so this will automatically leave space for the neck.
Lorraine Barrett
what weight would you say a skein is? online it says it’s about 198gms so I’m wondering whether to get 400gms of each colour where you say 2 skeins. thanks x
Selina Veronique
Hello and thank you for your comment. Yes that sounds exactly right.
Kristi Cunningham
I have only made 1 square of the yellow so far. I’m thinking I will need more yarn as I need to make 12 squares. Is it true I only need 2 skeins?
Selina Veronique
Hello, yes I only used up two skeins for the yellow. However you could always add a skein if you think you will need more. But the squares are not that big, so 2 was plenty for me. Hope this helps!
Alex
I got the same weight yarn and I’m using a 6mm hook like you said but my square is not 16cm across, it’s only 13. I’m not sure how you got it to be 16
Selina Veronique
Hello, this has probably to do with your gauge, you must have a tighter gauge than me. You should make a sample square chaining slightly more, to try and get to 16 cm. Hope this helps!
Selina Veronique
Hello and thank you so much for your comment. Yes I will make the correction now, however I do not believe that this would affect your yarn consumption. Thanks again for mentioning this to me.
Alex Hamame
I started making this cardigan and have all the yellow and orange done. I’m using the same weight yarn, hook size, and amount of stitches that you used but my squares arent 16 cm by 16 cm. I’m not sure what I could be doing wrong
Selina Veronique
Hello and thank you for contacting me. No worries, I don’t think you are doing anything wrong, you probably just have a different gauge than me. Indeed, I have quite a loose gauge, and so if you have a tighter or looser gauge, the squares will come out a different size. This is why you should always swatch.
I suggest you make a square approximately 16×16 cm, by measuring the squares you already have, and then you can see how many base chains you will need for each square.
I hope this helps,
Have a great day,
Selina.
jj
Hello, I was just wondering, would it be possible to do this in only 2 colours? Would it affect the pattern in some way?
Selina Veronique
Hello, yes that’s absolutely fine to do this in just 2 colours.
Kiera McGovern
Hiya, how would you reccommend me editing the size to a universal XL? Also, is the Cygnet wool just the chunky one or the “SERIOUSLY CHUNKY” one?
Selina Veronique
Hello, thank you for your message. I would maybe use a bigger size hook, such as a 7 mm. Make sure you measure your first square to make sure it is the size you want.
I used Cygnet chunky wool, not the seriously chunky one. I hope this helps!
Ally
How many HDC per row?
Selina Veronique
Hello, the number of stitches for each part of the pattern is indicated in the pattern
nathalie
Hi Selina
I’m currently working on square 2 (red one) and the red ones are a bit bigger ( 2-3cm) than the yellow ones. I’m doing everything exactly like it is in the pattern except for hook because I’m using 5mm. Do you have any idea what might be wrong?
Selina Veronique
Hello, thank you for reaching out. I think this is nothing to worry about, I believe this is due to different gauges ( I probably have a different gauge to you for instance). I recommend if one of the squares is too big (like your red ones), just chain a few chains less, to make your square smaller. If there is a slight difference between squares it is not very important (I mean slight difference such as 1 cm). I hope this helps!
Just try swatching the red square so as to have it measure approximately the same size as Squares number 1.
Have a great day
Selina.
Shaunna R
Anyone looking for the Cygnet yarn, I found it all for a great price on this site. Delivered to the US in about a week.
https://www.woolwarehouse.co.uk
Selina Veronique
Thank you for sharing this information!
Iris Kiene Lopes
Hii Selina, thank you so much for teaching us this pattern. Im facing some problems and I would like to know if you can help me. Im a begginner and Im practicing the stitches before I really start working on the Cardigan. The square N1 I chained 19 for 13 rows just as is written and for me it looks more like a retangle. My real problem is with square N2, I chained 19 for 15 rows just as is written here but it is clearly much bigger than square N1. Is it supposed to be like that or am I dong something wrong? Thank you so much!
Selina Veronique
Hi and thank you for reaching out to me! Indeed, both squares should be square and have roughly the same size. However, if you have a different gauge than me, it may come out slightly different (ie smaller or bigger). So you are right to practice before making all your squares. Basically, check out the measurements I have written down for each square and make your square as close as you can to those measurements (you shouldn’t be too far off). So just measure your squares you have made, and try and add one or more chains to the base so as to have a square that measures what is indicated in the pattern. You then should add as many rows as needed until it forms a square.
Both square number 1 and 2 should roughly measure the same, however if there is a difference of around 1 centimeter that is absolutely fine and normal. It won’t impact your end result.
I hope this helps, have a great day and let me know if I can help you in any way
Selina.
Bev
Hi so I am attatching the collar however after attaching the two shoulders there is a 1/2″ drop between them, is the back supposed fit flat but the side have a bit of fold in them .
Selina Veronique
Hello and thank you for contacting me. I think I replied to you in our private Facebook group, if you want to have a look. This way we can discuss this easily and at length, and also with the help of photos.
Thank you so much,
Selina.
Jen
Hi, I am doing the red and black squares and I’m getting more stripes than a check pattern even though I think I am doing it correctly. Any advice on getting it to be more of a check pattern? Otherwise it’s going quite well! Thanks for the pattern!
Selina Veronique
Hi and thank you for your comment. I am not sure why you would get more stripes than a check pattern. Are you alternating SC and DC from stitch to stitch, and row to row?
I am pleased you are enjoying this pattern,
Selina