
Crochet Beautiful Lilac Cardigan with Ribbed Edging
Crochet Beautiful Lilac Cardigan with Ribbed Edging
Hello everyone, I hope you are keeping well and safe this week. Today I am bringing to you the Crochet Beautiful Lilac Cardigan with Ribbed Edging. It’s a super fun and easy project to make!
Welcome back to my blog, and today I wanted to bring to you this lovely Lilac Cardigan/Shrug which is a great Spring/Summer piece for your wardrobe. Crocheted with Stylecraft Special Aran in shade Wysteria, this pattern is created from a large square of filet crochets, before adding the ribbed border that gives it this vibrant look. The color is super feminine, and definitely looks great with the filet crochet pattern.
Crochet Beautiful Lilac Cardigan with Ribbed Edging: The video
The Youtube video can be found here: Crochet Lilac Ribbed Cardigan Video Tutorial
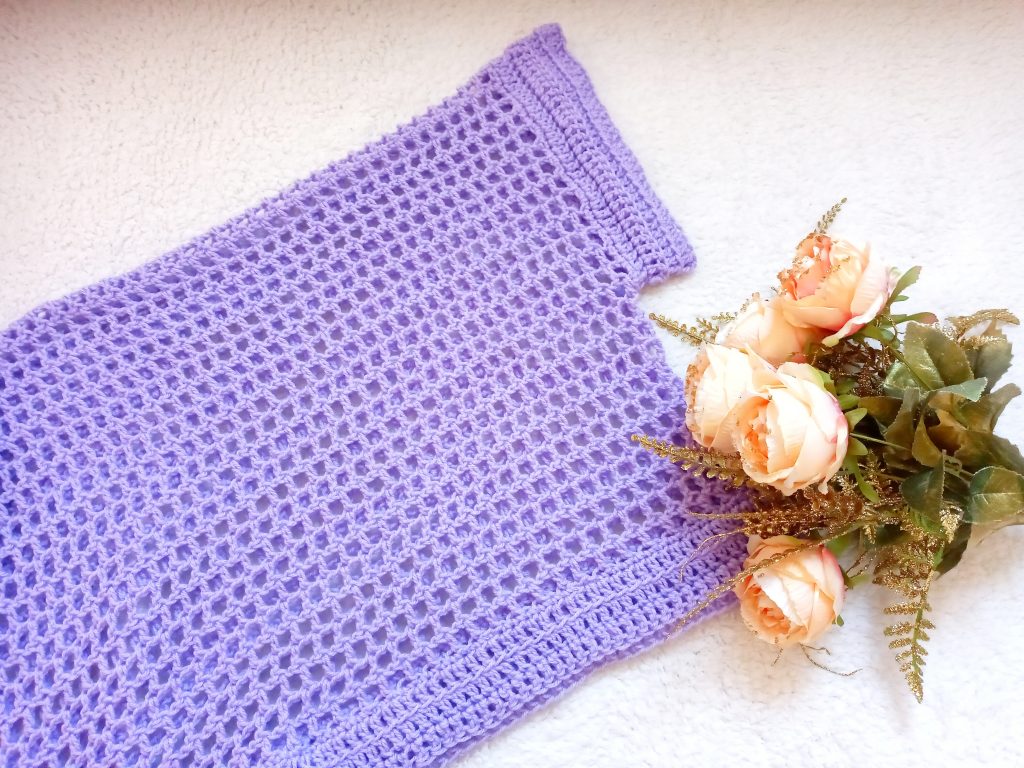
It’s very easy to crochet, using the repetitive filet crochet stitch to achieve this light and breezy look. I then added a ribbed edged border on the neck and sleeves for a little bit of texture and an edgy vibe. This is a great project for beginners and crochet experts alike, especially during these trying times of lock downs and quarantines, when we want to just focus on an easy, repetitive stitch that will give us a break from everything that is happening.
This yarn has definitely become one of my favorites. I have ordered more skeins in different colors, to create more wonderful and squishy crochet projects. Which aran weight yarn is your favorite? I love this one to be honest, and I am already thinking of making another project with it (in pink, I think).

Crochet Beautiful Lilac Cardigan with Ribbed Edging: The Pattern
I love connecting with my Crochet Community through my blog and Social Media. You can find me on Youtube, Instagram, and Pinterest. I would love to connect with you on these platforms.
You can also join my private Facebook group to connect.
Join my exclusive and fun Patreon community, a haven for feminine crochet and so much more!
Lots of love,
Xoxo Selina.

The written pattern:
You can purchase the ad free, large print, PDF pattern from my Etsy shop here: Crochet Lilac Shrug PDF Pattern
You can purchase the ad free, large print, PDF pattern from my Ravelry store here: Crochet Lilac Cardigan With Ribbed Edging Cardigan Pattern
Level: Easy
Gauge: 10×10 cm (4,5×4,5 inches) = 8 rows and 12 stitches accross
Materials:
5 skeins of Stylecraft Special Aran in shade Wisteria
6 mm crochet hook
Tapestry needle
Pair of scissors
Stitch marker (optional)
Measuring tape
Abbreviations:
I will be writing in US terms
ch: chain
sk: skip
SC: Single Crochet
DC: Double Crochet
HDC: Half Double Crochet
Sl st: Slip stitch
EOR: End of row
BLO: Back loop only
Begin pattern here:
Small: chain 112 [Initial square before border will measure 90 x 90 cm (35,5 x35,5 inches)]
Medium: ch 127 [finished initial square before border will measure 102×102 cm (40 x40 inches)]
Large: ch 137 [Initial square before border will measure 110×110 cm (43,5×43,5 inches)]
XL: ch 147 (finished initial sqhare before border will measure 118×118 cm (46,5×46,5 inches)]
Complete rows as follows:
1: DC into 6th ch from hook, *sk 1 ch, ch 1, DC into next ch* until eor
2: Ch 4 (=DC + 1 ch), *sk 1 ch, ch 1, DC into next ch* until eor
2-end (number of rows depend on pattern size): repeat row 2
When your square is complete, fasten off, leaving long tail for sewing.
Once you have finished your HDC square, fold in half and:
S/M: measure 23 cm/9 inches from the centre fold (inside of cardigan) to form arm pit and hole, place stitch marker.
L/XL: measure 27 cm/10,5 inches from the center fold (inside of cardigan) to form arm pit and hole, place stitch marker.
Use long tail of yarn and tapestry needle to sew seam from stitch marker to end of cardigan, make a double knot, sew in loose ends. Repeat on the other side, attaching a piece of yarn to sew that edge of cardigan. Fasten off and tidy all loose ends.
Border (both arm and front panel):
1: Attach yarn onto any st. of sleeve hole, ch 1, SC into every st. around, sl st to 1st ch 1
2: Ch 3 (counts as 1st DC of round), Dc into every SC from previous row, sl st. to first ch 3
3: Ch 3 (counts as 1st DC of round), Dc into every DC from previous row this time in BLO to form ribbed edging, sl st to first ch 3
4-5: repeat row 3
Fasten off, tidy up all loose ends.


5 Comments
Susan
Lovely pattern and color. Looking at the pattern I see mention of Hdc in list of stitches used but I don’t see it in the pattern. Thank you
Selina Veronique
Hello and thank you for your comment! The mention of the HDC is a typing mistake, I will be correcting the written pattern, so thanks for letting me know! Take care xxx
MaryAnne
I am curious about what this pattern looks like from the back. Would you please post a picture? Many thanks!
Selina Veronique
Thank you for your comment, yes I will try and do that soon.
Selina Veronique
Amazing! Thank you for stopping by